


Whether you are a professional creation tutorial, teachers provide online courses, or show the content creator of your work, knowing how to screen record on Mac will bring a convenient experience.
In this comprehensive guide, we will take you to understand the various methods and tools that can be available to ensure that you master the operation of screen recording. From using built-in functions to exploring third-party applications, let us understand the possibility of screen recording on Mac, and make you easily share your ideas, knowledge, and creativity.
Contents: Part 1. How Do I Record My Mac Screen without Software?Part 2. How Do I Record My Mac Screen with QuickTime?Part 3. How to Screen Record on Mac via Chrome Extension?Part 4. Best Screen Recorder for Mac with Internal AudioPart 5. In Conclusion
Part 1. How Do I Record My Mac Screen without Software?
How to screen record on Mac without other software? Apple is equipped with built-in features for its macOS so that the process is both efficient and user-friendly. One of the fastest ways to start screen recording is the keyboard shortcut key: Command + Shift + 5
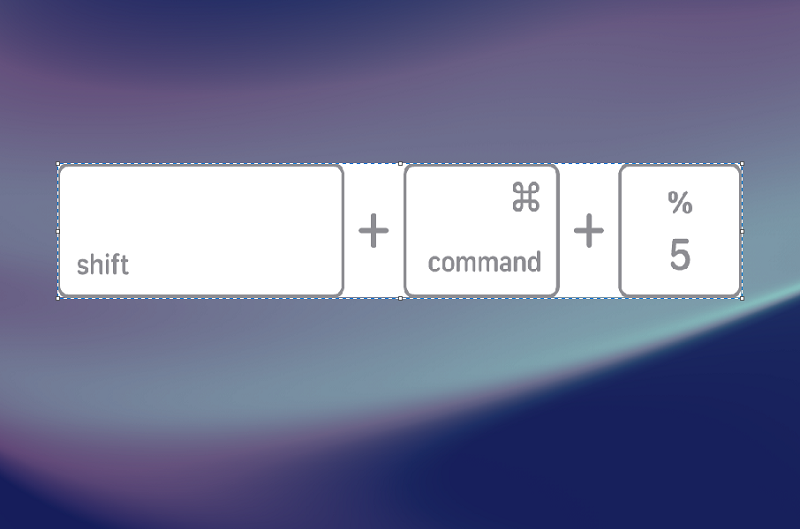
Apple introduced a dedicated screen recording tool in macOS Mojave and higher versions, which can be visited by keyboard Command + Shift + 5. This will open the screen snapshot toolbar at the bottom of the screen, providing a series of options, including screen recording. Click the "Record" button, you can start catching the screen in a few seconds.
The built-in screen recording tool also allows customize your recording area. You can choose to record the entire screen or selected part, set the timer for the delay record, or you can determine the location of the recording. This flexibility can ensure that your screen recording experience is customized according to your specific needs.
After capturing the required content, stop recording is as simple as the stop button on the menu bar. The tool will then save the recording to the location you choose, simplifying the process from beginning to end. By mastering these keyboard shortcuts, you will find that you have to record the Mac screen without relying on external applications so it is a convenient solution for fast capture.

Part 2. How Do I Record My Mac Screen with QuickTime?
How to screen record on Mac with Quicktime? Although the keyboard shortcut provides a fast access method to record a screen on Mac, another multi-functional tool that can be used is the Quicktime Player. This app comes with Apple and is usually used to play media files but can also be used as a screen recording tool. This is a step-by-step guide on how to screen record on Mac using Quicktime:
- Launch the Quicktime Player from your application folder, or you can use Spotlight (Command + Space, and then type "Quicktime Player") to find it.
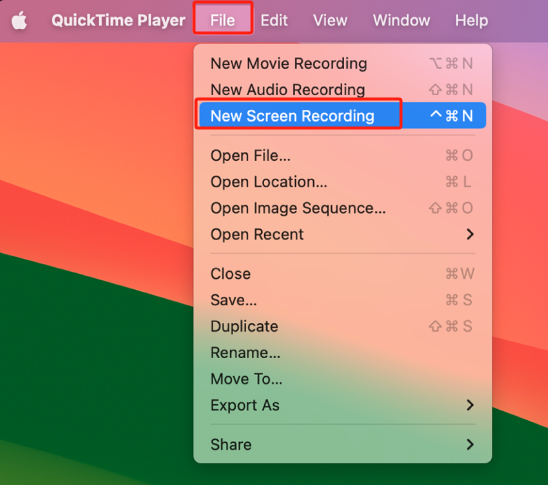
- Click on "File" from the menu bar and choose "New Screen Recording" to access the screen recording interface.
- Before starting your recording, you can customize the recording settings. Click the arrow next to the "Red Record" button to select the microphone input, display the mouse click in the recording, or select a part of the screen to capture.
- Start capturing the screen by clicking the red record button. You can choose to record the entire screen, or you just need to click and drag to select a specific area. After that, click the "Start Recording" button.
- After getting the required content, click the "Stop" button in the menu bar. Then, Quicktime Player will automatically save your recording to the location you choose.
- If you want to make further adjustments or trimming, you can use the editing tool of Quicktime Player. This is especially useful for improving your content before sharing.
The use of QuickTime Player on the Mac provides additional custom functions for screen recording. This is an excellent choice for users to experience more flexibility during the recording process.
Part 3. How to Screen Record on Mac via Chrome Extension?
If you often use Chrome browser, you can use the function of its extension to record the screen on Mac. Several available extensions are completely compatible with Chrome, which provides a convenient way to capture and share screens. This is a simple guide on how to screen record on Mac using the Chrome extension:
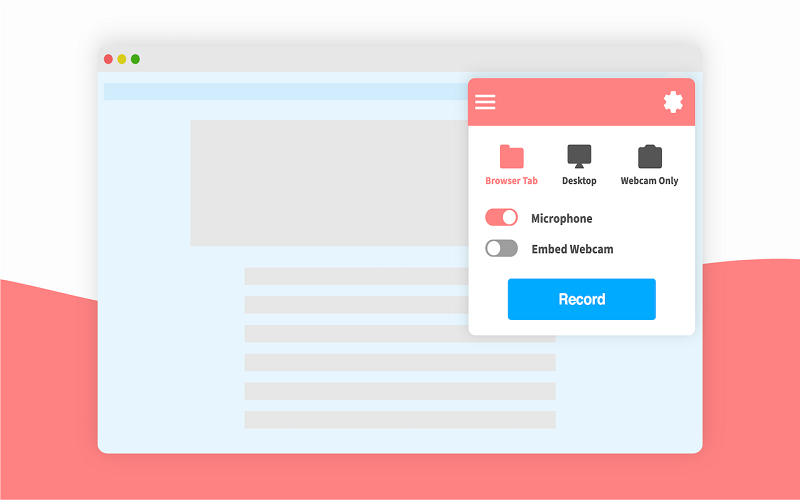
- Navigate to Chrome Web Store and search for the well-known screen record extension: "Loom", "Screencastify" or "CloudApp". Click the extension you select, and then select "Add to Chrome" for installation.
- After adding the extension, it may require some permissions to access your screen and microphone. You need to allow these permissions to use all the functions of the extension.
- Find the extension icon in the Chrome toolbar. Click it to open the extension and access its function.
- Before starting recording, configure the extension settings according to your preferences, like selecting a screen or application to be recorded, and adjusting the audio settings, or a timer setting.
- Click the "Record" button in the extension interface to start capturing the screen. After completing the recording, click the "Stop" or "Finish" button.
- Your recording can usually be saved into a computer or cloud storage depending on the different extensions. In addition, many extensions provide a sharing option, allowing you to quickly share screen recording with others.
Chrome Extension on the Mac provides a method of using the browser as a tool, which is very suitable for people who often work in the Chrome environment and prefer simplified browser solutions.
Part 4. Best Screen Recorder for Mac with Internal Audio
While the built-in features and browser extensions offer convenient ways to screen record on a Mac, users often seek more advanced solutions, especially when it comes to capturing internal audio. iMyMac Screen Recorder stands out as an excellent third-party tool that not only simplifies the screen recording process but also allows users to capture high-quality audio directly from their Mac. Let's delve into why this tool is a top choice and how to screen record on Mac use it:
The screen recorder is a functional tool that can meet the various screen recording needs of Mac users. What is different is that it can capture screens and internal audio at the same time, to easily create fascinating content.
Key Features:
Internal Audio Recording: It can easily capture system audio, which has become an ideal choice for recording game sessions or any content that depends on internal audio prompts.
Flexible Recording Options: Users can choose to record the entire screen, partial, or specific application window.
Multiple Output Formats: It supports various output formats, allowing users to save their records in formats such as MP4, and MOV. Make sure the recording can be compatible with different platforms and devices.
Editing Tools: It allows users to trim, shear, and annotate their recordings, thereby enhancing the overall quality of the content.
Below are the detailed steps on how to screen record on Mac using this wonderful tool:
Get A Free Trial Now! Normal Mac M-Series Mac Get A Free Trial Now!
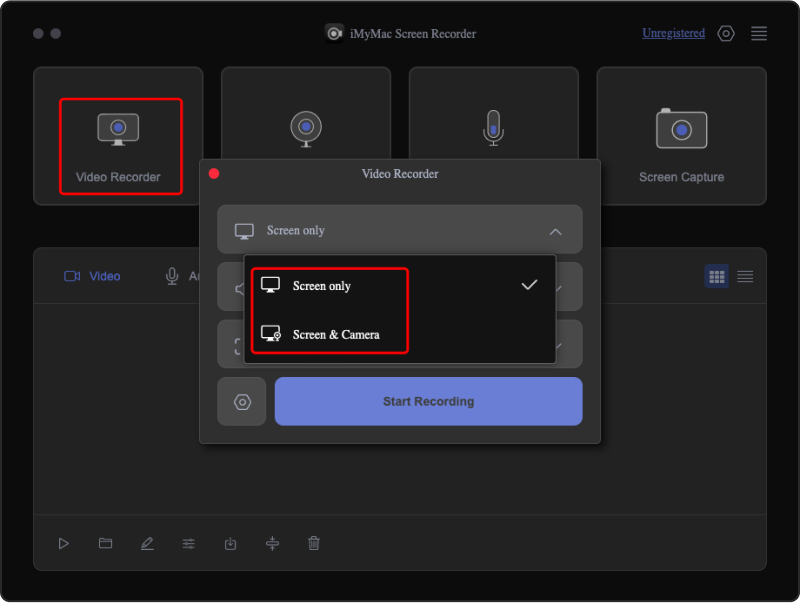
- Launch the iMyMac Screen Recorder on your computer. Navigate to the main interface and click on "Video Recorder".
- Choose to capture only the screen by opting for "Screen Only", or simultaneously record the screen and webcam by selecting "Screen & Camera". (The program will automatically identify your webcam. If your webcam is not detected, click "Recheck" to retry.)
- Then, proceed to click and choose the recording area: Full Screen, Window, or specify a Custom Size.
- Adjust the audio settings by deciding whether to record sound or not. Click on "System Sound & Microphone" to capture both system and microphone sounds concurrently. Alternatively, you can choose "Microphone" or "System Sound" to record only one type of sound. If you prefer not to record any sounds, simply opt for "None".
- Click "Start Recording" to initiate the screen capture process. Tip: If you've chosen "Window" as the recording area, a window will appear, displaying various program windows. Simply select your desired window, and the software will automatically identify it.
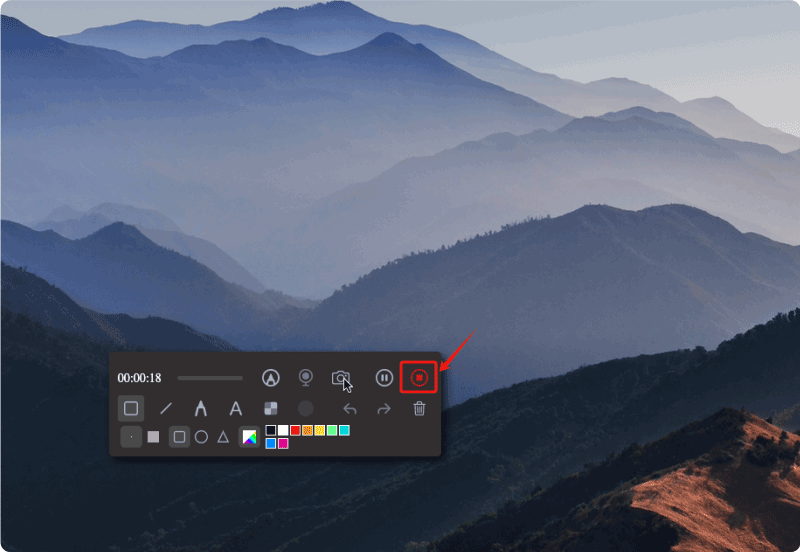
- Throughout the recording, a floating toolbar with annotation tools and other buttons will be visible. Click the "Edit" button to select annotation colors and utilize tools such as lines, circles, rectangles, triangles, arrows, text, brushes, and erasers. Additionally, Undo, Redo, and Clean buttons facilitate smoother annotation. In addition to annotation tools, you'll find buttons for activating the webcam or taking screenshots while recording.
- Press the red stop button to conclude the recording. After that, the recording file will be stored on your device. If you want to pause the recording, click the "Pause" button, and then click it to recover again when you are ready. Click the "Restart" button to discard the previous recording and restart a new one.
Part 5. In Conclusion
How to screen record on Mac? For a seamless and feature-rich screen recording experience on your Mac, we highly recommend iMyMac Screen Recorder. With its intuitive interface, comprehensive customization options, and the ability to capture internal audio, iMyMac stands out as a top-tier solution. Whether you're a content creator, educator, or simply want to record your screen effortlessly, it provides the tools and flexibility needed to enhance your recording capabilities. Elevate your Mac screen recording game with iMyMac for professional and captivating results.
