


If you’re a casual music lover, you might not be that meticulous when choosing an audio format. You don’t do things like listening carefully if the audio quality is up to standards or not. You simply listen to music, but that doesn’t apply to music fanatics. They often listen to different formats to determine which sounds better and which aren’t good enough. By doing so, they’ll know which format they’ll stick to.
Perhaps that’s your goal right now, to determine which is better between M4A and WAV and convert M4A to WAV, or vice versa. Either way, you’ll learn about all of these once you read this article. Let’s start with a simple question.
Contents: Part 1. Does WAV Sound Better Than M4A?Part 2. How Do I Convert M4A to WAV in Windows Media Player?Part 3. How to Convert M4A to WAV Using iTunes?Part 4. How Do I Convert M4A to WAV on Mac?Part 5. How to Use Audacity to Convert M4A to WAV?
Part 1. Does WAV Sound Better Than M4A?
Despite being both audio formats, there are a lot of differences between WAV and M4A, but there are also similarities, and it’s beyond just having a better sound. Let’s start by finding out more about the WAV format:
WAV
WAV is short for Waveform Audio File Format, and it’s an audio file format created by Microsoft with the help of IBM. It’s mainly used as a container for audio specifically built for Windows PCs. Moreover, it’s one of the oldest audio formats there are.
Due to these characteristics, WAV quickly became a staple for audio formats. More particularly, it’s the best format for studio recording, but that doesn’t mean it’s the best audio format. Additionally, due to its popularity, even Apple media players made sure WAV is supported.
WAV is known for its high audio quality, which is perhaps why a lot of people are asking whether it sounds better than most formats. However, it has a larger file size, which is understandable since higher quality means a bigger size.
M4A
M4A is another audio format, but it was developed by Apple. You can think of it as WAV’s counterpart. If WAV is from Microsoft, M4A is from Apple, and M4A is usually protected by DRM, making it harder to convert M4A to WAV, and vice versa.
Which Sounds Better?
The main difference between M4A and WAV is that M4A has a smaller file size but has less audio quality. In other words, while the difference is negligible, WAV sounds better than M4A, but it also takes up more space.
Part 2. How Do I Convert M4A to WAV in Windows Media Player?
Among the many formats supported by your computer, only a few can rival WAV in terms of audio quality. After all, it’s an audio format with one of the sharpest sounds there are. Hence, the vast majority of media players support the WAV format. The problem is that conversion is not a function common to media players, so converters are crucial, but that’s not the case for Windows Media Player.
Windows Media Player is a media player with the primary purpose of playing music and videos. However, surprisingly, it also has the ability to convert files from one format to another. Hence, you can convert M4A to WAV, but it’s going to be quite difficult.
Below are steps that you need to follow:
- Get an audio disc ready for the conversion.
- Insert the audio disc into your Windows computer. Make sure Windows Media Player is currently installed on that computer.
- Drag and drop the M4A file into the Windows Media Player window.
Note: You can also click on File, select Open, and browse to where the M4A files are.
- Click the arrow to the left of the Rip button at the menu bar of Windows Media Player.
- Clicking the arrow will show you multiple options. Select WAV from the list.
- Click Rip to start the conversion.
With these six steps, you can convert any format. However, remember that you should always have a CD prepared. So, make sure you don’t make a mistake since you’ll need a disc to pull it off, and you don’t want to waste money by buying CDs whenever you mess up the process.
Part 3. How to Convert M4A to WAV Using iTunes?
You can also use iTunes both on Windows or Mac to convert M4A to WAV. iTunes is capable of converting between compressed and uncompressed formats, so it’s a good idea to use iTunes. Let’s start with the steps on how to use iTunes on Mac:
On your Mac
- On your Mac, open the iTunes.
- Click on the Music tab from the top menu bar and select Preferences from the resulting dropdown menu.
- On the Preferences window, go to the Files tab.
- Click on Import Settings.
- On the Import Using field, select the encoding format that you want, which should be WAV. Click OK.
- Select the songs that you want to convert from your library. If the M4A files are on your Mac computer, it should automatically be in the library.
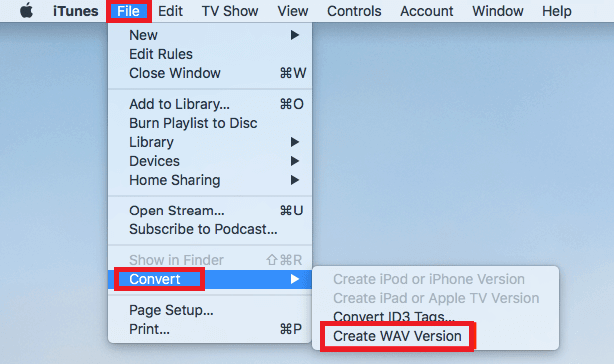
- Click on File and select Convert, and then click the Create WAV Version button.
On your PC
- Open the iTunes app on your Windows PC.
- On the menu bar, click Edit and select Preferences.
- Now proceed to the General tab.
- On the Import Settings tab and under the Import Using section, click the format which should be WAV. Click the OK button.
- Select songs that you want to convert.
- Click on File from the menu bar and select Convert. Finally, click Create WAV Version.
- Choose the songs in your library that you would like to convert.
- Select Convert under the File menu, then Create [format] Version.
As you can see, it’s quite easy to convert M4A to WAV using iTunes. After all, the iTunes is known for their versatility.
Part 4. How Do I Convert M4A to WAV on Mac?
If you think using iTunes and Windows Media Players takes too long, you can use a third-party converter instead, which is why I suggest iMyMac Video Converter. Here are some of the most powerful features of this software:
- Acceleration Technology. iMyMac Video Converter utilizes hardware acceleration technology, which results in a rate that is six times faster than normal tools.
- Format Conversion. This tool supports countless formats, from popular formats to unpopular ones. These include M4V, MP4, AIFF, and most importantly, M4A and WAV.
- Supported Resolutions/Quality. iMyMac also supports various resolutions from 480P to 4K Ultra HD. You can also convert the audio and change the bitrate.
- Video Enhancement. You can also use this tool to enhance the video quality of the files that you convert. In addition, issues such as too much darkness, shaking, and overexposure can be resolved using iMyMac Video Converter.
- Some other features. You can use it to add watermarks, subtitles, and even audio effect, and more.
Now that you’re aware of the features of this software, let’s proceed to the steps on how you can convert M4A to WAV using iMyMac Video Converter:
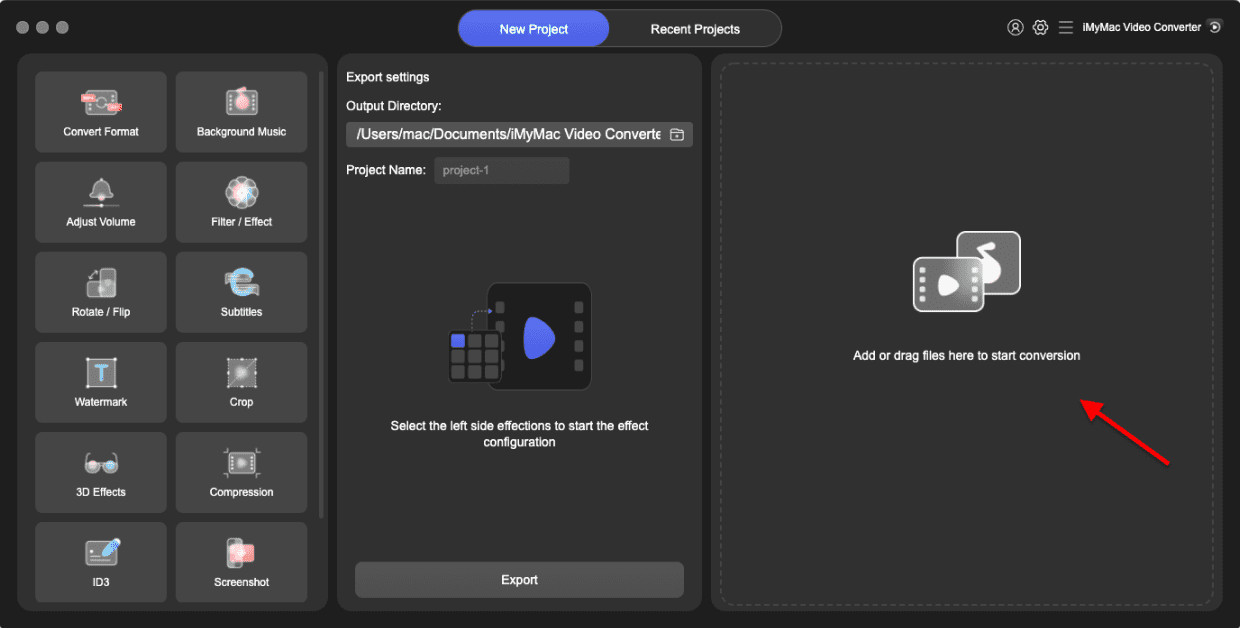
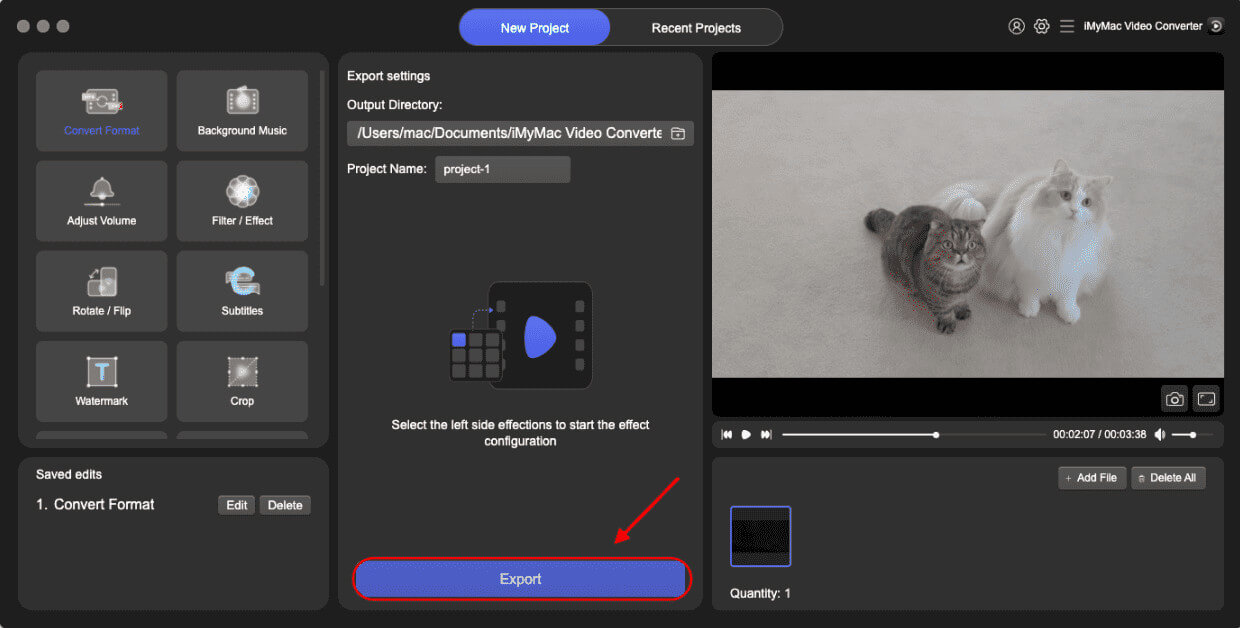
Step 1. Add M4A Files
Launch iMyMac Video Converter on your computer. On the left side of the main page, drag and drop the M4A files into the software. You may also click Add Multiple Videos and Audios to locate the files you want to convert.
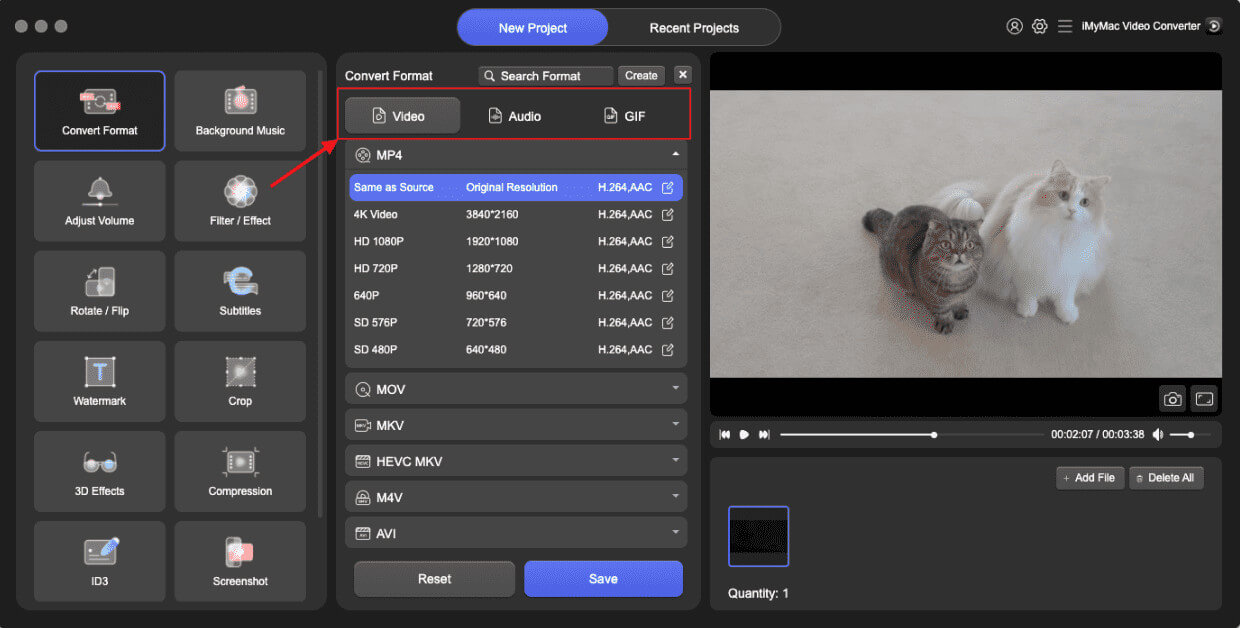
Step 2. Select WAV Format
Next, click the "Convert Format" menu in the middle of iMyMac Video Converter. Once you click the menu, there will be multiple options showing up on the right side, wherein you have to choose WAV and click the Save button.
Step 3. Convert M4A to WAV
Finally, click the Convert button. Make sure you choose the destination folder to save your converted files. After the converting process is complete, you can view the converted files in the "Recent Projects".
That’s how you can convert M4A to WAV using iMyMac Video Converter. If you’re not fond of unfamiliar software, you can also use popular software.
Part 5. How to Use Audacity to Convert M4A to WAV?
Audacity is a popular audio editor that is available for free. Although it’s meant for editing audio files, it’s also capable of simple conversions. Since both M4A and WAV are audio, you can use Audacity to convert M4A to WAV. Here are the steps that you need to follow:
- Open the Audacity tool on your computer.
- From the menu bar, click Project and select Import Audio.
- Now look for the file that you want to add, and click on Open once you select them.
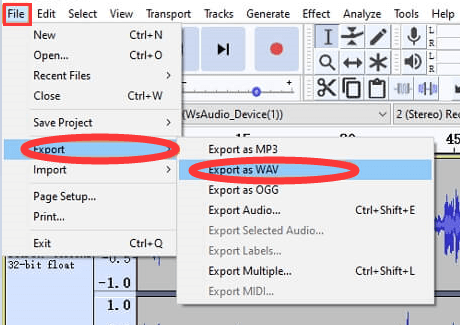
- Click on the File tab.
- You will see multiple Export As options. Simply select the format that you want the output file to have, which is WAV.
- Now give a name to the WAV file and select the folder where you want to save it, and then click on Save.
- You will see a dialog box after clicking save, from which you should click OK.
That’s how you can convert M4A to WAV using Audacity. Remember that M4A and WAV should be supported, so if there’s an error, simply reinstall Audacity or update it if needed.
