


My Macintosh is handy when it comes to editing videos and images. I use it to create important documents too.
Lately, though, it has been showing performance issues. What do I do to enhance its performance? Do I need to do what they call defragmenting?
 Don't Worry. I will teach you how to defrag a Mac and how to improve the performance of your Mac.
At this point in time, you might have noticed that your Mac is showing signs of performance issues. When the need arises, you might need to defragment your Macbook regularly.
In this guide, we will tell you why you need or don’t need to defrag a Mac, and how to do a Mac defragmentation. And we’ll tell you the pros and cons of doing the process. Alternatives to defragmentation will also be given here.
Contents: Part 1. Is Mac Defragmentation Necessary?Part 2. When We Should Defrag Our Mac?Part 3. How to Defrag a Mac?Part 4. Safety Issues of Doing Mac DefragmentationPart 5. What are Alternatives to Mac Defragmentation?Part 6. Tips to Speed up and Optimize Your Mac/MacBookPart 7. Conclusion
Part 1. Is Mac Defragmentation Necessary?
Why do we need for defragment a Mac disk? Well, the process of defragmentation is used to boost the performance of a computer through the reorganization of your drive’s data. The related pieces of data are grouped accordingly thus launching and running files and software takes a smaller amount of time.
From your days with the Windows PC, you might have thought about defragging your Mac directly from the device. However, you will find that there is no defragging utility or command that allows you to do this on Apple macOS.
The File System of a Macintosh is formulated in a different way than that of Microsoft’s PC. Defragmentation on a Mac is done automatically, it reorganizes data and puts it back in the right order. This results in the speeding up of a slow system.
Is it necessary to degrag a Mac? Any Mac computer that runs the OS X version that is later than 10.2 usually doesn’t need defragmentation. If your Mac has SSD, you should not defrag it too.
This is because the macOS and the OS X have built-in utilities that do the process of cleaning up fragmented files located on the hard drive. Thus, it results in the elimination of the manual task of defragmenting.
There is also the case that if you are using High Sierra or Mojave macOS and the file system is switched to the new APFS, you will not be able to use any third-party tools to defrag your Mac.
Part 2. When We Should Defrag Our Mac?
When your hard drive contains less than 10% in free storage, macOS might experience problems with regards to automatic defragmentation. This usually happens with multimedia professionals who store a lot of large files in software such as Photoshop, Final Cut, and Adobe Premiere.
If you have a lot of large movies that are over 1GB in size, you should think about relocating these files to an external hard drive or removing them completely. Same goes for creative documents and audio files. Another option you can do is to defrag a Mac completely.
When do we need to defragment a Mac? There are several cases:
- When storage space is about to run out and there is less than 10% space left;
- Your Mac has a hard drive;
- Exceptionally large files are often saved on your computer, such as videos, software, etc. that are larger than 1GB;
With regards to removing large, unimportant files from your Mac device, you can use a Mac cleaning tool like iMyMac PowerMyMac.
This tool can help boost performance by freeing your Mac storage of unnecessary files that might be slowing it down. After launching the software, you can view the System Status of your Mac on the main interface.
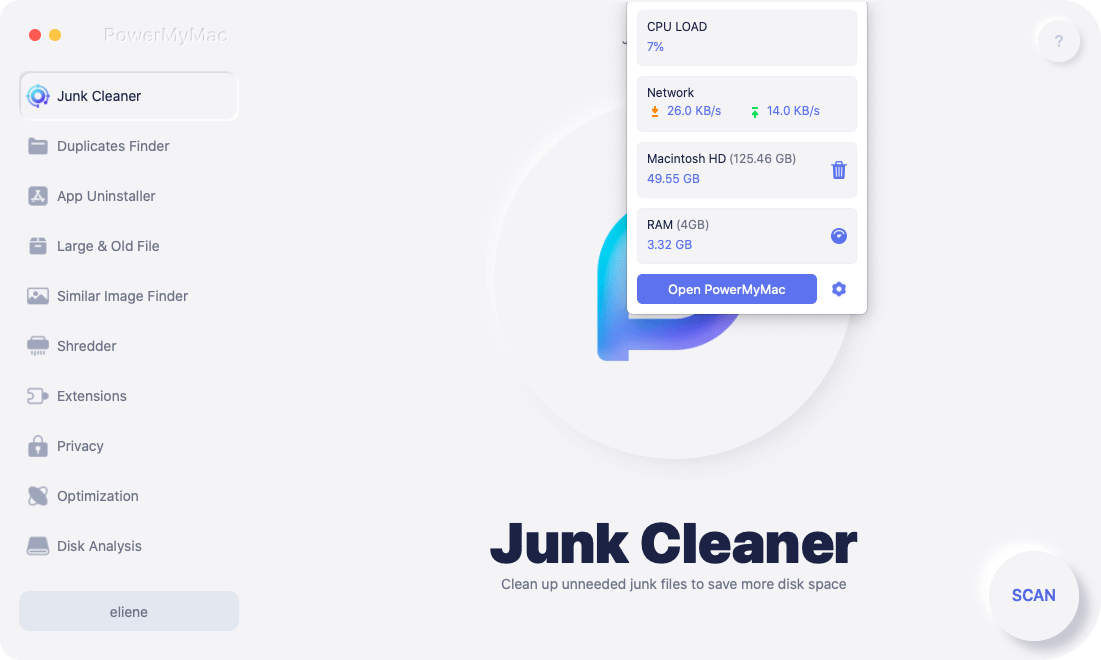
With this Mac cleaner, you can scan your entire Mac for unnecessary files and caches.
For example, when you use the "Junk Cleaner" module, you can see the files that will be displayed in various categories such as Application Cache, Mail Junk, System Cache, Photo Junks, System Logs, User Logs, System Trash, etc.
Select a category to show the details of that particular classification. Choose the data or files you want to clean and then press the “CLEAN” button. The software will ask if you are sure that you want to clean the selected data.

People Also Read:How to Update MacHow to Speed Up Mac
Part 3. How to Defrag a Mac?
You should use a Mac defragmentation tool from a trusted third-party in order to execute this on your device. However, before you safely defrag a Mac's hard drive, you should back your data up. Once something bad happens, you can easily restore your files.
To safely defrag a Mac:
- Step 1: Find and use a trusted third-party Mac defrag tool, such as Drive Genius, or Micromat Techtool Pro 17. Most of them are premium software.
- Step 2: Back up your Mac data to prevent accidental file loss. You can use Time Machine, iCloud, or an external drive to back up your files.
- Step 3: Follow the guidelines after installing the defragmentation software for Mac.
When selecting or looking for a defragmentation tool, you should check out its compatibility requirements. Mac devices that run on operating systems older than the OS X version 10.2 are usually not compatible with the new types of defragmentation software. Thus, sometimes, it can be hard to find a useful tool.
Once you have found the program, install it on your device. Open the tool and carefully follow its instructions for Mac defragmentation.
The process will take a lot of time. Be patient and never move your device until the process is complete. Sometimes, you will need to restart your Mac device to complete the entire defragmentation process.
Part 4. Safety Issues of Doing Mac Defragmentation
After reading all throughout this guide, you might be wondering if defragmentation will harm your hard disk drive (HDD).
Don’t worry though. It won’t. Disk defragmentation can actually be a good thing for your drive. HDDs usually fragment data into various pieces and stores it in various locations too.
Thus, reading a file with all the pieces in various locations can take some time.
Disk defragmentation arranges all these data and this will not cause harm to your HDD. It just results in your device’ performance boost.
Of course, extreme measures of boosting your Mac’s performance is not advisable. Defragmentation is always a safe process IF done properly.
However, if your Mac comes with an SSD, you should NEVER do a defragmentation. SSDs are different from HDDs and they also operate differently.
Solid state drives maintain themselves with automatic processes. Thus, a defragmentation of an SSD is not recommended.
A defragmentation process could also hurt your solid state drive. It is because it uses flash memory that has a finite lifespan.
Its cycles of reading and writing data are limited. With defragmentation, the process reads data and writes it to another location.
If you defrag solid state drives, it will read and write thousands of times and reduces the lifespan of the drive.
Part 5. What are Alternatives to Mac Defragmentation?
When your Mac is running slow, sometimes you don’t need a Mac defragmentation. There are other alternatives you can try. Below are some of them:
One troubleshooting method for Mac devices is repairing disk permissions. What are permissions? These are settings of files that affect the ability to write, read, and execute a specific file.
If these permissions are not correctly set, the software that utilizes the file might not run properly.
The Disk Utility can be used to repair startup disk file permissions on OS X Yosemite (and other earlier versions). However, on OS X El Capitan, automatic protection of disk permissions are done. Thus, verifying them with Disk Utility is unnecessary.
So how do you repair your Mac device startup disk? Here are the steps for Mac optimization:
- Open Disk Utility on Mac.
- Select your specific startup disk.
- Select the tab called “First Aid”.
- In order to check out permissions, press “Verify Disk Permissions”.
- In order to repair permissions, you should press “Repair Disk Permissions”.
Part 6. Tips to Speed up and Optimize Your Mac/MacBook
How do you improve your Mac’s speed or performance?
1 - Software Updates
You should update your macOS software to the latest version. Usually, the newer versions perform better comparatively. System updates include bug fixes and performance optimization that could speed up your device.
2 - Remove Unnecessary Data
It is best to have at least 25% of free space in your Mac. This gives your Mac enough space to perform background tasks.
It also provides an ample amount of space for caches, temporary files, and virtual memory. Use PowerMyMac to remove unnecessary files easily and quickly!
3 - Stop Automatic Program Launches
When you turn your Mac device on, there are a lot of programs that might be running or launching simultaneously. Others even run in the background making you unaware of its existence.
You can stop multiple apps from running by going to “System Preferences”. Then, select “Users & Groups” and then selecting “Login Items”.
It will list down applications that launch during your Mac’s startup. Switch off the applications that you don’t need.
The Mac optimizing tool PowerMyMac can also help you manage your Mac login items.

Part 7. Conclusion
Once you experience performance issues, you need to do multiple things to boost your Mac’s performance. Defragmenting your Mac can be a great way to speed up its performance.
Although, you should only do this for HDDs and not for SSDs. You can also use PowerMyMac to clean up unnecessary files. Finally, you should always strive to take care of your Mac by following our tips above.

