


Apple Inc. was clear enough when they said that the storage on their Mac is actually not enough for their users. This was out when they made the very last OS update. Because of this, they introduce a new feature which can actually help their users to free up space on their Mac. This is the Optimize Storage. So we will talk about how to optimize Mac storage in this post.
Contents: Part 1. What is Optimize Storage on Mac?Part 2. How Do You Optimize Storage?Part 3. Cons of Optimize Storage ToolPart 4. How Do I Clean up My Mac Storage without Optimize Storage Tool?Part 5. How to Turn off Optimize Storage on Mac?Part 6. Conclusion
Part 1. What is Optimize Storage on Mac?
Optimize Storage is a set of in your Mac’s system that has the ability to transfer files into the cloud. These are not deleted. And, instead of getting the file itself, it just gives you a link to the file. Because of this, the optimization will be giving you more space on your hard drive and a huge amount of gigabytes taken on cloud storage. Before introducing how to optimize Mac storage with this tool, let's see how to access it below:
How to Access Optimize Storage on Mac?
For you to be able to access the optimize storage of your Mac, follow these rules.
- Click on the Apple icon that is located at the upper left corner of any window.
- Then, click on “About this Mac”.
- After that, choose storage.
- Then locate the Manage button that is at the top of the storage bar.
- Then, you will be able to see a menu on your screen.
- On the left side of your screen, you will see a menu of possible cleanups and optimizers. You can simply click each one from the list for you to apply automatic cloud storage.
Part 2. How Do You Optimize Storage?
What we have here are some ways for you to be able to optimize Mac storage. They are pretty much effective in their own ways. Here are things that they can do to make your storage on Mac well managed.
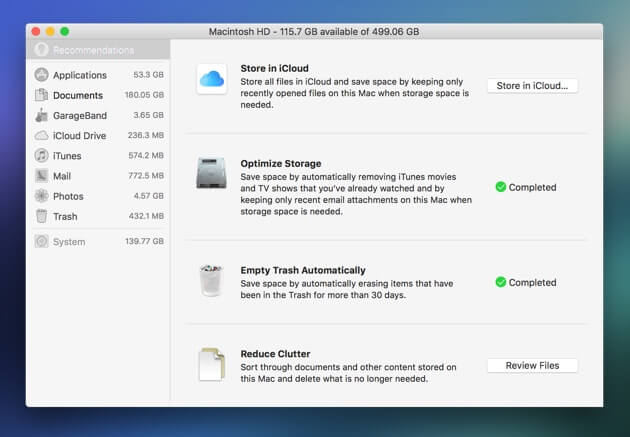
1. Store in iCloud
This actually already states what it does. Once that you are having low space on your hard disk and then you moved your files or your photos that you have not yet opened to your iCloud. This means that you will not be able to access these files and photos if you are not connected to the internet. You will not also be able to access them if you do not log in to your iCloud account.
However, once that you have all the necessary things that you need to do for you to access them, you will be able to see them. Also, the files that you have stored in your iCloud, they are not deleted. Also, you will be able to save up some of your storage space on your disk.
2. Optimize Storage
This one actually refers directly to your iTunes and Mail attachments. This actually removes your old email attachments and as well as your movies that you have already watched to optimize Mac storage. However, these movies can just be easily downloaded since you have previously bought them. For your email attachments, they will be located on your Mail client. Also, you can also completely empty your Trash automatically.
3. Reduce Clutter
Reduce Clutter is one of the ways for you to be able to look through your documents for you to locate the largest file that you have stored on your Mac. Once that you have located these huge files, you can completely remove them.
Aside from this, you can also sort out the large files that you have according to the date they were made and saved so that you can see easily which file is the oldest one. After that, you can immediately go to your Downloads folder for you to choose all the files that you no longer need and then remove them.
Part 3. Cons of Optimize Storage Tool
Nothing says that this will work perfectly for you to optimize Mac storage. In general, getting some more storage space for your Mac is the most dilemma of Mac users. Though Apple had come up with a solution that Mac users can do, still they have not perfected it yet. Here is why the Optimize Storage is not that reliable yet.
• There is a monthly subscription if you want to keep it active. In using iCloud, you will have a free 5GB of free storage space and if you want to get more, then you have to pay for it. It is just a small amount if you want to get more storage space for you iCloud but this will depend on your country.
• Your system junk and cache files still keep on eating up the storage on your Mac’s hard drive. And there are still no available tools that you can use for you to remove them from your Mac.
• Once that you have moved files and other data on your iCloud from your Mac, that does not mean that you are sorting them out, but instead, you are just simply piling them up on your iCloud. Think carefully if those files that you are going to move to your iCloud are all useful or if you are still going to open them or not. Because if not, they might as well remove them completely.
Part 4. How Do I Clean up My Mac Storage without Optimize Storage Tool?
Firstly, make sure that all the files that you are going to move on your iCloud are all useful to you. You would not want all unnecessary files to pile up on your iCloud. Then you can begin to optimize Mac storage by cleanning up your system junk files.
For you to do this method, you will need a Mac cleaner installed on your Mac. Surely, there are a lot of programs that you can use for you to clean up your system junk on your Mac and what we highly recommend is using the iMyMac PowerMyMac. It is very safe to use and easy as well. It can help you find and then remove all of your junks files from your Mac and this will give you more of your storage space on your hard drive.
PowerMyMac can also help you remove all of your email attachments, iTunes backup, and those multi-language that you no longer need. Also, it can help you find and remove all of your large and old files. Doing all these using the PowerMyMac will surely boost up the speed of your Mac and can help you get more of your storage space. Here is how to use the program to optimize Mac storage.
Step 1. Download and Launch PowerMyMac on Your Mac
Go to the iMyMac official website and have the PowerMyMac downloaded. After that, install the program. Then launch the program.
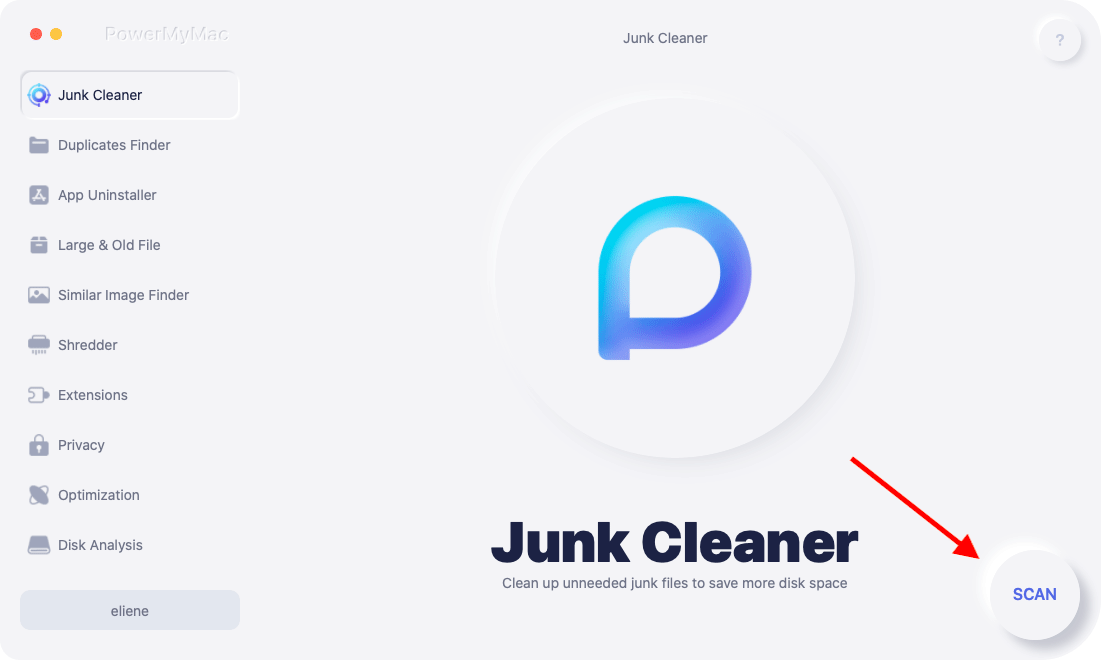
Step 2. Scanning System Junk
On the left side of your main screen, you will be able to see a set of modules. From that list, click on “Junk Cleaner” then “SCAN” button. PowerMyMac will then start scanning all the junk files that your Mac contains. Wait for the program to finish the scanning process.
Step 3. Review and Select Items to Clean Up
Once that the scanning process is complete, PowerMyMac will show you a list an of categories of your junk files. You will see categories such as Application Cache, Email Cache, Photo Cache, System Logs, System Cache, User logs, System Trash, and more. Choose all the categories that you desired to remove from your Mac. Once that you clicked on the category, you will be able to see all the items that it contains on the right side of your screen. Review all these items to make sure that you do not need any of them anymore.

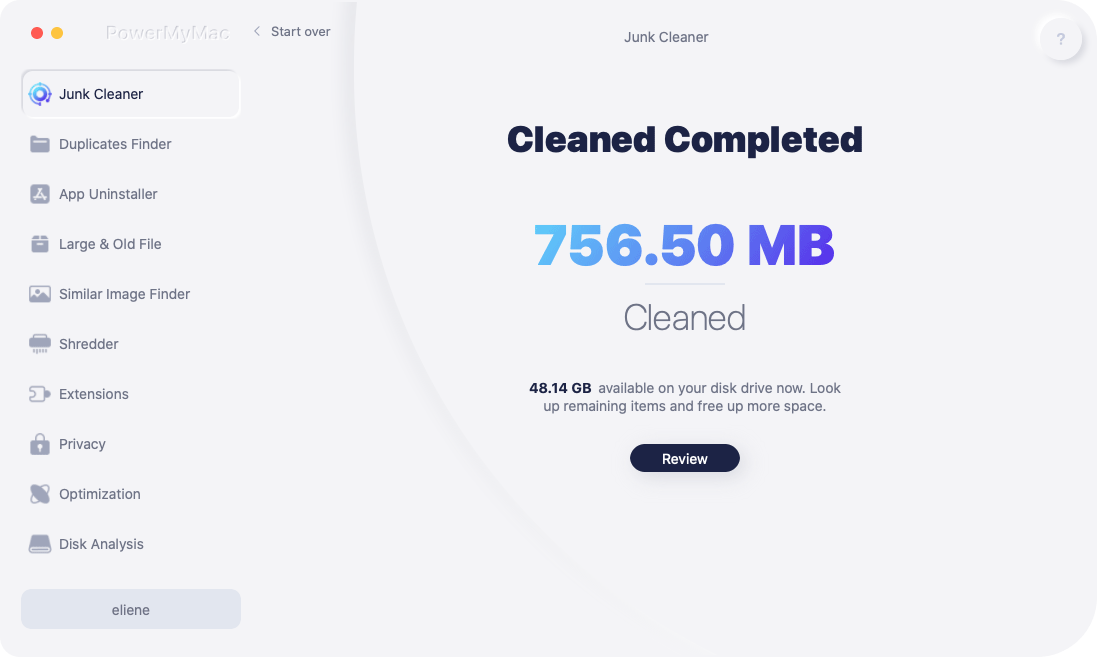
Step 4. Clean All Junks On Mac
After choosing all the junks that you want to remove from your Mac, click on the “CLEAN” button. PowerMyMac will then start cleaning all the junks out of your Mac. Once the cleaning process is done, you will see an “Cleanup Completed” indication beside each file. However, some folder will not have this indication because they are considered to be auto recreated folders.
*Note: You can also do the whole process with “Duplicate Finder” and “Large and Old Files” module to optimize Mac storage.
Part 5. How to Turn off Optimize Storage on Mac?
Now you have a Mac cleaner to help you optimize Mac storage. If in any case that you would not want to use the optimize storage on your Mac, then you have the option to disable it. Once that you disable optimize storage, your Mac will also stop moving your files and other data from your Mac to your iCloud. It will also stop deleting all of your iTunes movies.If you want to disable optimize storage on your Mac, here are the simple steps to do it.
- Click on the Apple icon located at the top left corner of your screen.
- After that, choose “System Preferences” from the menu shown on your screen.
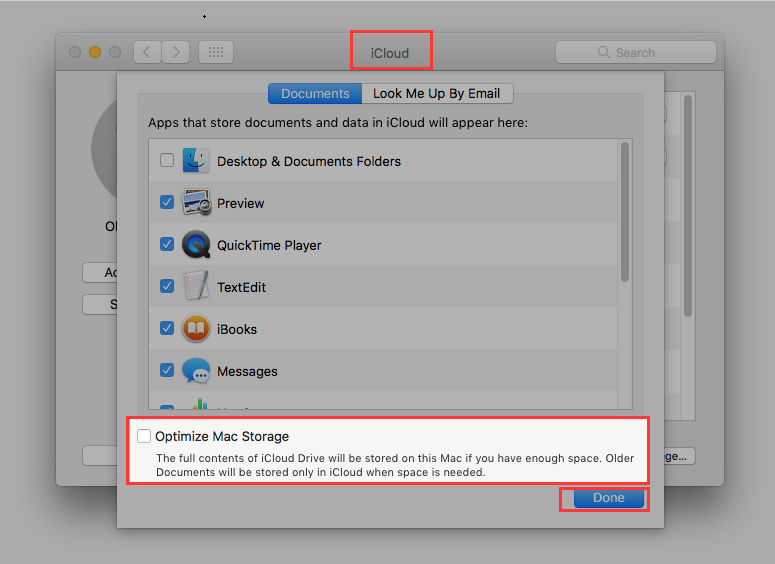
- Then click on iCloud.
- Then click on the Options seen besides “iCloud Drive”.
- Then, remove the check mark beside “Optimize Mac Storage” which is located at the bottom of your screen.
- After that, click on the “Done” button.
After doing all the steps above, the Optimize Storage on your Mac will then be disabled. If in case you change your mind and you would want to enable optimize storage again, just do the same steps and put a checkmark beside Optimize Mac Storage.
Part 6. Conclusion
Optimize Storage feature on Mac will somehow help you in managing the storage space on your Mac so that you can optimize Mac storage. This is because some of the files that you have on your Mac will automatically be moved on your iCloud storage. However, this feature is not yet perfected by Apple. Though you can have your own way as to what and what not will be moved on your iCloud.
It means that you have to make sure that the files that you are going to move are those files that are still useful to you. If not, they might as well remove those files completely from your Mac. This way you will also save space both on your iCloud and your Mac device. This is because as we all know, iCloud only gives you limited storage space and if in case that you run out, you have to buy a bigger space and that requires you to pay for it per month.
If you do not want to do this, you can actually have PowerMyMac to help you automatically optimize Mac storage. Having this program will allow you to remove all the junk files that you have stored on your Mac. Not only that, but it can also help you with your cluttered files and large and old files that you no longer need. It is also safe as well because it will make sure that it will not touch any other data on your Mac aside from those data that you wanted to remove for good.
Using the iMyMac PowerMyMac on your Mac will be a great help for you because it can help you free up more space on your Mac and at the same time, it can also help your Mac to boost its speed for you to have a better experience in using it. Have this powerful tool on your Mac now and do regular cleaning and rest assured that you will no longer experience a slow performance just because of the files that are piling up and you no longer need.


Phil2023-02-13 03:53:42
Will you be doing an update for Ventura? The locations called in this article have all been changed. Does Optimize Storage even exist as a switch that can be turned off or on, anymore?