


Email inbox fills up easily, whatever you use Gmail or Outlook, or others. Even if you do your best to clear it up regularly, the emails will just keep on coming. At some point, it's going to be a pretty annoying task to clear mail storage Mac. When that happens, you're going to end up with more emails to clean up.
Well, you don't have to reach that point where you're annoyed to clear mail storage on Mac. Why is mail using so much storage on Mac? Because attachments on mail can take up much disk space on your Mac. There are three ways on how you can clean your mail storage to free up your Mac's space by deleting caches or attachments. Read on to learn more about them.
Contents: Part 1. How Do I Free up Mac Mail Storage?Part 2. How Do You Clear Storage on A Mac?Part 3. In Conclusion
Part 1. How Do I Free up Mac Mail Storage?
Option #1. Use The PowerMyMac To Clear Mail Storage on Mac
PowerMyMac is designed to help speed up your Mac. It cleans up your Mac by uninstalling software that’s not needed anymore. That’s not the only thing that the PowerMyMac can do for you. The best thing about it is that it is the easiest way to clear your mail storage.
How do I delete thousands of emails on my Mac? Read the instructions below on how to use the PowerMyMac to clear mail storage.
Step 1. Download and Open the iMyMac PowerMyMac
Visit the iMyMac website here. Take your cursor to the menu bar on top and click on PowerMyMac. Click on the button that says Free Download. You are not required to pay immediately. It’s worth noting that it’s very easy to upgrade your account soon as you decide to avail of the paid version. Open the program.
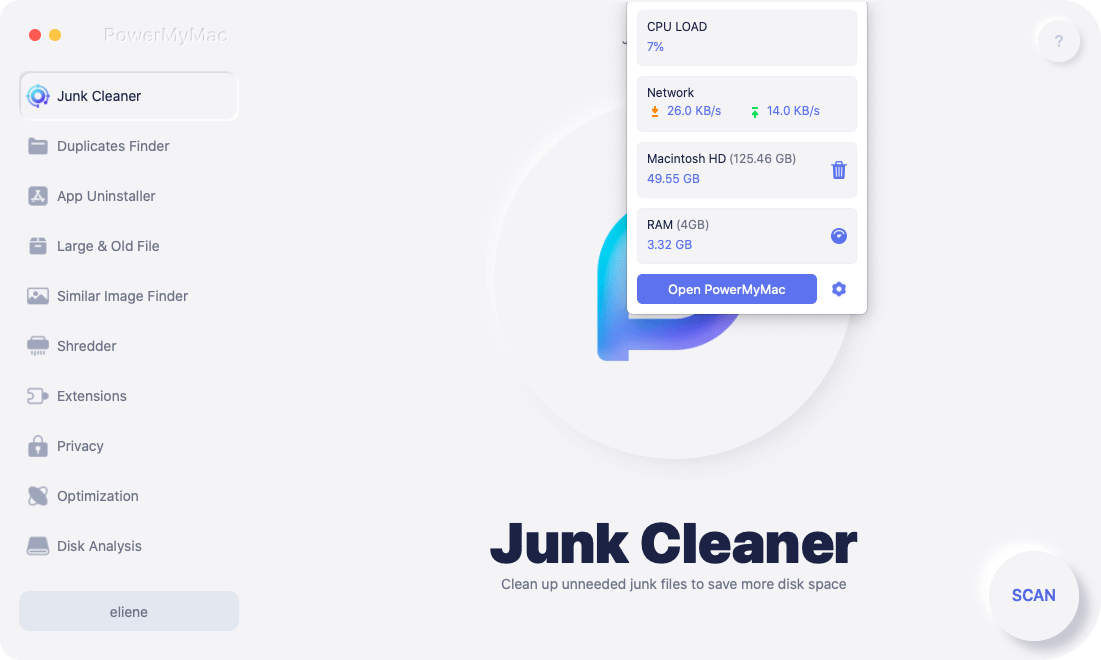
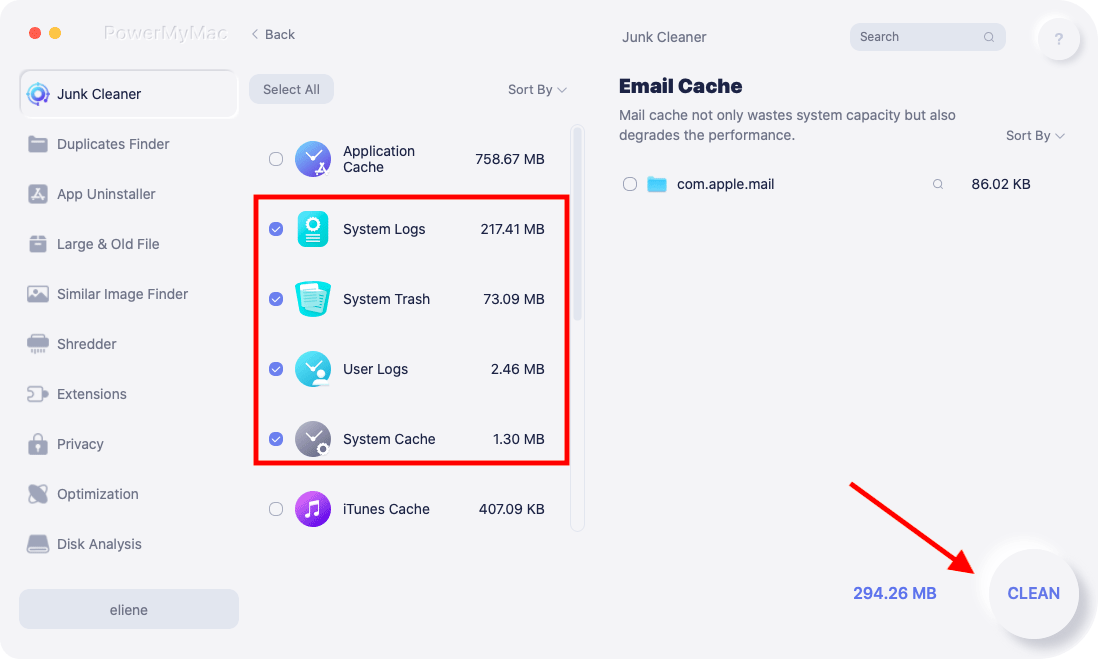
Step 2. Choose Junk Cleaner and Scan It
Click on Junk Cleaner. You will find this module on the left side of the screen and it will clean out the junk files that are occupying a lot of space on your Mac. Clicking on SCAN. Once the scanning is finished, it will show you all the junk files that are on your Mac.
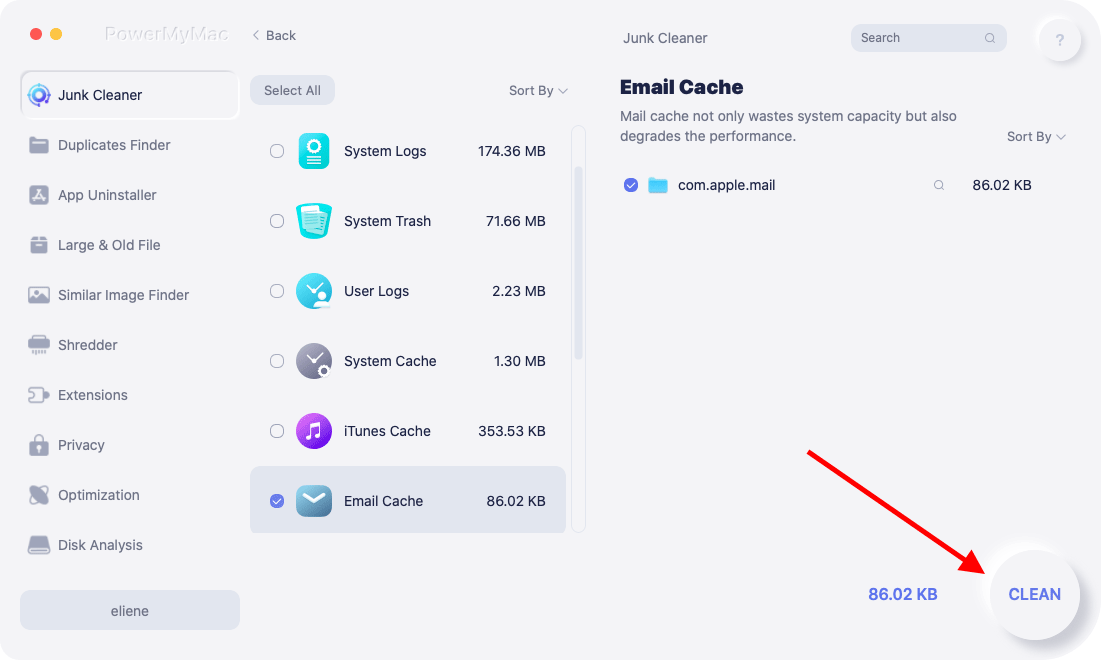
Step 3. Review the Results and Choose Files to Clear
Take some time to review the items displayed by the PowerMyMac. Then press the CLEAN button to clear mail storage on Mac.
It’s worth noting that the same procedure is used for all the other modules you see on the left-hand side of the screen. Another thing worth noting is that the PowerMyMac is very easy to use to clear mail storage from your Mac.
Option #2. Create a Rule to Instruct Your Mac to Delete Emails
This process of how to clean mail storage on Mac involves using a built-in Apple Mail feature that will help you create a Rule so that you can instruct your Mac to delete emails. This process entails you to move your emails into a newly created mailbox so that you can separate junk emails from the important emails.
It’s important to note that this option is flexible. It could either be set to delete emails all the time or from time to time only. For example, if you think your email is already full, you can just set this rule to clear mail storage on Mac. Then you can just turn it off after. So, it’s up to you as to how you want to use it.
Whatever you're using Gmail or other mail, you just have to be careful as to when and how you want to use it to avoid losing important emails. How do you clean mail storage? Follow the steps below to create a rule that will instruct your Mac to delete emails.
- Open up the Apple Mail application.
- Create a new mailbox. This new mailbox will be your new place to store all of your junk mails.
- Take your cursor to Mailbox on the menu bar above.
- Select New Mailbox from the list.
- Think of a location where you want to store your new mailbox. Click on the Location field on the pop-up window and choose a location.
- Name your new mailbox on the Name field.
- Click OK.
- Create the rule that will clear mail storage on Mac. This rule will instruct your Mac to filter the emails that should go into the new mailbox. You can do this step by taking your cursor to the Mail on the menu bar.
- Select Preferences from the list.
- Choose the last option on the next window. As you will notice, the last option is Rules.
- Click on Rules.
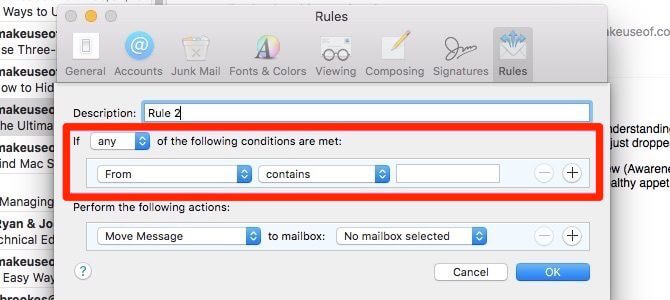
- Click on Add Rule on the right side of the screen.
- Change the description in the Description field.
- Start assembling the Rule. Click on From.
- Choose Sender is not in my contacts from the list.
- Add a second rule by clicking on the + sign on the right side. That will open up another From field.
- Choose If the person is not in my previous Recipients from the list.
- Click on the Move Message field under Perform the following actions. Then move the messages to the new mailbox you have just created by choosing the name on the list.
- Click OK.
- Click on Apply when the pop-up window appears. Then take a good look at your mailbox and you will see that all the messages have disappeared. That means all of your messages have been moved to the new mailbox that you've just created. Now, open the new mailbox you've just created to see all your emails.
- Sort your emails in your new mailbox and make sure to choose From when the list comes out. That will put together all the emails coming from the same person, group, or company.
- Go over all the emails in your new mailbox. When you find an email that you don’t want to junk. Add the person (who sent the email) to your Contacts. That will prevent any deletion of important emails. Most importantly, it will prevent all the emails of that person from ending up in your new mailbox.
Tip: Add a Person to Your Contacts
- Take your cursor over the name of the email address you see listed in the header of the email.
- Click on the arrow you see on the right.
- Select Add to Contacts from the list.
Keep in mind that the rules only work if the Apple Mail program on your Mac is running. So, if you decide to do this on your work computer and you shut it down at the end of the day, you will notice in your iPhone that the new junk emails are still going to your inbox.
It is only when you turn on your Mac and open the Apple Mail program, that the rule will move the junk emails on all of your devices. This will happen automatically. Once that happens, it should be easy for you to quickly delete all of those messages.
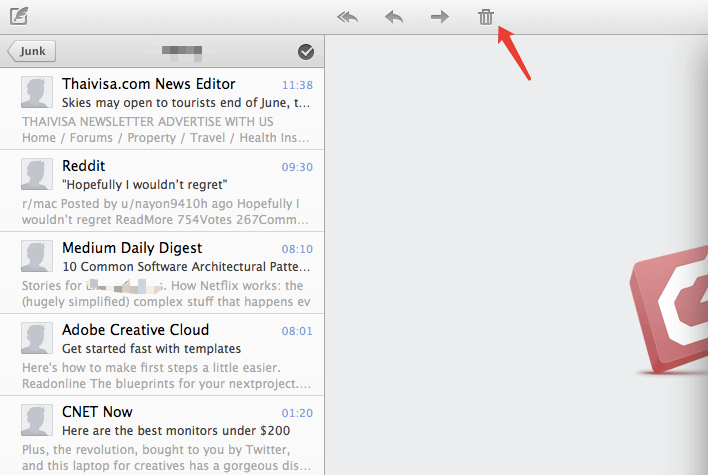
To clear mail storage on Mac, if you want to select and delete large amounts of messages all at the same time, you can just click on the first item, press on the Shift key. Go to the last item and click on it. All of the emails in between will be selected. Once they’ve been selected, you can just tap the Delete key.
If you don’t want to keep this rule running on your computer, just go back to Mail Preferences. Click on Active to uncheck the box. If at some point in time, your email gets clogged again, just come back and re-check the box.
Option #3. Delete Emails Manually
This is a very tedious option, nonetheless, it can help clear mail storage on Mac. Just follow the manual steps below:
- Click on one particular email like Foxmail.
- Go to the menu bar.
- Click on Edit.
- Choose delete from the list. You can also use the key command, which is
Command + delete. Unfortunately, this option can take you forever to do. It just doesn’t make any sense to spend so much time doing something so menial. Nonetheless, it does work.
You might be curious about mail storage location on Mac. Well, you can find them in your Library folder: ~/Library/Mail, or /Users/NAME/Library/Mail.
Part 2. How Do You Clear Storage on A Mac?
It takes some time to create rules that can help you clear mail storage on Mac. This is not to say that this process of creating a rule doesn’t work because it does. It’s just that the process is pretty long. It’s the same thing when emails are deleted manually. It’s also labor-intensive and time-consuming.
If you don’t have all the time in the world, it’s best to resort to using the PowerMyMac. It is the most practical way to remove mail cache from Mac. It also erases those junk files so that your Mac can have more storage space. It also finds and removes large email attachments that take up so much space on your Mac.
How do I delete mail storage on my Mac? It’s without a doubt that the PowerMyMac is the easiest way to clean your mail storage. The best thing about it is that it doesn’t just delete emails for you. It does so much more than that. You can clean junk files with Junk Cleaner, completely remove your unneeded apps with App Uninstaller, or find and delete duplicates with Duplicates Finder.
Part 3. In Conclusion
When the time comes that you have to clear mail storage on Mac, you have three options as to how to go about it. Out of the three options, there is no doubt that the iMyMac PowerMyMac is the fastest way to do that. With the Free Download, you can immediately see for yourself how it works. What option will you use to clear mail storage, Mac? Share with us your thoughts.

