


One of the biggest questions that every Mac users have is that “what OS can my Mac run?”. This is actually a tough one as it depends on the model of Mac that you have on hand.However, if you are actually running on OS X Mavericks, then there is a high chance that you can upgrade and run your Mac on the newer OS available and one of which is the OS X Yosemite.But before you make the upgrade, you have to make sure that you have the right requirements that your Mac should have such as the system requirement because this is the most important one that you should have. But, what else do you actually need for you to get that upgrade on your Mac?
Contents: Part 1. Why Should I Upgrade My Mac?Part 2. Mac Models That You Need to UpgradePart 3. Things That You Should Have To Get An UpgradePart 4. Cleaning Up Your Hard Drive to Get More SpacePart 5. Conclusion
People Also Read:What are the System Requirements for OS X Yosemite?How to Upgrade To OS X Yosemite?
Part 1. Why Should I Upgrade My Mac?
Having your Mac upgraded to a newer version is something that is not done lightly. You will surely spend a lot of time and there is a possibility that you will be needing to have a new software. After that, you will then have to learn all the new things that the upgrade have. This is why you have to make sure that you have allocated more of your time doing this.
Doing an upgrade may seem challenging but it is highly recommended that you make an upgrade for you to know what OS X is able to run on your Mac. This is also a good idea because you once an upgrade is done, you will have all the newest feature that the OS X upgrade have for you.
Make sure that you know what are the types of OS X version that you can have running on your Mac for you to avoid any technical errors. You can always check online for the model of your Mac and the OS X that you can run with it.

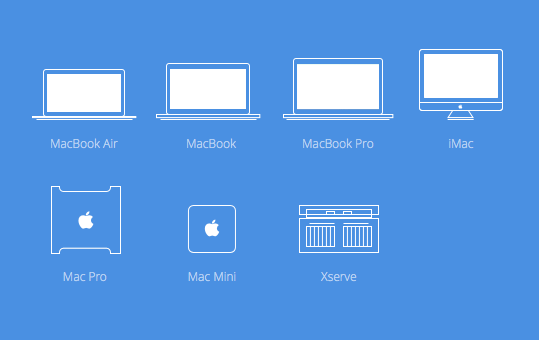
Part 2. Mac Models That You Need to Upgrade
The first thing that you should know is that if the model of your Mac is eligible or if it is capable of doing an upgrade. Here is a list for you to have an idea of the models of Mac that has a high chance of getting the upgrade.
1. MacBook – late 2008 aluminum, early 2009 or newer version.
2. iMac – middle of 2007 or newer version.
3. Mac Pro – earlier of 2008 or newer.
4. MacBook Air – late 2008 or newer version
5. MacBook Pro – mid-2007 or newer
6. Xserve – early 2009
Part 3. Things That You Should Have To Get An Upgrade
As what we have mentioned earlier before you make an upgrade, you have to make sure that you have the right system as this is the most important requirement that you should have. Now, here are the things that you have to ensure.
1. Know What OS X Version You Have
If you currently have the OS version of OS X 10.6.7 then you can have it upgraded to the OS X Yosemite. In case that you do not know what version your Mac is running then you can simply do the following:
- Just click on the Apple icon located at the upper left corner of your screen.
- After that, click on the “About This Mac” option.
- You will then see a set of numbers under “OS X” which serves as your version number.
2. Know The Space Available on Your RAM
For you to start upgrading your Mac OS X to OS X Yosemite, you will actually be needing 2GB of memory or even more. Now, for you to check on the available space on your RAM, all you have to do is to follow these steps:
- Click on the Apple icon found at the upper left corner of your screen.
- And then, you will see besides “Memory” the number of GB that you have left on your RAM.

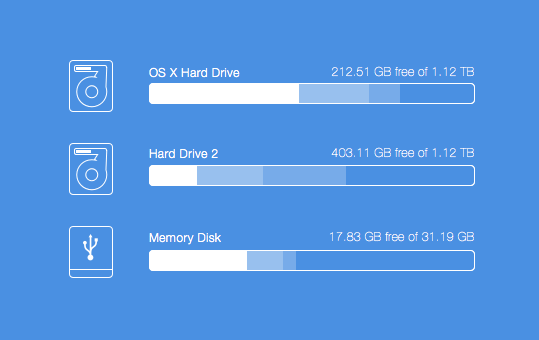
3. Know How Much Free Space Left On Your Hard drive
For your Mac’s hard drive, you will be needing to have at least 8GB of free space on your Mac’s hard drive. To check how much space is left on your Mac’s hard drive, all you have to do is to follow these steps:
- Click on the Apple icon located at the top left of your screen.
- And then click on the “About This Mac” option. A new window will then appear on your screen.
- Click on “Storage” located at the upper left of your screen.
- You will see the amount of free space left on your Mac’s hard drive as it has a multi-colored bar. And there an indication that says “XXX GB free out of XXX GB”.
However, often times, there is not enough memory left on your hard drive for you to fulfill this upgrade. But this is just an easy task. All you have to do is for you to clean up some space on your hard drive for you to get more space. All you have to do is to remove all the files and junks that you no longer need on your Mac as these junks surely take up a lot of space.
Part 4. Cleaning Up Your Hard Drive to Get More Space
As we have mentioned earlier, you need a huge space on your hard drive for you to proceed with the upgrade. Often times, you will not have that enough amount on your Mac because of the junks that it contains.
But never worry because this is one of the easiest tasks that you can get done in just a few minutes. Not unless you would want to do it manually which will take you a long time to get that space you need.
PowerMyMac can help you remove all of you’re junks files that you no longer need on your Mac. It helps you find and then remove all of your unneeded iTunes Backup, Email Attachments, and multi-languages, large and old files...
By having PowerMyMac perform all of these operations on your Mac, you will surely have that extra space that you need for you to upgrade your Mac’s, OS X. Here are the steps with how you can clean up all of the junk files on your Mac.
Step 1. Download and Install PowerMyMac
Download PowerMyMac from the official website then install and launch it on your Mac. On the main interface of the program, you will see your Mac’s System Status.
Step 2. Scanning System Junk
On the main interface, you will see several modules such as Junk Cleaner, Duplicate Finder, and Large and Old Files.
Choose “Junk Cleaner” to start cleaning up your junk files from your Mac. Click on the “SCAN” button, PowerMyMac will then start scanning all the junk files that you have on your Mac. Wait for the program to finish the scanning process.

Step 3. Preview Your Junk Files
After that, all the junk files will be shown to you in a category files such as Application Cache, Photo Junks, Mail Junks, System Logs, User Logs, Trash Bin, and more. Review all the things that you see on your screen for you to make sure that you have all the items that you no longer need.

Step 4. Clean Up Mac System Junk is Done
Once that you are satisfied with all the items that you see on your screen, you can click on the “CLEAN” button. PowerMyMac will then start to remove all the junk files that you have on your Mac.
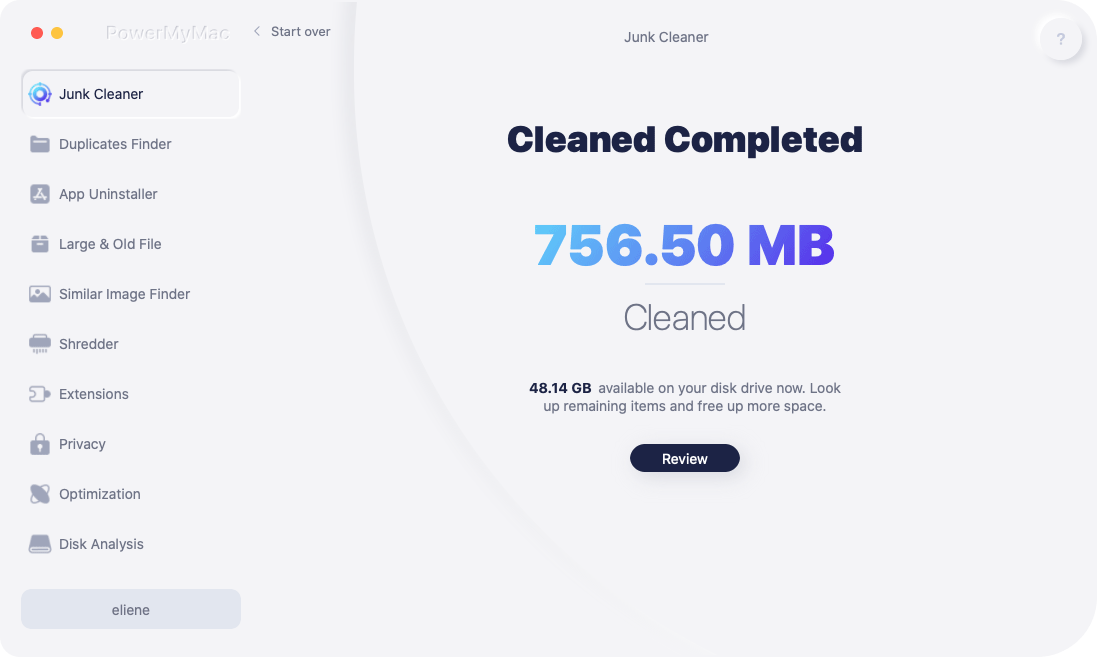
So there you have it! All the junk files that you have on your Mac are all removed permanently and you now have that space that you need for you to make an upgrade.
NOTE: You can also do the following steps if you want to choose other modules to remove other kinds of files. Getting all these things removed from your Mac will surely give you more space on your hard disk which will allow you to proceed with the process of upgrading your Mac’s OS X.
Part 5. Conclusion
Now that we have included here an example of a version of OS X that your Mac can run, give it a try. There are also some other ways for you to find out as to what OS X your Mac is compatible to run with by searching.
If you are going to make an upgrade on your Mac, then you should make sure that you have all the required data to make an upgrade, such as if you have the required space for your RAM and hard drive.
Your hard drive is the easiest one that you have free up space if you use PowerMyMac. This program will help you in cleaning up all the data that you no longer need on your Mac and remove all of your junks files which actually eats up more of your hard drive’s storage space.

