


A backup means an additional reproduction of computer data for retrieval and restoration after loss. Data hemorrhage results from computer defects, theft, natural disaster, user error or other catastrophes. Often, data loss is unforeseeable making it critical to create backup duplicates of your files.
Companies carve architecture to integrate Mac machines into a centralized backup and disaster recovery setup. A simple architecture supports environments with up to 100 Macs utilizing Windows servers. Massive deployments entail intricate configuration.
This article will guide you to map out an effective plan about how to backup Mac, make the best use of the wide range of hardware, software, and know-how to make the process as effortless as possible.
Contents: Part 1. How to Backup Mac by Using Time MachinePart 2. Considerations for Selecting Hardware and Software to Do BackupPart 3. Test Backup Application to Ensure Its Bootable
People Also Read:Tips: How to Back Up iPhone to MacHow to Remove Old Backup Files from Mac?Best Cloud Backup for Mac to Meet Your Needs
Part 1. How to Backup Mac by Using Time Machine
Inbuilt Backup by Apple

Apple Support recommends backup for every Mac. Time Machine acts as a built-in data recovery solution. It creates backup automatically for all your files such as apps, media, photos, documents, and system files. With a backup, you can retrieve files if the original data is lost from your computer or the hard disk is erased.
Onto the downsides, lack of a bootable duplicate makes it more challenging to salvage data following a hard drive failure. It’s also time-consuming to harvest files from an archive.
Choose Storage Device as the Backup Reservoir
A single external drive can automatically back up with Time Machine. Encrypt Backup Disk to keep data out of reach from users without a password for foolproof security. Time Machine maintains an up-to-the-minute replica of everything on your Mac. It envisions how your computer appeared, so you can travel back in time and see exactly how a Mac behaved in the past.
Relax and Enjoy Automatic Backups
After you choose a backup destination, Time Machine instantly starts making periodic backups automatically without manual intervention. The leading backup eats up more time due to the mass files processed. Backups don’t stop you from using your computer in the meanwhile. It backs up pieces of data that change after a previous backup making it faster in the future.
To launch a backup manually, select Back Up Now in the Time Machine menu. The menu shows the status of the process while you may want to skip a backup underway.
Troubleshooting Malfunctioned Time Machine

Apple users have experienced issues with Time Machine after macOS Mojave or High Sierra. An incompatible file system of a hard drive like Windows FAT or NTFS will not work with Time Machine.
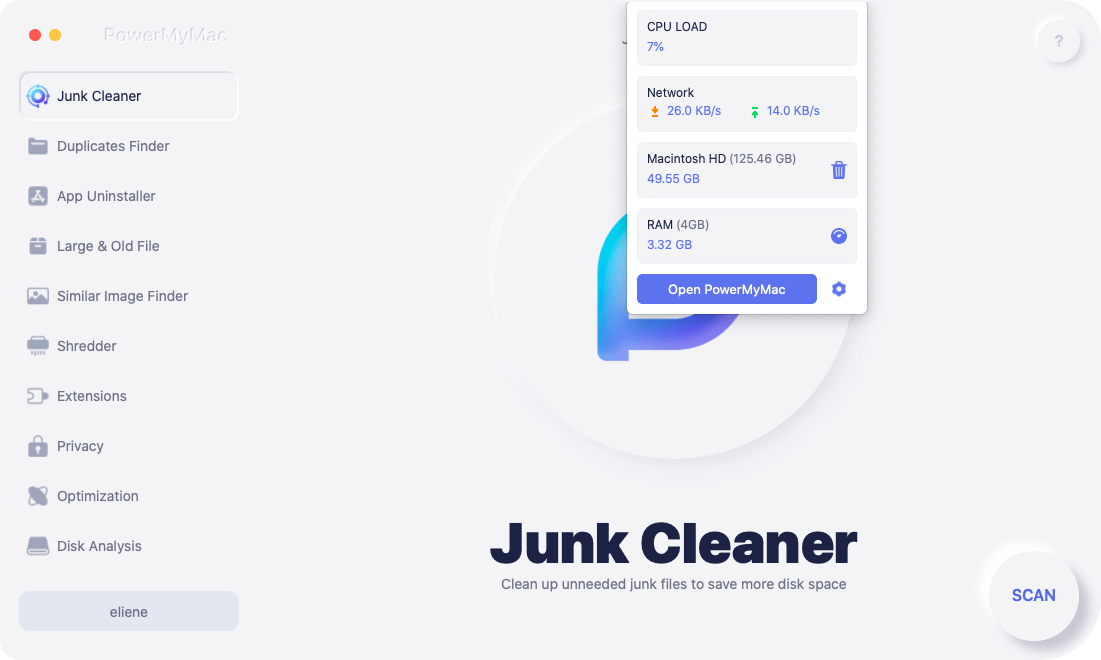
iMyMac PowerMyMac is a multi-OS digital maintenance tool to keep your computer running in tiptop shape with the regular cleanup. It helps you reclaim storage space on your hard drive to back up your entire Mac data. It boasts a smart detector that slices through the time machine backup location and the entire system registry. Junk files may infiltrate backup data and stall Time Machine.
PowerMyMac’s system monitor gives you an intuitive interface. The built-in macOS Activity Monitor pales in comparison to its easy-to-read and nifty readout for memory, CPU usage, and disk consumption.
The potent cleaner incorporates smart functionality to help you automatically spruce up digital dirt. PowerMyMac equips your machine with a rich ToolKit with various handy utilities.
Part 2. Considerations for Selecting Hardware and Software to Do Backup
Approach #1 Select Your Hardware
From the days of backing up hard disks onto a massive pile of floppies to the FireWire drive, you have many options at your disposal. However, new technologies have out-crowded floppy disks, CDs or DVDs, tape drives and Zip/Jaz drives.
- Hard Drives
Ranked as the favorite option for many users, external hard drives lead the pack as the ideal backup destination. We recommend them for individuals and small startups. Since you can unplug it and store more securely, it safeguards your data if your Mac suffers severe damage. It’s fast to copy mass files and offers generous capacity. Apart from their terrific speed in copying files, hard drives provide the convenience of random access, versatility and economy. Go for the largest disk space, pocket-sized hard drives and automatic backups.
- Optical Media
CDs and DVDs will work for earlier Macs equipped with a SuperDrive or Combo drives that read and write this media. However, backing up to CDs or DVDs is slow. In fact, the fastest optical drives transmit data at less than 1/10 of the slowest hard drive. It imposes manual efforts but answers your description if you have a shoestring budget. Over time, data falls prey to depletion and becomes unreadable. Mechanical damage, scratches or fingerprints also destroy the disc. For the minimum inconvenience, get the highest-capacity disc and reproduce duplicates monthly.
- Magneto-Optical Disks
Magneto-optical (MO) drives or disks with a capacity of up to 9.1 GB outlive CDs and DVDs. They cost much higher than optical media making them unattractive to many. With their formats and size limitations, they lack the versatility of hard drives.
- Other Detachable Media
Iomega Zip and Jaz take up insignificant footprint than a pile of hard drives and require fewer wires and adapters. Digital tape drives like VXA and DDS provided backup for vast quantities of data. But speed makes them the most time-consuming option. Others include flash drives, SAN, NAS,
Approach # 2 Select Your Software
A backup program must generate additive incremental archives. Choose applications with duplication features for a bootable backup, automatic updates and archiving features. This allows you to retrieve a complete archive as a bootable volume. Also, consider the ease of recovery like dragging and a restore command.
Part 3. Test Backup Application to Ensure Its Bootable
Even if your backup shows no errors, you should put its duplicate to test so you won’t be caught napping in future.
- Launch System Preferences and hit the Startup Disk
- Select the volume with your duplicate and remember to connect an external drive. Use NetBoot to run a special disk image located in a central machine supporting Mac OS X Server.
- Click on Restart.
- After rebooting your Mac, confirm that it applied your duplicate as the startup volume. For Finder preferences set to thrust mounted hard disks on the Desktop, the one displayed at the top represents your startup volume.
If your Mac fails to use the right volume, restart it once more, latching on the Option key until the screen displays icons for each of the correct startup volumes. Tap on the volume you wish to employ and then hit off the right arrow button to wrap up the startup process.
- Do a couple of experimental checks to verify important data is where it should be, that you have network accessibility, and launch some applications.
- Go back to System Preferences, select the Startup Disk icon, choose your normal startup disk, and click start.
Final Thoughts
If you hit a snag restarting from a duplicate volume, your backup tool may have malfunctioned. Execute the back up again, pore over software documentation, or get in touch with your software developer’s technical support team for help.
Also, run iMyMac PowerMyMac to disinfect your Backup files and give it another shot. All contemporary Macs can boot from an external FireWire hard drive. Apple’s website contains details about external drives’ compatibility. Draft a backup strategy to determine your hardware and software along with the nitty-gritty.
I hope you enjoyed our work and successfully backed up your Mac.

