


Do you want to know how to reset Mac to factory settings? Then, you should continue to read this article. Our guide will help you learn the exact steps to reset Mac to factory settings. After you have finished reading this guide, you’ll have a Mac that’s good as new.
It is important to note that this guide is useful for various Mac devices such as iMac, MacBook, Mac Pro, and MacBook Air.
Article GuidePart 1. Backup Files before Factory Reset Your MacPart 2. Tick This Entire Checklist before Reset Mac to Factory SettingsPart 3. How Do I Restore My Mac to Factory Settings?Part 4. Wrapping It All Up
Part 1. Backup Files before Factory Reset Your Mac
When you reset your Mac device to its factory settings, all information will be wiped out of your hard drive. Thus, it is necessary to make a backup of your most important data. It’s similar to copying your hard disk drive and keeping the files for some period of time.
There are various ways to do this. First, you can manually copy all files and applications to an external hard disk drive. You can also use iCloud as a backup platform.
But, the best way to do this is through the Time Machine. This software is built into your mac device and is a fast and secure method of backing up your data. In case something goes wrong, you can immediately recover specific files or the entire hard drive.
Tip: If you have many old backups on your Mac that taking up so much space, you can check out this link to delete them.
Wipe out Your Mac without Losing Necessary Data
Before utilizing the Time Machine, you must clear up your Mac device. In this way, you won’t back up unnecessary junk files that will just clutter your computer. Backup files are smoothly created when your computer is not chaotic and cluttered.
So, how do you do this? You can use a utility tool like iMyMac PowerMyMac. This tool can detect useless applications, large files, old data, system junk, caches, and other unnecessary data within your computer in a few simple clicks.
Here’s how to use it to free up your Mac's space step by step:
- Download iMyMac’s PowerMyMac and launch it within your computer.
- Click “Master Scan”.
- Click Scan.
- After the scanning process is complete, you can view the results. You can also go back and select “Re-scan” to do the process all over again.
- Select the files you wish to delete.
- Click the “Clean” button. If it asks for authentication, simply enter your password.
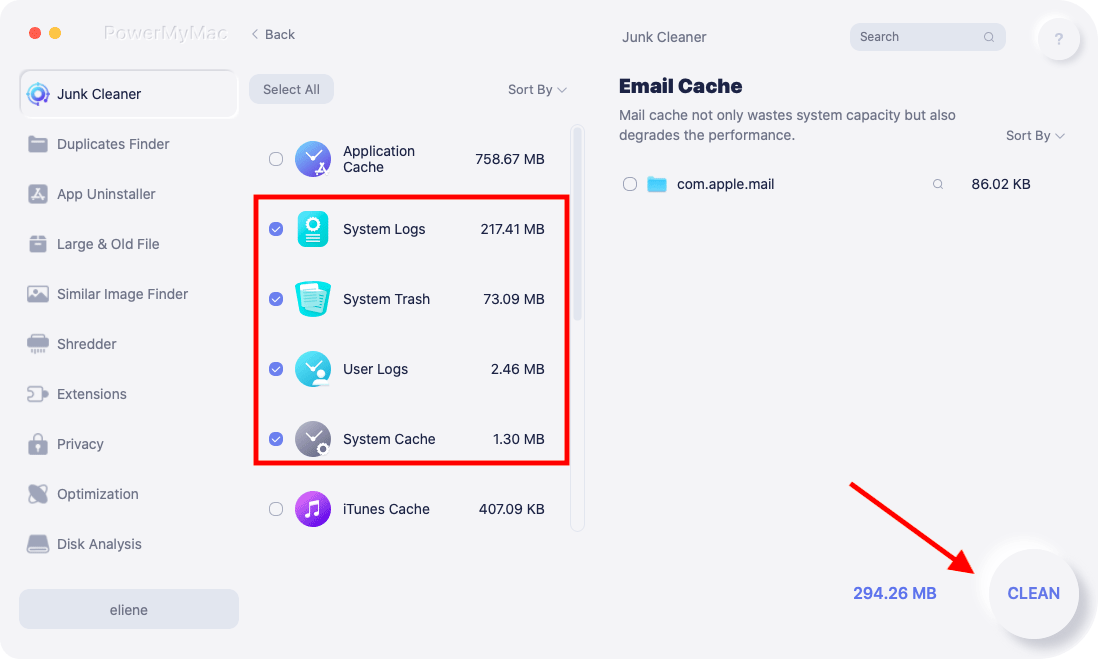
Doing this will allow you to remove more unnecessary junk within your system. You can also use Duplicate Finder and Similar Images to remove duplicates within your system.
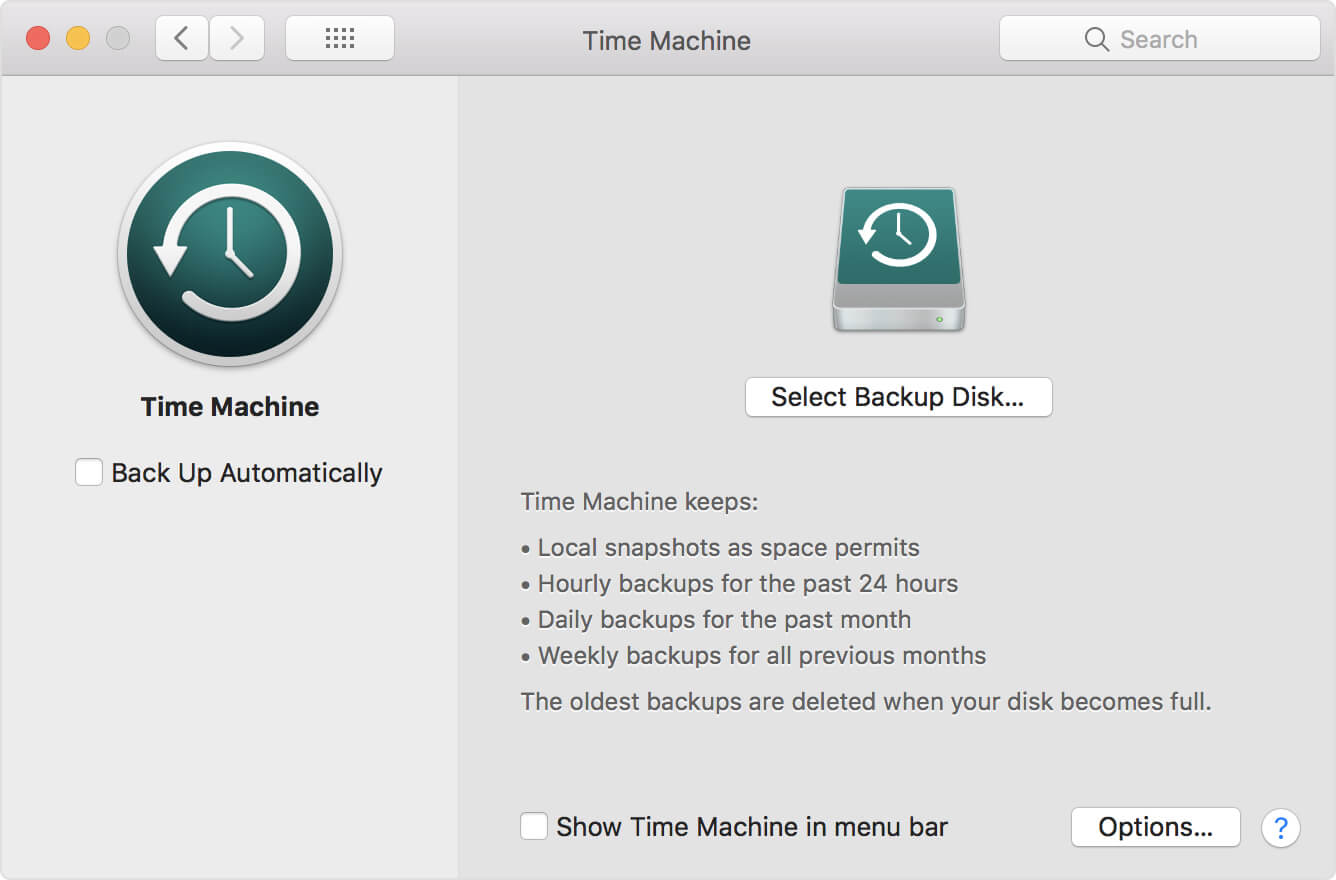
Backup Files with Time Machine
Now that you have cleaned your Mac device, you can begin to activate backups through Time Machine. Below are the steps on how to do it:
- Visit the Apple menu. This is located at your screen’s top-left corner.
- Select System Preferences.
- Choose the Time Machine.
- Press “Select Backup Disk”.
- Select the disk you’d want to use as your Time Machine backup.
- Press “Use Disk”.
- Check the box labeled “Back Up Automatically.” This enables the automatic creation of a backup to the selected disk.
Now, you’re done backing up your files. This can take a really long time and it depends on the amount of data you have. However, it is necessary to follow the steps above to ensure that you don’t lose your data.
In addition, if something goes wrong during the factory reset process, you can make sure that your files are kept intact.
Part 2. Tick This Entire Checklist before Reset Mac to Factory Settings
Before you do this step, make sure you have backed up your data as seen above. After which, you should ensure that you have disabled every service associated with the actual system you are going to reset.
These services include iCloud, iTunes, iMessage. Plus, you need to deactivate programs within your Mac device. You need to sign out of these apps and services to make sure you avoid calls from salespersons. Usually, they call new users “after the sale” has been made.
Checklist 01: Deauthorize iTunes
You can authorize a maximum of 5 computers to use iTunes. This means, you can play media on five different Mac devices. You have to ensure that your computer isn’t linked to your own iTunes account. This step is important especially if you’re selling the device to a new owner.
Here’s a step-by-step guide on how to deauthorize iTunes:
- Launch iTunes within your Mac device.
- Go to the menu bar and select Account.
- Select Authorizations.
- Choose Deauthorize This Computer.
- Provide the necessary Apple ID and password.
- Press Deauthorize.
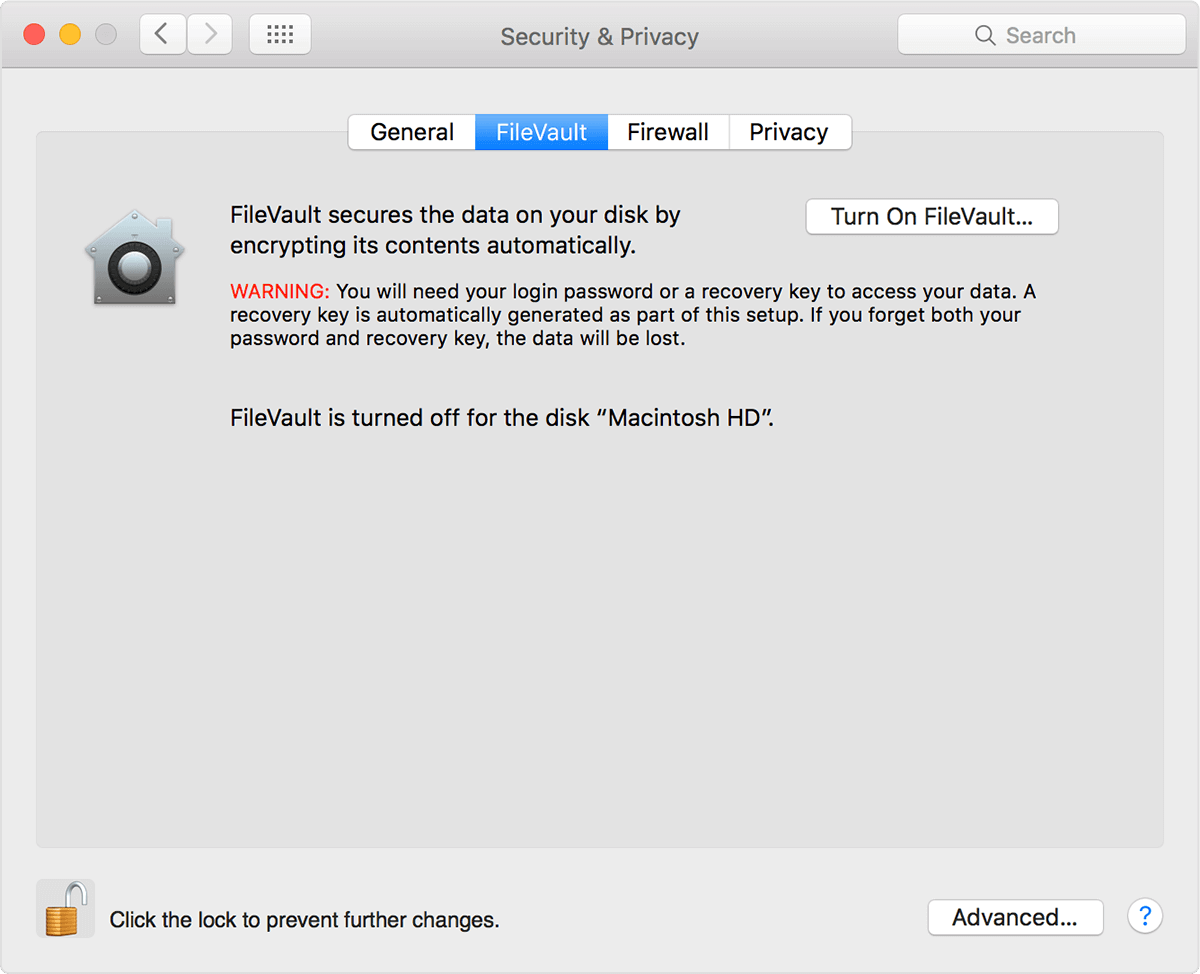
Checklist 02: Turn FileVault Off
FileVault is an essential part of your Mac computer. It provides hard drive data encryption. In this way, unauthorized access to the information contained in your startup disk is prevented. If you’re going to reset your Mac to its factory settings and remove all data, you should turn FileVault off.
Here are the instructions on how to do this:
- Visit the Apple menu and go to System Preferences.
- Find the lock icon and click it. This will unlock it.
- Input the administrator username and its associated password.
- Select Turn Off FileVault.
Checklist 03: Deactivate iCloud
If you’re going to sell or give your Mac to a new user, you should ensure that remains of cloud data (e.g., bookmarks, reminders, notes, etc.) are not visible to him or her.
Here are the steps you should follow to deactivate iCloud:
- Visit the Apple menu and go to System Preferences.
- Choose iCloud.
- Press Sign Out.
- Confirm that you really want to wipe out the data from the Mac device.
Checklist 04: Sign Out Of Your iMessage Account
Signing out of your iMessage account is one of the steps you should do before you actually reset your Mac device.
Here’s how to do it:
- Launch Messages.
- Press Messages again. This is located at the menu bar in the top-left part of your screen.
- Within the drop-down menu, select Preferences.
- Choose your own iMessage account.
- Click Sign Out.
Checklist 05: Wipe Out Data From Touch Bar
To make sure all data are wiped out from Touch Bar, you must delete it. Follow the steps below in order to do so:
- Press the power button and then press down the keys “Command + R”.
- Select Utilities and then go to Terminal. These options can be seen in the Utilities window of macOS.
- Within the Terminal, type out this command: xartutil –erase-all
- Press Return. If it asks for confirmation, type out “yes”.
- Press Return one more time.
- Select Terminal.
- Choose Quit Terminal.

Part 3. How Do I Restore My Mac to Factory Settings?
Let’s summarize what we’ve done so far. First, you clean up your Mac device of Junk Files using iMyMac’s PowerMyMac. Next, you back up your files using Time Machine. After which, you sign out of everything to make sure another user doesn’t get access to your apps and accounts.
After you’ve done everything outlined above, your Mac is now ready to be restored to its default factory settings. Here’s how to do it step by step:
Step 01: Restart Your Mac And Place It In Recovery Mode
This is pretty straightforward. Here’s how to do it:
- Visit the Apple menu (top-left corner).
- Select Restart.
- As the system is restarting, hold down the keys “Command” and “R.”
- Wait until the Recovery Mode window comes up.
Step 02: Wipe Off Data From The Hard Drive
We now have to erase data within the hard drive to make it squeaky clean. Don’t worry though, you’ve made a backup before right? Here’s how to do it:
- Within the Utilities window, select Disk Utility.
- Press Continue.
- Select your desired startup disk.
- Check out the top part of the Disk Utilities Window. Press Erase.
- Go to the menu and select Mac OS Extended (Journaled).
- Select Erase.
- Wait until the process is complete then visit the Disk Utility menu. This is located in the screen’s top-left corner.
- Choose Quit Disk Utility.
Step 03: Install The macOS Again
You have finished reformatting the hard drive. Now, you can re-install your Mac operating system. In order to do this, you simply need to press “Reinstall OS X” or “Reinstall macOS.” After which, confirm that you really want to do the operation. Simply follow the instructions prompted on the screen.
If you’re giving the Mac to another owner, it is recommended to quit the process. You can allow the new owner to provide new, necessary information appropriate to him or her. To do this, you simply press and hold the keys “Command + Q.” After which, select Shut Down to turn the Mac off. Now, it will be ready for a new user.

Part 4. Wrapping It All Up
Before you actually perform the process on how to reset Mac to factory settings, you should clean up your entire device of junk files. Then, you can proceed to back up your files and sign out of apps and accounts.
Finally, you can reset your Mac to its factory settings ensuring that it is in tip-top condition for you or its new owner.

