


So, how to install Minecraft mods on Mac, and what are mods? Mods represent unapproved add-ons as well as alterations developed through other gamers. Mods created as well for Minecraft: Java Version must also operate for Minecraft using Mac.
To begin downloading Minecraft modifications, you should first simply download perhaps the Minecraft Forge Web service software. So just keep scrolling below and you will see a step-by-step guide on how to download Minecraft mods on Mac.
Contents: Part 1. What Are Minecraft Mods?Part 2. How to Install Minecraft Mods on MacConclusion
Part 1. What Are Minecraft Mods?
Since mod stands for modifications, and Minecraft mod means simply everything that changes something within Minecraft out of its previous form to such a new state. Mods could include different recipes for crafting, offer as well as replace entities inside the game, also drastically alter the game's playability.
Additional modifications work beyond the scene to help improve the game's performance, appearance, and even to introduce fresh features such as interactive virtual capability. Because once you begin hunting for such a mod that deploy, you should know there were two variations of Minecraft, but every version manages modifications differently.
Part 2. How to Install Minecraft Mods on Mac
How to Install Minecraft Forge
- First, head to the main website of Minecraft Forge using any browser.
- Press on Install to download the file
.jarwhich could install Minecraft Forge on Mac. - Now from the Dock of your Mac bottom of the main screen, launch Finder, and press on the Downloads Whenever you saved into another location the Forge Installer file.
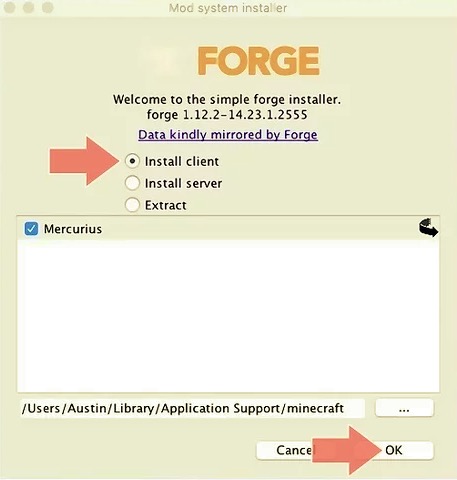
- Click on the file of forge installer, select the option “Install Client” and also press on “OK”. After that, it will now install on the Minecraft Forge. After the installation process was completed, a popup notification would then appear.
How to Install Minecraft Mods on Mac
- Open the Google search bar, input on “Minecraft Mods” then hit enter.
- Find on the preferred Minecraft mod, press on Download button after that locate the link from the content page.
- Launch on Finder, press on the Downloads folder and choose on that mod files, then hit on key
Command+Cwhich then copy anything in the clipboard. - From the menu bar, press on “Go”. This then shows the list of the common directory from your Mac.
- Once you hit the key “Option”, then the Library folder would then show from the list of directories from the menu bar.
- Now, you must select the Application Support directory, which then contains the files of Minecraft as well other apps.
- Press on the folder of Minecraft and tap on the folder of Mods.
- Upon entering the Mods folder, you must now tap on the “Edit” located from the menu panel from the uppermost top on your screen.
- Lastly, to finish the process, tap on “Paste” so that the mod file would paste into the mods folder, and now the mod was indeed installed on your Mac.

Conclusion
This article tackles how to install Minecraft mods on mac. As you’ve been read and mentioned above we also give an overview of what was Minecraft mod. In addition to the main point of the article, we also included how to download on Minecraft forge which you could use in downloading and installing on Minecraft mod on mac.
Some day when you no longer need Minecraft Mods, you might want to uninstall it. PowerMyMac will be your best choice to uninstall apps on Mac. It not only helps you remove unneeded apps but also delete all their related files within clicks. It is time-consuming and easy to operate. We hoped that this would then help you. Have a great and cozy day ahead.

