


Everybody shares photos these days. Photo sharing has become the norm. What better way to keep everybody updated but through photo sharing? Thanks to digital technology, photos sharing has become an easy task. The only disadvantage is that the oversharing of photos online could compromise privacy.
To preserve privacy, it’s safer to share photos on private platforms such as the iCloud Photo Sharing app. So, if you’re still not in the know as to how to share photos on iCloud, then it’s time you learn about it.
Article GuidePart 1. What Is the iCloud Photo Sharing App? Part 2. The Easy Way to Share Photos on iCloudPart 3. Bonus: The Similar Image Finder is What Every Photo Sharer Needs Part 4. In Conclusion
People Also Read:How to Access iCloud Photos on MacHow to Find Similar Images on Your Mac?
Part 1. What Is the iCloud Photo Sharing App?
The iCloud Photo Sharing app is designed to do exactly what it’s supposed to do and that is to share. Since iCloud syncs all of your devices together, sharing of photos and documents is easily made possible. Hence, is the reason why the Photo Library is one of the coolest features of iCloud.
The Photo Library allows you to sync all your photos to Apple servers so that it’s easy to access them from any of the Apple devices. With all your photos synced to Apple servers, you have fewer chances of losing them as well.
Considering how easy it is to sync your photos with the iCloud Photo Library, it makes a lot of sense to use it as a platform to share photos with family and friends. That way, you wouldn’t end up posting photos on public platforms such as your social media accounts. So long as your friends and family have access to the web, they will be able to see the photos you share through the iCloud Photo Sharing app.
Part 2. The Easy Way to Share Photos on iCloud
How to Enable iCloud Photo Sharing on Mac
The thing about the iCloud Photo Sharing is that you need to enable it first. That way, your friends and family will be able to see your photos. Even if they’re not using an Apple device, they will still be able to see the photos you share on your iCloud.
So, if you want to know how to share photos on iCloud, the first thing you should do is to check if it’s enabled. If it’s not, then follow the steps below to enable it.
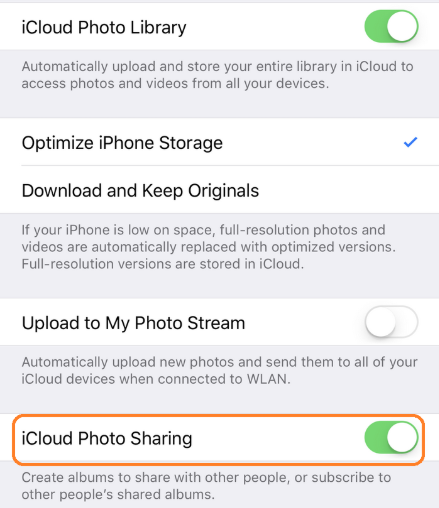
- Go to Settings to make sure the iCloud Photo Library is turned on.
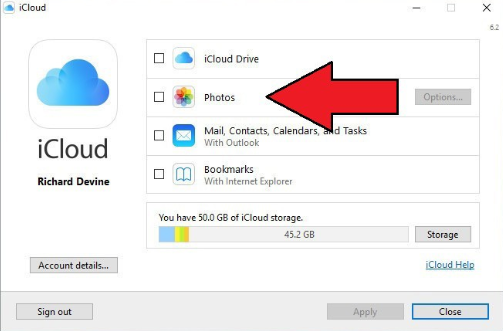
- Go to the upper, left-hand corner of your screen and click on the Apple icon.
- Select System Preferences from the drop-down list. The System Preferences window will pop up.
- Look for iCloud on the System Preferences window and click on it.
- Turn on Photos on the next pop-up window.
- Click on the Options tab opposite the Photos tab. You will see the iCloud Photo Library. Check it to turn it on.
- Click on the blue Done button below. Your photo app will open.
How to Start Sharing Photos on iCloud
Now that you have the iCloud Photo Sharing app-enabled, you can start sharing your photos. Follow the steps below to see how to share photos on iCloud.
Step 1. Open up the Photos App.
Step 2. Type in A Title on the Shared Album Name Field.
Step 3. Create an Album.
Step 4. Select the Photos You Want to Share.
Step 5. Select the Shared Album.
Let’s discuss the detailed steps on how to share photos on iCloud below:
Step 1. Open up the Photos App
Once you have opened up your Photos app, click on the Shared tab you see on the top, the mid part of the screen. If you want to have a sidebar instead, click on View on the top menu and select Show Sidebar. Click on Activity on the left sidebar, then click on the Start Sharing button you see in the middle of the screen.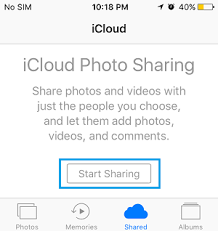
Step 2. Type in A Title on the Shared Album Name Field
Type in a title on the Shared Album Name field. You can also invite some people to view your album by filling in the To field underneath the Shared Album Name field. Once you invite some people, they too can automatically share and post some photos. For example, the whole family can post photos of a vacation to one shared album.Step 3. Create Album
Click on the Create button below. Your album will be created once you have clicked on that button.Step 4. Select the Photos You Want to Share
Click on the Albums tab on the top, the mid part of the screen. By clicking on the said tab, you will be able to find the photos you want to share. Select the photos you want to share.You can also do a right-click on each of the photos so that you can select the iCloud Photo Sharing option that will come out on the drop-down list. You can also click on the Share icon located at the top, right-hand side of the screen. By clicking on it, the iCloud Photo Sharing will also come out on the drop-down list.
Step 5. Select the Shared Album
Select the Shared Album you want to add the photos. That is how easy it is to upload your photos to the cloud and share on enabled devices.
Part 3. Bonus: The Similar Image Finder is What Every Photo Sharer Needs
Congratulations! Now, you know how to share photos on iCloud. This way, you can share your photos with just a chosen group of people. People you don’t know won’t be able to see your precious photos.
In a way, your privacy is taken care of. How about your Mac space? With more and more photos shared and downloaded on your Mac, you’re most likely going to use up a lot of space. Unfortunately, some of that space will just be used by similar images that have been shared back and forth by some of the friends you have invited. What a waste of space.
That’s where the Similar Image Finder from iMyMac comes in. This is a powerful tool that can do a reverse image search on your Mac. All the similar images on your Mac can be cleaned up. To learn more about it, you can click here.
Part 4. In Conclusion
Learning how to share photos on iCloud isn’t that hard to do. You just have to make sure that the iCloud Photo Library is enabled. Sharing photos on iCloud is a safer way to let your friends and family know what you’re up to. You just have to make sure that the photos you download won’t take up so much space on your Mac. For that, you can consider the Similar Image Finder from iMyMac.
Do you share photos on iCloud? Our readers would love to hear from you. Feel free to comment below.

