


With a file-sharing setup, you can transfer items or folders with other devices on your network. You can even allow other users to access your entire Mac or only certain. In 2017, Apple’s cursory fix to an unprecedented security flaw opened a new can of worms in some macOS High Sierra. The update trigged a bug that disrupts file sharing.
Broken file sharing may also appear if you update to macOS Mojave. Sometimes, malware infiltration, corrupted or omitted system files, incompatible system settings, and digital dirt in your system could be the culprits. So how to fix the issue of Mac file sharing not working? Find it in this post.
Contents: Part 1. Quick Solve Broken File Sharing on Mac DevicesPart 2. How to Fix File Sharing Not Working & Mac Connection IssuesPart 3. Additional Options to Deal with File Sharing Problems
Part 1. Quick Solve Broken File Sharing on Mac Devices
Mac File Sharing permissions is not working? File sharing connection is failed or the SMB does not show files? Unable to access shared folder on Mac? If you have encountered one of these problems, try to fix them with the solutions below:

Solution #1. Fix File Sharing with Terminal on High Sierra
A security flaw detected in High Sierra exacerbated vulnerability as anyone could get administrator access on Mac even without a password and username.
Apple swung into action immediately to resolve it but inadvertently broke file sharing. Some users discovered that file sharing hits a snag. Apple circulated a step-by-step guide for a quick fix.
- Launch the Terminal app from the Utilities folder via Applications.
- Enter
sudo /usr/libexec/configureLocalKDCand hold down Return. - Type your administrator password and hit Return.
- Shut down the Terminal app.
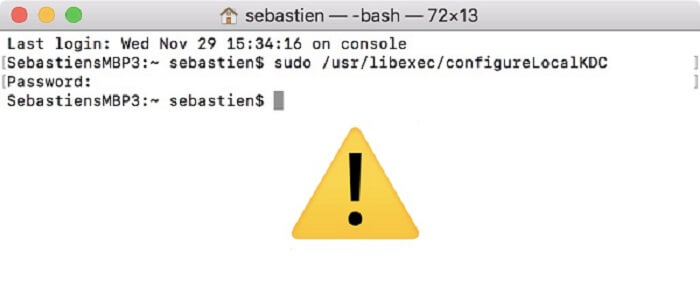
At this juncture, file sharing should work again without any problems.
Solution #2. Delete Unnecessary Caches to Fix Mac Issues
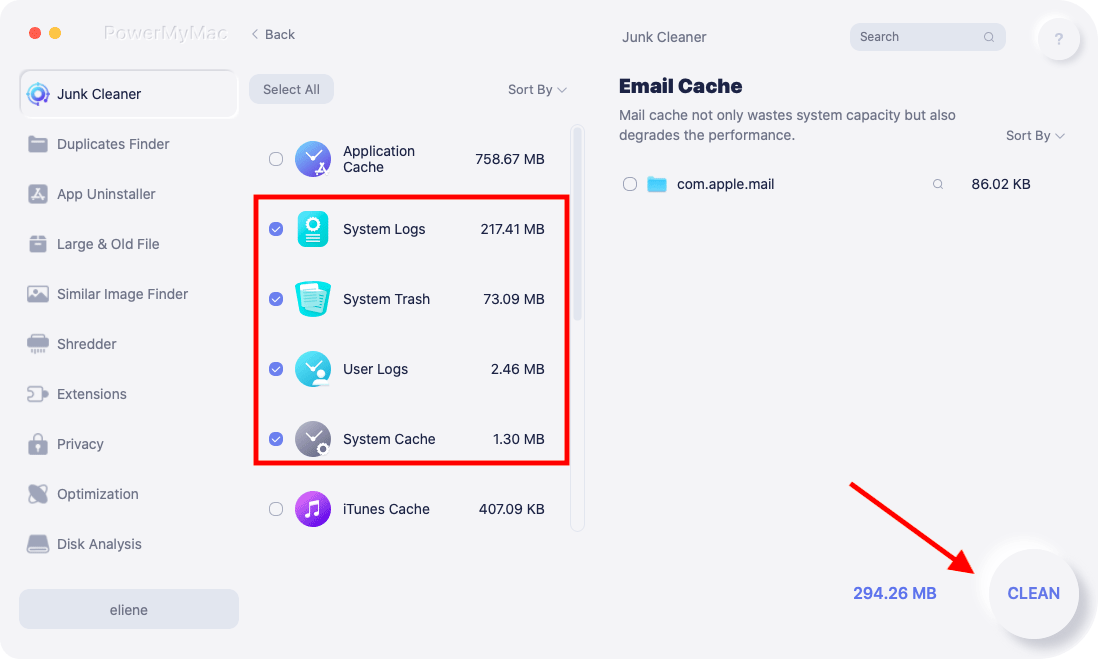
Sometimes, junk, duplications, large or useless files, and other redundant pieces of data interfere with file-sharing capabilities. It integrates smart cleanup technology, a performance monitor, memory retriever, and a richly-armed toolkit. It’s a cleanup workhorse to revitalize your Mac and free up storage space.
Run PowerMyMac to identify computing baggage that wears down your Mac. Try it for free to delete unnecessary caches to fix Mac File Sharing Not Working issue.
Best of all, you can preview items before erasing them to safeguard the integrity of your system. It works extremely hard to maintain a nippy machine. Uninstall the app with its leftovers is also allowed in PowerMyMac.
Solution #3. Deactivate Your Antivirus Program
Some antivirus software includes settings that corrupt file-sharing on your Mac. You may want to see if the Firewall in the antivirus is configured to Public Network. It’s easy to do this.
From Preferences, choose Firewall > Network Connections. Tweak the settings from the Public to Work or Home. Now, try file sharing to confirm you’ve fixed the problem. You can’t exchange the Apple File System (APFS) stuff over the Apple Filing Protocol (AFP).
Part 2. How to Fix File Sharing Not Working & Mac Connection Issues
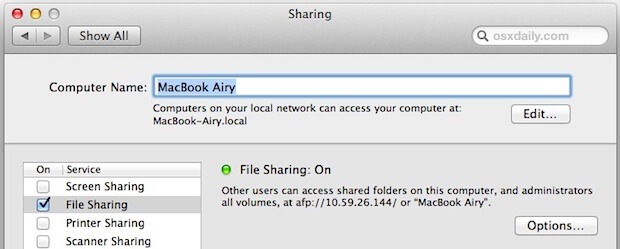
Method 1. Adjust File Sharing Configurations
Once you’ve set up file sharing via System Preferences and Public folder, you transfer items automatically. Alternatively, utilize file sharing options to determine the protocol and other possibilities for each item. If you cannot share files on Mojave, check settings. By enabling File Sharing, you fix the issue.
- From the Apple menu, choose System Preferences > Sharing.
- Next, tap on the Add (+) in the foot of the window to share a specific item. Highlight the folders you want to relocate, then click Add.
- Hold down the
Controlbutton, click on the name of the item and choose Advanced Options followed by your preferences. Click on OK. - You can rope in a few selected users. Choose the item you want to transfer in the Shared Folders list of options, then click the Add(+) and cherry-pick the targeted users. Add users from a network, Mac users, or contacts.
- In addition to identifying users who should access your items, you may also need to restrict the scope of accessibility.
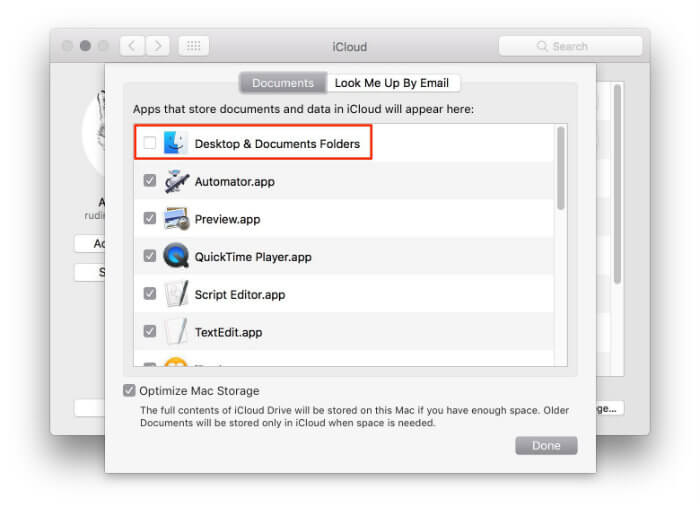
Method 2. Enable iCloud to Share Files
You can utilize other methods to share files from your Mac with other devices. Apple suggests iCloud Drive carves out a straightforward pathway to share files. iCloud Drive auto-saves files in Documents and Desktop directories to the cloud. Apple premised its decision on the presumption that most people save files here.
Follow the steps below to enable iCloud Drive Desktop and Documents access:
- Launch the Apple menu > System Preferences, then hit iCloud.
- In the menu, highlight iCloud Drive and select Options.
- Scroll to the Documents icon and click it.
- Next, sift through to the new Desktop & Documents Folder listing, and then enable it by ticking the box.
- There you’ve it. iCloud will now store files to the cloud. Give it enough time if you have mass files or corpus content to move.
Part 3. Additional Options to Deal with File Sharing Problems
Here additional things to do to access the shared files on Mac and feal with the file sharing problems.
#1. Downgrade to Mojave 10.14.4
Some users running macOS 10.14.5 who encountered the issue reported they resolved the issue by downgrading to 10.14.4. If you have nothing left in your bag of tricks, this could be your last resort. Set up your backup before you restore it to a previous type.
- Grind your computer to a halt, and then restart it instantly hold down the
Shift + Command + Option + Rsimultaneously. - Your Mac will take more time to reboot. Wait until the macOS Utilities screen to load on, and then hit Reinstall macOS followed by Continue.
- Refer to the onscreen instructions to finish the installation process.
#2. Toggle off the File Sharing
To link to an APFS formatted volume, you’ve to toggle off sharing via AFP on the macOS devices you want to share with.
- Go to System Preferences
- Choose Sharing > File Sharing > Options.
- Uncheck the Share Files and Folder using AFP. High Sierra installed on an SSD automatically transfigures the system volume to APFS.
#3. Advanced File Sharing Options
Advanced file sharing allows you to set the protocol or alternatives for each item.
- Go to the Apple menu, select System Preferences
- Hit Sharing and choose File Sharing.
- Control-click the title of the shared item then selects Advanced Options.
- Click on the “Shared over” pop-up list of options, then select a file sharing protocol (SMB: Share folder over SMB or AFP: Share folder over AFP).
- Select a choice from advanced options and hit OK.
Conclusion
File sharing issues have become commonplace in the Mac world. Accordingly, Apple unveils timeous fixes for such bugs but some versions like Mojave still remain vulnerable.
You have many tricks at your disposal to fix a file sharing glitch. These tricks have yielded positive results for many users. Before you implement radical changes, take a moment to diagnose performance issues on your system. Run cleanup software like PowerMyMac to cut the deadwood out.
That does it for now. You have learned a thing or two to resolve typical file sharing problems by trying the foregoing hacks. As always, let us know your firsthand experience in the comments section.


Mariusz Muszak2022-10-29 22:04:25
I did all the steps in command line and still there was a connection error. I mapped the file share (in my case 10.0.1.38) and I went to Finder- Go- Connect to server and I typed: smb://10.0.1.38 and... it worked!
tdavid2022-06-28 17:26:15
Does not cover my situation where the "file sharing" checkbox will litterally NOT stay checked.
Dave2022-09-14 15:20:24
sudo launchctl load -w /System/Library/LaunchDaemons/com.apple.smbd.plist Type that in the terminal or copy and paste, worked for me.
Renato2024-10-14 21:00:42
Amigos, este comando do Dave deu super certo no Mac OS CATALINA okokokokokok
игорь2023-11-21 18:10:34
камманда в терминале по совету Дейва сработала!Ура у меня теперь снова можно установить галочку и включить общий доступ!
LEV2023-04-12 07:53:47
Спасибо! Не устанавливалась галочка "Общий доступ к файлам". Только этот способ решил проблему! OS Catalina 10.15.7 (19H2026)
Leonam2023-04-06 00:08:32
Muito obrigado! isso resolveu o meu problema.
Helper2022-11-10 01:21:47
Dave command worked! I am adding that if you want to stop file sharing afterwards, type the same thing but with the word "unload". Ex: sudo launchctl unload -w /System/Library/LaunchDaemons/com.apple.smbd.plist
JRP2021-11-20 10:36:25
Does this issue persist into Catalina and Big Sur?
MARISA2021-04-13 17:09:26
Hola buenos días, tengo dos computadoras con Mac High Sierra y Office16 y otras más viejitas con OS anteriores.Con todas las otras compus puedo comparttir archivos de Word,a veces los archivos abren como sólo lectura pero no es un problema. Desde que puse estas dos Mac con High Sierra,cuando abren un documento, a menos que específicamente le cambien los privilegios, el documento ya no se puede abrir en otra Mac. No lo puedo abrir. NO tengo privilegios. Aunque abra en las carpetas compartidas tooodos los privilegios y agregue a toooodos los usuarios... no hay caso.