


Whether you’re working in an office, school, or remote environment, learning how to map network drive on Mac helps streamline your workflow. In this guide, we’ll walk you through different methods, including automatic connection at login. Plus, we’ll show you how to keep your Mac clean and optimized, especially if you regularly access large shared files or multiple network volumes.
Contents: Part 1: What Does It Mean to Map a Network Drive on Mac?Part 2: How to Map a Network Drive on Mac Manually?Part 3: Automatically Map a Network Drive on Mac at StartupPart 4: Common Network Protocols You Can UsePart 5: Troubleshooting Issues When Mapping Network DrivesPart 6: Optimize Your Mac for Smooth Network Drive MappingPart 7: Conclusion
Part 1: What Does It Mean to Map a Network Drive on Mac?
To map network drive on Mac means to create a shortcut or mounted volume that connects to another device’s shared folder or server. This lets you access files stored elsewhere, like on a Windows PC, a NAS, or a corporate server, without navigating the network every time.
Benefits of mapping a drive:
- Quick file access
- Centralized storage for teams
- Reduced local storage use
- Easier collaboration and backup
Part 2: How to Map a Network Drive on Mac Manually?
Follow these steps to manually map network drive on Mac using Finder:
- Open Finder.
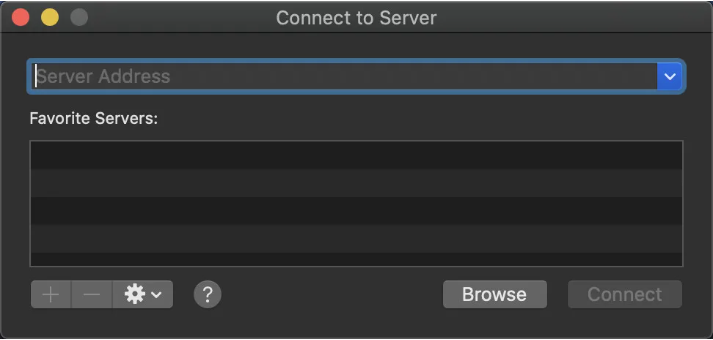
- Click Go in the menu bar → select Connect to Server.
- In the address bar, type the network path (e.g.,
smb://ServerName/SharedFolder). - Click Connect and enter credentials if required.
- Once connected, the shared folder will appear under "Locations" in Finder.
- To map it permanently, go to System Settings > Users & Groups > Login Items, and add the mounted volume.
Part 3: Automatically Map a Network Drive on Mac at Startup
To make your Mac reconnect to the network drive each time you log in:
- After connecting to the network drive via Finder,
- Open System Settings → Users & Groups,
- Choose your user account,
- Click Login Items → + → select the mounted network drive,
- Restart your Mac to confirm auto-mount works.
This ensures you don’t have to reconnect every time, making access seamless.
Part 4: Common Network Protocols You Can Use
When you map network drive on Mac, choosing the correct protocol ensures a stable connection.
- SMB (Server Message Block): Default for Windows file sharing
- AFP (Apple Filing Protocol): Legacy Apple protocol, still supported
- NFS (Network File System): Common in Unix/Linux systems
- FTP/SFTP: For servers or web hosting access (read/write limitations)
Always confirm what protocol your server or NAS supports before connecting.
Part 5: Troubleshooting Issues When Mapping Network Drives
Problem 1: Network drive not showing after restart
Solution: Re-add the drive to Login Items in user preferences.
Problem 2: Slow connection or timeout
Solution: Ensure Wi-Fi or Ethernet connection is stable; try using IP instead of hostname.
Problem 3: Permissions denied
Solution: Double-check username/password and share permissions on the host machine.
Part 6: Optimize Your Mac for Smooth Network Drive Mapping
iMyMac PowerMyMac is a multifunctional toolkit designed to clean, optimize, and monitor your Mac. When you regularly map network drive on Mac, system resources can get tied up with cached network data or background services.
Key features include:
- Smart Cleaner: Removes junk, logs, and caches that slow down network operations.
- App Uninstaller: Cleans up unused tools that may interfere with file sharing.
- Privacy Protection: Clears browser and connection history, ideal for shared devices.
- Performance Monitor: View memory and CPU usage in real-time while connected to network drives.
- Duplicate Finder: Eliminates redundant files to free up storage, making room for app updates and smoother processes.

Before mapping large volumes or working with shared files, run a cleanup with iMyMac PowerMyMac to ensure smooth performance and maximum speed.
Part 7: Conclusion
Learning to map network drive on Mac helps bridge the gap between local and network storage, making your workflow faster and more collaborative. From home setups to corporate environments, having mapped drives saves time and improves efficiency. And with tools like iMyMac PowerMyMac, you can keep your system optimized and ready for any network task.

