


Sometimes Premiere Pro conks off and plunges into annoying sluggish pace that leaves you scratching your head for a killer solution. Additionally, knowing how to speed up a clip in the software broadens your creativity horizons to polish up transitions or visual effects for your footage. But lags, crashes, or slow playback can add nightmares to your editing experience.
While Premiere Pro maintains its clean bill of health, your computer may be the root cause of your troubles. Fret not as you can invoke tricks for Premiere Pro speed up and take your finesse to the next level.
Contents: Part 1. Optimize Performance in Adobe Premiere Pro CCPart 2. Tweak Settings to Speed up Adobe Premiere Pro CCPart 3. Additional Options for Premiere Pro Speed upPart 4. Final Thoughts

Part 1. Optimize Performance in Adobe Premiere Pro CC
Speed Up a Clip in Premiere Pro
- Choose the clips you want to beef up.
- Launch the Clip > Speed/Duration panel, or right-click and choose Speed/Duration.
- Enter a higher speed in the relevant field. This will automatically tweak the time of the clip. You may want to unlink the controls and tweak the time manually.
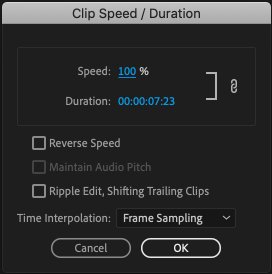
Bonus Tip:
You can implement Speed/Duration adjustments to different clips simultaneously or even transit across three distinct Time Interpolation modes. Free Sampling repeats or erases frames as needed to consummate a sequence, Frame Blending will even out the motion for duplicated frames, and Optical Flow generates fresh frames.
Optimizing Your System
At the outset, ensure you’ve a minimum of 8 GB and a powerful graphics processing unit (GPU). Importantly, solid state drives (SSDs) outpace hard drives powered by a spinning disk. A computer with SSDs should hit on all cylinders.
PowerMyMac |Superior All-in-one Optimization Concept
iMyMac PowerMyMac optimizes and increases system response time. It’s designed to pick out and erase bugs, junk files, and clutter that slow it down. Best of all, it has a sleek and intuitive interface so you can easily examine culprits or authorize deletion.
It reclaims hard disk storage to run your Mac at peak performance if you use small SSDs. PowerMyMac gives you a bird’s eye view of the space occupied or reclaimable on the disk drive. It’s the best-in-category optimization utility for comprehensive maintenance, removing browser caches, junk files and trash.
It will save you chunks of time and effort, easily fixing the problem of running out of application memory of your system. Mac users fritter away up to 62 GB of clutter that slows down Mac that prevents machines from running at peak performance.
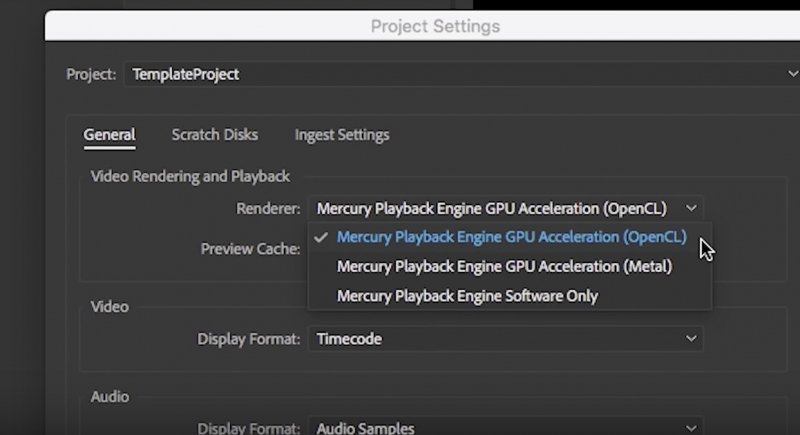
GPU Acceleration
Most features of Premiere Pro CC utilize GPU acceleration for playback or rendering. Otherwise, you’ll stumble upon a warning or trigger higher render duration and sluggish playback. This works like charm for lightning-fast render times and previews to pop up.
To turn it on, head to File> Projects Settings > General and check for “Renderer” dropdown in “Video Rendering and Playback”. Under this dropdown, you should choose “Mercury Playback Engine GPU Acceleration”.
Mac has two choices, viz., OpenCL and Metal. Experiment with both to determine the best for your system.
Avoid “Mercury Playback Engine Software Only” at all costs. All the same, this may not do the trick if your hardware becomes unstable.
Part 2. Tweak Settings to Speed up Adobe Premiere Pro CC
Media Cache Settings and Default Location
Premiere Pro processes imported files and generates their cache prototypes for quick access to read them via your drive. In this vein, audio files morph into .cfa and MPEG files into .mpgindex files.
With time, the cache files not only gobble up tons of gigabyte storage space, but also hogs down your drive and video editing workflow. Accordingly, you’ve to take control of media cache volume and location.
For internal SSDs, relocate media cache to the local drive to boost performance in Premiere Pro to the zeniths. Head for Preferences > Media Cache and tap on “Browse” to adjust your destination.
Your internal SSD may not have sufficient internal SSD, tool up with an external one that you can store your media cache. If you wrap up projects quickly, you can tweak your settings to erase cache files automatically in tandem with a fixed duration. You can also tap on “Delete Unused” in the media cache preferences to get rid of unused cache files.
Playback Resolution
Steer clear of lags on the playback by decreasing your Premiere playback resolution to ½ or ¼. This doesn’t distort the video quality but decreases memory consumption to project and play it back in the timeline. At ½ or ¼, it resembles a normal resolution but plays back much faster for editing.
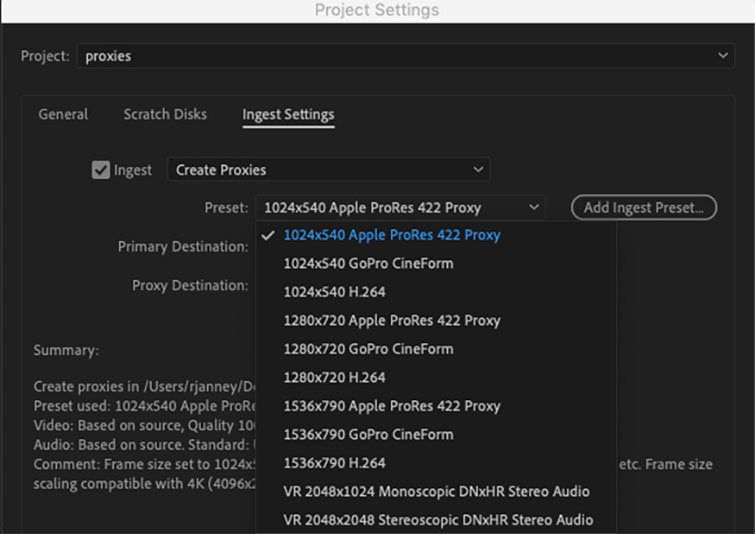
Create Proxies
Proxies are replicas of original video files with a lower resolution or file size. Generate proxy versions of full-resolution video for fast editing in Premiere Pro. As you get editing down to a fine art, proxies offer a nifty tool to maximize productivity.
It allows you to edit with a more amenable tool with a crystal-clear and crisp source video. It’s fast and excellent.
Part 3. Additional Options for Premiere Pro Speed up
Mute Effects
With Global FX Mute, you toggle off effects such as transitions, STAR WIPES, color correction, and BABY take a heavy toll on your machine’s power. Just mute them to optimize the performance of this program.
Memory Allocation
Make sure to close other software on your machine as you edit to unburden your RAM. For Premiere Pro, you can configure RAM usage for other applications or how much you can hive off for Adobe video apps.
To achieve this, head to Preferences> Memory and reserve more RAM for your Premiere Pro. With 32 GB of RAM, you can cream off 26 GB for your editing applications.
Part 4. Final Thoughts
If you don’t want to go off the boil in terms of Premiere Pro editing, try out different features such as Rate Stretch Tool, Ripple Edit, and other controls to sharpen your prowess. Knowing how to accelerate video unveils a whole new world of imaginative possibilities for your media files. Observe these little tricks and you’ll have your Premiere Pro running like a streak of lightning.
If you’ve any queries regarding your hardware or settings, leave a comment below. Keep an eye out for a wealth of insights to boost Mac performance under our informative blogs.


Александр2020-05-28 20:36:37
Привет! Спасибо за статью!! Но все равно нужна ваша помощь, совет, мнение! Купил аймак 3,4GHz IC i7, памяти 32, графика GTX 680MX гб. Специально его брал для премьера, а не тянет. Чуть накинешь эффектов, все, ложится. Приходится выкручиваться, прокси, доп. рендер. А если брать переходы или титры, вообще еле тянет. Может Адоб не дружит с маком, может комп мой Г...?