


Google Chrome is a superior web browser. Unfortunately, the Google Chrome Helper process takes a toll on the CPU and system memory of your Mac. This is critical information but you might be scratching your head, wondering what is Google Chrome Helper process.
This article will explain this issue and ways on how to deal with it. So, keep on reading to learn how you can manage the Google Chrome Helper process on your Mac.
Contents: Part 1. What is Google Chrome Helper Process?Part 2. Gauging and Lessening the Impact of Google Chrome Helper on MacPart 3. Conclusion
Part 1. What is Google Chrome Helper Process?
Even with the presence of Safari, most Mac users usually resort to using Google Chrome instead. Unfortunately, Google Chrome has one fatal flaw, most especially if you have a lot of tabs open. It gobbles up the RAM on your Mac. When that happens, your Mac runs out of space.
To understand how the RAM on your Mac is gobbled up, you need to know what is Google Chrome Helper process. The Google Chrome Helper process is a smart way to handle and manage all the tabs that are usually open when you’re using this specific browser.
When you open the Task Manager of Google Chrome, you’re going to see a list of processes that are preventing your browser from crashing. So, if you think about it, the Google Chrome Helper process is actually for the user experience.
It becomes a fatal flaw when an embedded content, like an extension, is dubious. So, if you have a lot of extensions added to your Google Chrome and you’re not sure about them, there’s a good chance that your Mac is going to run out of space.

Disabling Google Chrome Helper Process
The good thing is that you can disable the Google Chrome Helper process. It’s just a matter of changing some of your Chrome settings. Don’t worry about it. Disabling Google Chrome Helper is safe. The steps below will show you how to do it.
- If you have a lot of tabs open, close all of them. Don’t quit, just close them. Then open Chrome and go to the menu.
- Once you see the drop-down menu, search for Settings and click on it. The Settings window will launch.
- Take your cursor to the left panel and look for Privacy and security. Click on it.
- Look for Site Settings on the main screen and click on it.
- Scroll down the list and look for Flash and Unsandboxed plugin access.
- For the former, make sure to choose Block sites from running Flash.
- For the latter, make sure to choose Ask when a site wants to use a plugin to access your computer respectively.
Part 2. Gauging and Lessening the Impact of Google Chrome Helper on Mac
The Google Chrome Helper process will definitely have an impact on your Mac. For starters, your Mac is going to have high CPU usage. To gauge and lessen the impact of Google Chrome on Mac, read the options below.
Option #1. Use the iMyMac PowerMyMac
You can use PowerMyMac to gauge and lessen the impact of Google Chrome Helper on your Mac. This comprehensive cleaning tool checks on your Mac’s CPU usage. It also cleans your Mac to lessen the impact of the Google Chrome Helper on your Mac.
If you’re attributing the high CPU usage to Google Chrome Helper process, then it’s time you clean out some dubious extensions. Take a look at the steps below to see how the iMyMac PowerMyMac helps you gauge and lessen the impact of Google Chrome on your Mac.
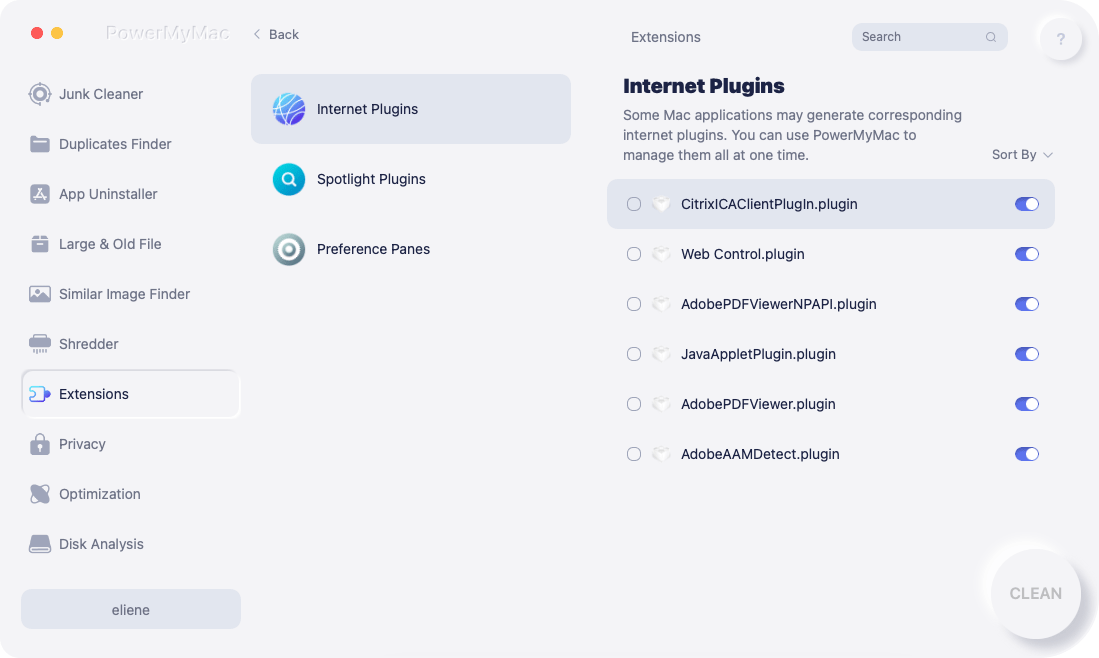
- Download the PowerMyMac, install and launch the program.
- Click on Extensions, then start scanning for extensions.
- After scanning, review a list of extensions on the main screen and select the ones that you might think are dubious and harmful to your Mac.
- C lick on the CLEAN tab to clean out extensions
Option #2. Launch Both the Task Manager of Google Chrome and Activity Monitor Windows
This option is pretty much the manual way of gauging the impact of Google Chrome Helper on your Mac. By launching both the Task Manager of Google Chrome and Activity Monitor of Mac, you will be able to see which is app is taking up a lot of space.
The steps below will show you how you can launch both windows.
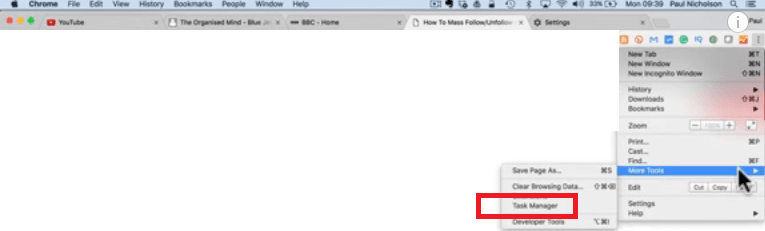
Step 1. Launch the Task Manager of Google Chrome
Open Google Chrome and click on the three dots you see on the top, right-hand side of the screen. Select More Tools from the drop-down list and click on it. Choose Task Manager from the drop-down list to launch it.
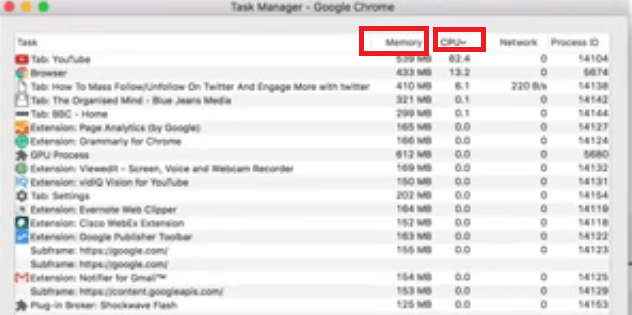
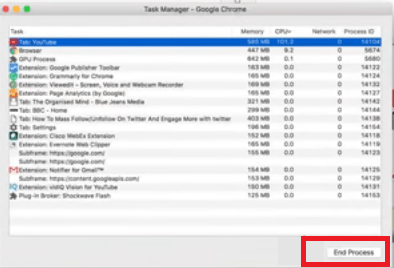
Step 2. Check How Much Memory and CPU Space the Apps as Taking Up
Once you see the Task Manager of Google on your screen, take a look at the apps. Beside each app, you will see how much memory and CPU is being eaten up. From this window, you will know which app is causing the problem.
Step 3. Launch the Activity Monitor of your Mac
Go to your Finder and click on the Applications folder. Then look for Utilities and open it up. Then click on Activity Monitor to launch it. Once you see it on your screen, mirror it with the Task Manager of Chrome.
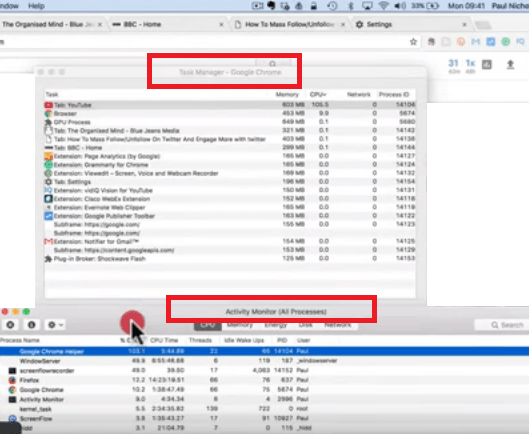
Step 4. End the Process
End the process of the app that’s taking up a lot of memory and CPU space. You can do that by simply clicking on the End Process tab you see on the bottom part of the Task Manager window. Once you have done so, take a look at the Activity Monitor of your Mac. You will notice that the activity has gone down.
Option #3. Run Program in Compatibility Mode
The steps below will show you how to go about this option.
- Locate the Google Chrome shortcut or executable file on your computer. Right-click on the icon until you see the drop-down menu.
- Look for Properties from the drop-down menu. Click on it to launch the Google Chrome Properties window.
- Look for the Compatibility You will find this tab on the top, right-hand side of the window. Click on it.
- You will see the option that says Run this program in compatibility mode for. Check this option and click on the Apply tab.
Option #4. Delete Browsing Data
The steps below will show you how you can delete your browsing data.
- Click to open Google Chrome. Then go the menu by clicking on the three dots you see on the top, far right-hand side of the screen.
- Select and click on More Tools from the drop-down list. Then click on Clear browsing data.
- Inside the Clear browsing data window, take your cursor to the Time range field. Select All time from the options. It’s recommended that you clear out the caches and cookies regularly. Check the boxes to clear them out. Then click on the Clear data tab.
- To get rid of the cookies, scroll down to the bottom and expand the Advanced Settings. Open up Content settings and scroll down to the list of all cookies.
- After you have deleted all of them, restart your PC.
Part 3. Conclusion
As an avid Google Chrome user, there’s no need for you to worry about the Google Chrome Helper process. If you know how to handle and manage it, Google Chrome won’t put a strain on your Mac.
Now, if you think you cannot handle or manage the Google Chrome Helper manually, you can always resort to using the iMyMac PowerMyMac.
Do you use Google Chrome a lot? If yes, have you experienced high CPU usage because of Google Chrome Helper? Feel free to share with us your thoughts.

