


I had a Windows PC before and am used to having two types of clicks, a left-click and a right-click. Now, I bought a MacBook and it only has a single click.
Although I find my MacBook very handy for my creative projects, I still want it to have a right-click option. How do I right click on MacBook?

 You are in right place. I will share some solutions to right click on Macbook. Read Along.
Contents: Part 1. What is Mac Right Click?Part 2. How to Right-Clicking on MacBook Using Trackpad?Part 3. How to Right-Clicking on Mac Mice?Part 4. How to Change Double-Click Speed Of Mouse?Part 5. Conclusion
Part 1. What is Mac Right Click?
During the first 2 decades of Mac’s life, it was notorious for having only one mouse button. This was contrary to Windows PC who had two mouse buttons; one for left-clicks and another for right-clicks.
The first way to right click on Mac is to use the Control (Ctrl) key. With Mac’s mouse, there was no option to do a right click. Since Mac has only one mouse button, to achieve a right-click, you have to press Ctrl and click the mouse button at the same time.
Ctrl + Click is the equivalent of the right-click. With applications and websites that support the right-click feature, doing a Ctrl + Click will achieve identical results as that of doing a right-click on a traditional mouse.
After some years, the Apple mouse still doesn’t contain a right button. Actually, they do not contain any button. Trackpads on the MacBook Pro, MacBook, and MacBook Air do not have any buttons too.
Although at present, the macOS has included support for doing a right-click (a.k.a. secondary click). Thus, when you purchase a mouse from third-parties that includes a right button, you will have the ability to utilize it on a Mac.
For example, you can right-click this third-party mouse to show a contextual menu.

Part 2. How to Right-Clicking on MacBook Using Trackpad?
The second way to right click on Mac/Macbook is using Trackpad.
Apple calls the popularly-known right click as secondary clicks. It is due to the reason that a variety of options are available for performing the said secondary click.
You can actually set up a secondary click on a MacBook, MacBook Air, and MacBook Pro. Here are the steps on how to right click on Mac using Trackpad:
- Visit the Apple menu then choose System Preferences
- Click Trackpad
- Choose the tab entitled Point & Click
- Check the box you see located beside Secondary Click
- Choose one of the following: Click in bottom left corner, click or tap with two fingers, and click in bottom right corner.

If you wish to tap the Trackpad instead of a click, go to the box titled “Tap to click” and check it.
You will see that in Secondary Click Options, the option to “Click with two fingers” is replaced by “Click or tap with two fingers.”
You can also set up the Tracking Speed of your pointer inside your Trackpad pane. This refers to how fast the pointer moves on the screen as you move your finger along the trackpad.
You can simply move the slide to the left for a slower pointer movement. Sliding it to the right will result in a faster pointer movement.
Gestures for zooming and scrolling can also be configured. Gestures for features such as App Expose, Mission Control, and Notification Center can be modified as well.
Once you have modified the secondary click options, you might find that the modification you have done doesn’t suit your preferences.
You can simply go back to Apple Menu’s System Preferences and do the same steps all over again but on another option.
Part 3. How to Right-Clicking on Mac Mice?
Linking an external mouse makes various operations on the Mac more convenient, and many external mice will have a right-click function.
Apple’s Magic Mouse looks like a sleek piece of device that doesn’t show its right button visibly.
However, it has the ability to decipher a left-click from a right-click similar to that of a MacBook’s trackpad. You can actually configure the right-click on a Mac mouse. Here’s how to do it:
- Use the Apple Menu or the Dock to open System Preferences
- Select Mouse pane
- Select the tab labeled Point & Click
- You will see Secondary Click and a box next to it. Check this box
- Select “Click on the right side.” This will activate secondary click (a.k.a. right-click) on a Mac mouse.
If you want to have the left side of the mouse as the secondary click, you can choose the option “Click on the left side.” In addition, the Point & Click tab gives you the ability to modify the mouse tracking speed.
Part 4. How to Change Double-Click Speed Of Mouse?
Most people are used to a standard speed of double-clicking the mouse. However, other people have different requirements and this means they need to adjust the speed of double-clicks in their mouse.
You can actually modify the length of time your Mac waits for in order for a second click (of a double-click) to happen.
This is very important if your fingers move comparatively slower than the standard double-click speed.
Here’s how to modify the speed of double-clicks:
Step 1 - Open System Preferences and go to the pane titled Accessibility
Step 2 - In the left-hand portion of the sidebar, click Mouse & Trackpad
Step 3 - You can find a slider entitled “Double-click speed.” Drag it towards your left-hand side to make your Mac wait longer for your double-click’s second click.
In the Accessibility pane, you can modify the delay that happens during the time when you drag a file over a folder and standby for it to automatically spring open.
If you notice that when you drag files towards folders and it unintentionally opens, you can modify the speed of spring load by slowing it down.
However, if you notice that you have to wait for a really long time before a folder opens, then you can modify it in the opposite direction.
The slider entitled “Spring-loading delay” can be dragged towards the right to make folders open slower and it can be dragged to the left to make folders open faster.
Tip: The right-click function of the Mac can be managed with the Accessibility, Trackpad, and Mouse System Preferences panes.
These three are all standard of the macOS’ System Preferences. Sometimes, third-party applications, software, and plug-ins have their own panes and install it in your system.
In most cases, there are no problems with this. It’s because it is dependent on how to control the plug-in or application. However, sometimes it can lead to issues (e.g. Flash gets outdated).
In these types of cases, you can use iMyMac’s Mac Uninstaller to safely uninstall the ones causing the problem.
How to Use PowerMyMac to remove apps causing issues on Mac?
You can use the Mac Uninstaller of PowerMyMac to remove programs causing issues on your device or to clean, speed up, and optimize your Mac.
Here’s a step-by-step guide on how to use it:
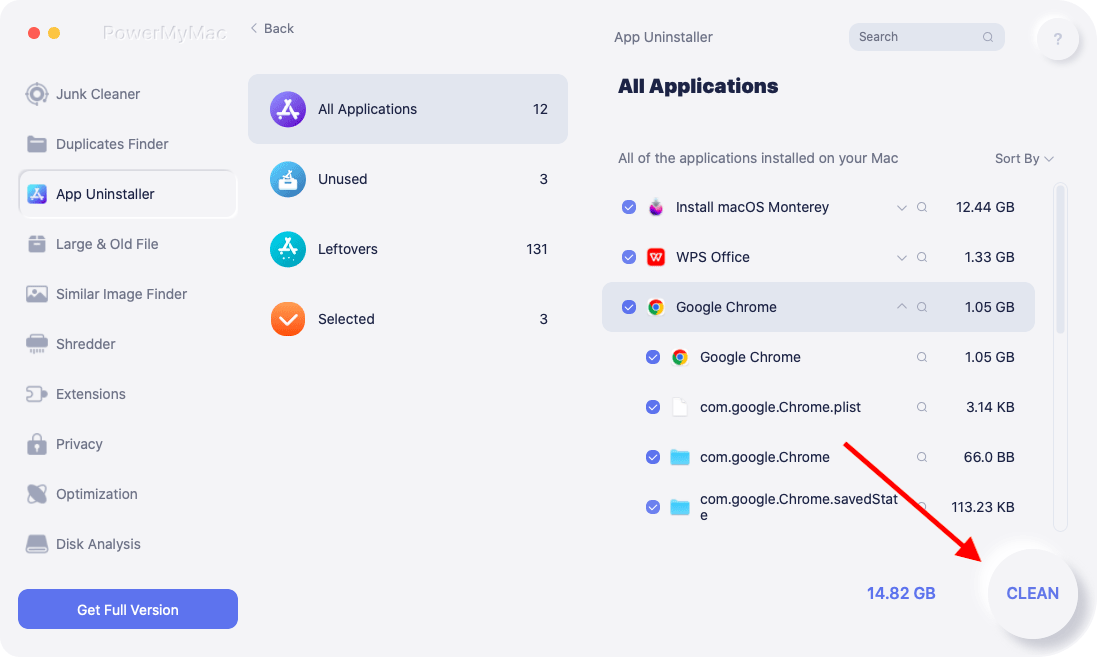
1. Download PowerMyMac and open it. Choose “App Uninstaller” on the left-hand side of the screen.
2. Click SCAN button to scan all applications on your device.
3. After the scan is done, all the applications and software will be listed on the main screen. Select the application causing trouble. Click the CLEAN button.
Use PowerMyMac to clean up and optimize your Mac in just a few clicks. It can also help you delete tons of junk files, scan for duplicate files, and uninstall unwanted apps to free up more disk space and make your Mac run faster.
People Also Read:Uninstall: App Not Safe on Mac6 Solutions to Do Mac Malware Removal
Part 5. Conclusion
In the past, Mac doesn’t have a right-click feature on their mice and trackpads. Fortunately, at present, it is now available and is called a secondary click.
You can do various methods to configure your right-click (secondary click) on a Mac and a Mac mouse through the System Preferences.
You might notice, though, that when you install other applications, they have their own System Preferences panes. This might cause some issues on your device.
Fortunately, you can use the PowerMyMac tool to uninstall or remove the application causing the problem.

