


Professional photographers have traditionally favored Adobe's Lightroom for photo editing. There are now two versions of the app: Lightroom and Lightroom Classic. If you’re using the tool, you may want to know how to clear Lightroom cache and delete app cache files for better Mac performance.
Here, we will discuss how to clear the Lightroom cache on your computer. We will talk about whether it’s safe to clear the Lightroom cache or not. Finally, we will also talk about both manual and automatic methods of clearing out the cache.
Contents: Part 1. Is It Safe to Delete Lightroom Cache?Part 2. The Quickest Way to Clear Lightroom Cache on MacPart 3. Manual Steps to Clear Lightroom Cache on Mac or WindowsPart 4. Conclusion
Part 1. Is It Safe to Delete Lightroom Cache?
Let's describe the Lightroom cache before decide to clear Lightroom cache. It refers to the storage space set aside for documents, multimedia, information, and also instructions that aid in accelerating program performance. Lightroom also employs cache, which over time consumes precious storage and frequently results in workflow issues and delays.
Is it okay to erase the Lightroom cache after that? You may safely erase the previews folder, but Lightroom will start to regenerate Preview as fast as could be expected when you begin editing again. Therefore, any advantage will only last a short time.
As immediately as you launch Lightroom for the first time, the cache starts accumulating data. All of this information is utilized to speed up loading. The information is only transient and not really important, though. As a result, you may occasionally get rid of it to make room for other things.
Part 2. The Quickest Way to Clear Lightroom Cache on Mac
More than simply a Mac cleanup tool, iMyMac PowerMyMac is versatile. You may use it to speed up and optimize your Mac. Add more free space to your Mac right away. In addition, you can use it to help you clear up caches including those of Lightroom
PowerMyMac comes with a ton of useful features. Duplicate files, iTunes trash, large, outdated files, photo cache, mail trash, and system detritus may all be easily removed from a Mac with this tool. It offers a convenient method to check the quantity of disk space on your Mac and improve the amount of free storage.
Its free edition allows you to access all of its essential features. You can easily clear Lightroom cache or remove Adobe cache files from Mac with this tool. A free trial is provided too. However, it has several limitations. For example, you are only allowed to scan and handle 500MB of data on your Mac.
Using the fantastic program PowerMyMac, you can optimize and clean up your Mac. With just a few easy actions, your MacBook or iMac will operate more rapidly and free up storage on your Mac.
Keep your Mac operating at its best. Consequently, the need for this optimization and cleansing tool exists. It is a cleaning-focused solution designed to help users clear up space on their Mac by eliminating unused files and programs.
Here’s how to use the tool on your computer to clear Lightroom caches:
- Download, Install, And Launch The Tool. First, you must download the tool’s installer and use it to install PowerMyMac on your computer. Once that is done, simply launch the tool on your macOS computer.
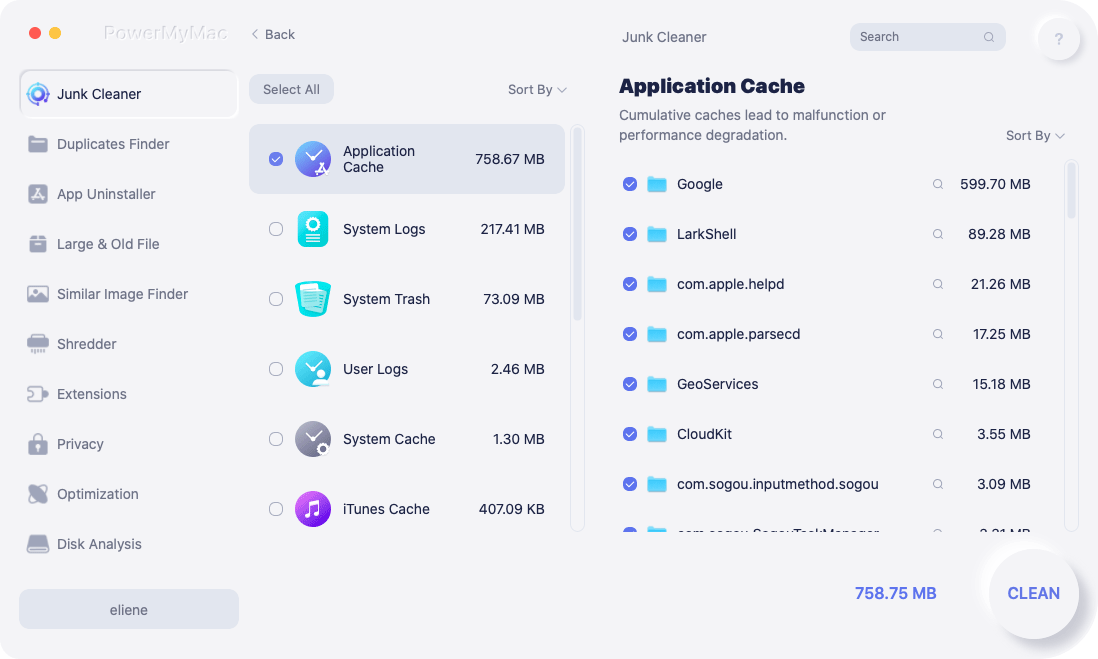
- Click Junk Cleaner. On the left panel, click the option for Junk Cleaner to clear up caches and other unnecessary files.
- Click the SCAN button to start locating all the junk files in the system.
- Preview And Select Files. Now, preview the files that will be displayed as a list. You can select the files you want to delete. You can also “Select All” to maximize the removal of unnecessary files in the system.
- Click CLEAN. Now, click the Clean button in order to start the cleanup process.
- Wait Until the Process Is Complete. Wait for the process to be done. The tool will say “Cleanup Completed” once the process is finished.
Part 3. Manual Steps to Clear Lightroom Cache on Mac or Windows
Here are the steps to manually clear up Lightroom cache on your computer:
- Launch Lightroom on your computer.
- Go to the Edit menu on your Windows computer. On Mac computer, click the menu for Lightroom.
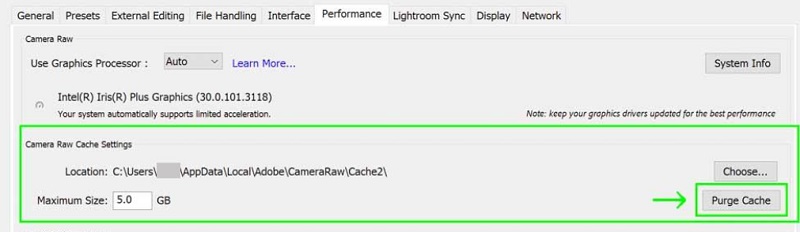
- After that, press Preferences and choose the tab for Performance.
- Click Purge Cacheon both “Videos Cache” and “Camera Raw Cache” on it.
To delete the Smart Previews and Previews cache on your Windows computer, visit the following locations and delete the contents of it:
-
C:\Users\[NAMEOFUSER]\Pictures\Lightroom\Lightroom Catalog Previews.lrdata -
C:\Users\[NAMEOFUSER]\Pictures\Lightroom\Lightroom Catalog Smart Previews.lrdata
On the other hand, to delete the Smart Previews and Previews cache on the Mac computer, visit the following locations and clear Lightroom cache:
-
/Users/[NAMEOFUSER]/Pictures/Lightroom/Lightroom Catalog Previews.lrdata -
/Users/[NAMEOFUSER]/Pictures/Lightroom/Lightroom Catalog Smart Previews.lrdata
Before deleting these files, it is necessary for you to quit the Lightroom application on your Windows or macOS computer. In this way, the files can be deleted without errors. You can empty the Trash or the Recycle Bin for Windows afterward. Once that is done, simply restart your computer for a full deletion of the cache.
Part 4. Conclusion
This guide has given you the top ways to clear Lightroom cache on your computer. We have talked about the actual steps you need to follow for it. We gave the manual ways to do it on both Windows computers and macOS machines.
Finally, we also talked about the automatic method of clearing up the cache. To do that, you can use PowerMyMac which is essentially a great tool to clear up junk files and optimize your Mac machine. Grab the tool today!

