


If you are using Mac then it is more likely that you have also tried or you are still using Apple’s Mail App. If so, then you know that upon using this, you are also losing a lot of gigabytes in your storage space. This is because once that you use the Mail apps, it will more likely cache all the emails and email attachments that you are receiving. A large number of caches in applications and mails could slow your Mac.
Here, we are going to show you how you can clear mail cache Mac on your Catalina or other versions because we know that this is such a waste of space to slow your Mac. This is too irritating especially if you have a Mac that has a low space for your storage.
How to Clear Mac Mail Cache?
Checking the steps below to clear your Mac mail cache:
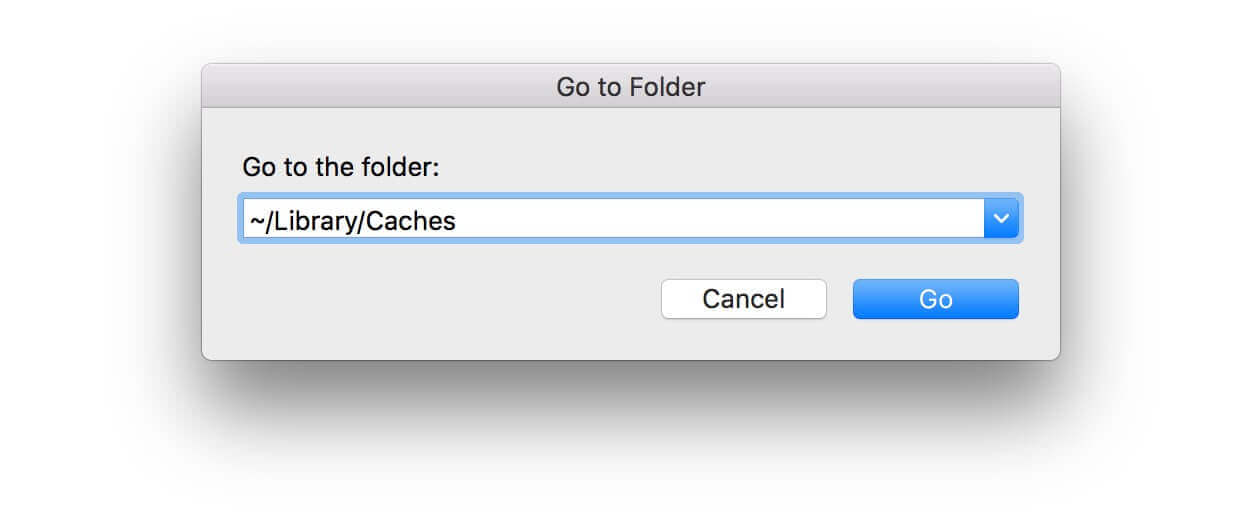
- Launch Finder on your Mac.
- Click on the GO menu, then choose Go To Folder.
- Then type the following:
~/Library/Mail/V2and press on the Enter key. - After that, right-click or do a control-click on the folder that has the name of your email account.
- From there, simply choose “Move to Trash”.
- After that, simply empty your trash. This way, you will be able to save more of your storage space on your Mac.
Another auto way to free your hand and energy is by using a powerful tool, PowerMyMac can deeply scan all the junk files including mail cache for you to delete, with just several clicks!
People Also Read:Top 2 Ways to Remove Mac Purgeable SpaceHow to Speed Up Your MacBook?
Contents: Part 1. How to Check Mac Mail Storage?Part 2. Can You Clear Mail Cache on a Mac?Part 3. What Is The Fastest Way to Clean up Mail Cache on Mac?Part 4. How to Manage Mail App Storage on Mac?Part 5. Conclusion
Part 1. How to Check Mac Mail Storage?
How to check and clear mail cache on Mac? Keep in mind that every user actually has a Mail directory in their Library folder. You can find this if you try to access ~/Library/Mail or /User/NAME/Library/Mail. Accessing this will lead you to where your Mail apps put on all their data for every user.
Here is another way for you to check your space mail.
- You can also try to access Finder and then click the “Go” button.
- Then click on the “Go to Folder”.
- After that, type in ~/Library into the empty field and then press on the Enter key.
- Then locate the Mail folder.
- Once that you have located the folder, right-click or Control-Click it.
- Then, choose the “Get Info” option.
- From there, you will be able to see how much space was used by your Mail apps.
How to Delete Mail Storage on Mac?
Follow all the steps below to delete the "Mail" application storage on your Mac:
1. Delete large mails or mails with attachments. You can select "Sort by" under "View", and then select "Size".
2. Remove the attachment you saved before. Select "Message" then "Delete Attachment", this will delete the message remains in the mailbox and the attachment.
Note: For IMAP accounts, please download attachments first, or the attachments will be removed from the mail server and cannot be recorvered.
3. Empty attachments in your trash can. Your most recently deleted message is in the Trash, but it has not been deleted from the mail server. Choose "Mailbox" then "Delete Deleted Items" and choose to delete them from all your accounts or specific accounts.
Note: For POP accounts, you can choose "Preferences" under "Mail", click "Accounts", select an account, click "Advanced", and then select other options from the pop-up menu under "Remove copy from server after retrieving a message". This can lower the time of the emails and attachments' copies remainming on the mail server before being deleted.

Part 2. Can You Clear Mail Cache on a Mac?
Yes, you can clear the Mail cache on a Mac, and it’s generally safe to do so. Clearing the cache can help free up storage space and resolve issues like outdated data or slow performance in the Mail app. Here's how it works:
- Cached Data: Mail stores cached files such as attachments and messages for quicker access.
- Automatic Regeneration: The Mail app will automatically re-download and recreate the cache as needed, so clearing it won’t delete your emails or account information.
- Close Mail App: First, make sure the Mail app is closed.
- Open Finder: Click on "Go" in the Finder menu bar and then select "Go to Folder."
- Navigate to Mail Cache Folder: In the "Go to Folder" dialog, type: ~/Library/Mail/. Press Enter.
- Delete Cache Files: Inside the Mail folder, look for subfolders with names like V7, V8, or V9 (the number varies depending on your macOS version). Open these subfolders and look for a Bundles or Data folder. This is where cache data is stored, such as attachments. You can delete these folders to clear the cache.
- Restart Mail: After clearing the cache, reopen the Mail app. It will automatically rebuild the necessary cache files.
Part 3. What Is The Fastest Way to Clean up Mail Cache on Mac?
You may want to remove the Mail cache files in the fastest and easiest way. That is why what is need is a powerful tool that will give you the ability to delete mail storage on Mac including mail caches, emails attachments that you have your Mac.
And what is highly recommended by many people is the PowerMyMac from iMyMac. It can help you in speeding up your Mac by removing all old apps as well as the junk files in your Mac in a safe and quick way to save more of your storage space.
PowerMyMac can also help you locate all of your photos and even unneeded email attachments on your Mac, as well as remove your old iTunes backup and multi-languages that you no longer need on your Mac.
Now, for you to know how to use the PowerMyMac to clear mail cache on Mac, we have here a step by step guide for you:
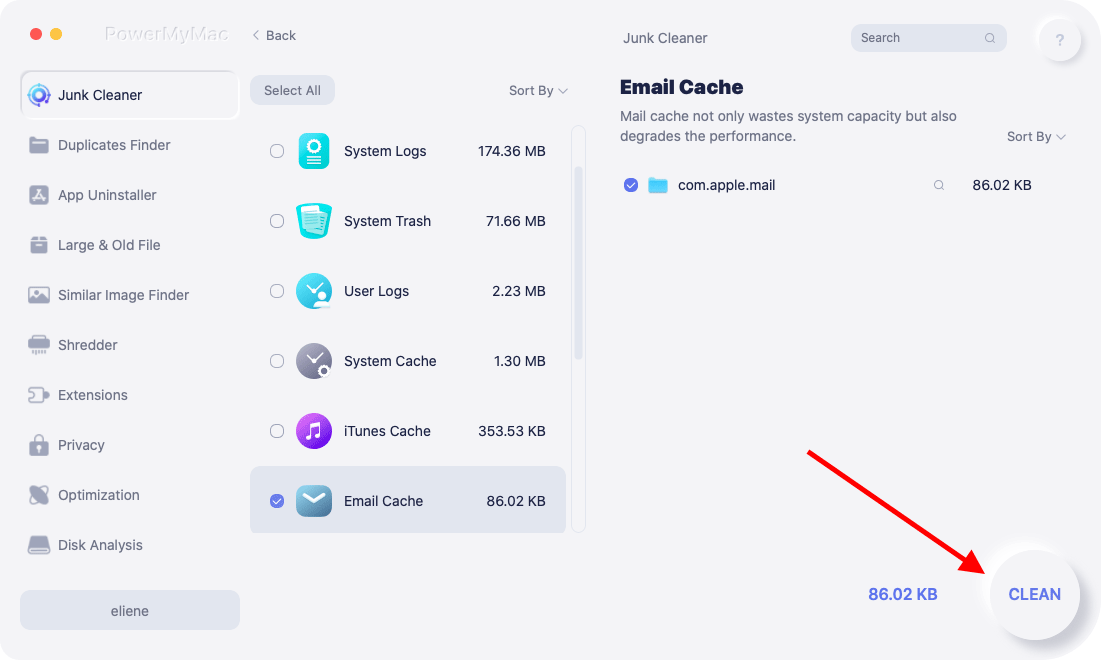
- Download the PowerMyMac from its official website, then have the PowerMyMac installed and launched on your Mac.
- Choose “Junk Cleaner” on the left column, then begin to scan all the junk files on Mac.
- Once that the scanning process is complete, PowerMyMac will show you all the junk files in a category.
- You need to choose the “Email Cache” category since you want to remove the email caches.
- Then click on the “CLEAN” button to clear mail cache on Mac.
Part 4. How to Manage Mail App Storage on Mac?
Decrease the Usage of Space of Your Mail apps
Besides to clear mail cache on Mac, you need to do other things to manage your Mail storage since the mail folder grows real fast. This is because the mail app continuously downloads all of your email attachments and have them all stored on your Mac. This may end up losing all the storage space on your Mac.
Since the option to control the size of your email cache by changing the “Keeping copies of messages for offline viewing” to “Don’t keep it” was already removed by Mac, now what you can do is to change options by telling Mail not download attachments automatically:
- Launch the Mail app, click on the Mail menu.
- Then click on Preferences.
- After that, click on the Accounts icon and then choose the account that you would want to change its settings.
- Then click on the “Advanced” tab and then uncheck the “Automatically download all attachments”.
Once that you are done with this, all of your email attachments will not be automatically downloaded on your Mac. They will all just be stored online until such time that you see them.
Use Some Alternative to Your Mail
You can also stop using your Mail app to make sure that it will not download any of your emails and email attachments again. After that, you can just simply clear mail cache on Mac.
You can also try to consider using other email services on the web like Gmail on the web or some email clients on your Mac’s App Store that will let you store fewer emails even if you are offline.
Now, for you to disable the use of your Mail app, all you have to do is to follow the steps below.
- Launch your Mail app, then click on the Mail menu.
- After that, choose Account.
- Once that you are under the account, uncheck the account that you do not want to use anymore on your Mail.
- From the time you disable this, you will no longer have any downloaded emails from the account that you have removed.
You can also try to disable your email account so that you will no longer receive any emails on your Mail app but they will still be stored on your offline cache. From here, all you have to do is to delete the folder.
And here are the steps:
- Launch Finder on your Mac.
- Click on the GO menu, then choose Go To Folder.
- Then type the following:
~/Library/Mail/V2and press on the Enter key. - After that, right-click or do a control-click on the folder that has the name of your email account.
- From there, simply choose “Move to Trash”.
- After that, simply empty your trash. This way, you will be able to save more of your storage space on your Mac.
In case you have more than one account and you would want to remove all of them, then you should delete all the folders that correspond to all the email.
Once that you are done, all of the copies of your mail will then be removed but do not worry because they will be stored in your email server and you can still access them online.
Part 5. Conclusion
There are really several ways to clear mail cache on Mac. Since because Apple had removed a very useful option for you to deal with your email attachments, you will need a different tool with this.
That is why we have the iMyMac PowerMyMac just for you. This program will help you in removing all the email attachments that you have on your Mac to save more storage space and at the same time, the speed of your Mac will become faster.


Gregory2023-06-14 11:32:51
I would NOT tell users to delete the ~/Library/Mail/V2 (V#) folder because there are very important files in there that either support the Mail app or is a personal setup preference within the Mail app such as signatures. If the V# folder is deleted, one may find him/herself losing more than just cache files. Apple has changed the way the Mail app stores its cache files from older systems (macOS 10.13 and earlier) to their latest systems (macOS 10.14 and later).
Miguel2023-03-22 08:37:58
I have been using a script for cleaning the mail but after updating to Ventura the system tell me that is "unable to open database". This was easy to solve with the previous System Preferences, you only tu have to give permission for accessing to the full disk, but with the new System Preferencia I am not able to know how to do that. Do you have any idea about it? Thanks.
Thomas2023-03-17 10:06:22
It is very dangerous to delete mail folders content like V2 or any similar folder like V10 because very probably deletes all your email as well. If you start Mail the next time they will be deleted on the mail server, too, and are lost forever.