


When it relates to the system cache, removing data in any of Mac's caches may be tricky business if one does not even understand what they're doing since it risks mistakenly erasing files that keep your Mac running smoothly. The user must clear WPS Cache in order to debug.
The finest option for creating, editing, and sharing PPT, Excel, Word, and PDF documents is WPS Office. Versions for Computers, such as Mac, Linux, Windows, etc., are accessible. Android and iOS have mobile apps.
If your Mac or WPS office is performing badly, you may want to test whether clearing the cache resolves the problem. After restarting the Mac, the problematic software, and maybe removing and installing the application again, this is most often the final outcome.
Contents: Part 1. Can I Clear WPS Office Cache?Part 2. How to Erase WPS Cache on Mac Quickly?Part 3. Manual Steps to Remove WPS Cache from MacPart 4. Conclusion
Part 1. Can I Clear WPS Office Cache?
If you're considering anything so radical, you should definitely wipe your Mac and run a fresh installation of macOS rather than deleting all the data inside your cached files. You shouldn't remove all of these cached files since some of them are required for your Mac to function smoothly. You run the risk of breaking anything if you arbitrarily remove or clear WPS cache files for instance.
Moreover, clearing the cache connected to a program might lead to problems. Some programs store crucial user data in cache files and might not function without it. The fact that you can restore your Mac to the condition that it was in when that began messing with it, or better yet, at the most, put the cache data back in the folder which you have erased them from, is a strong incentive to make a copy before you delete WPS cache or even in your Mac.
We advise you to clear WPS cache files on your Mac that are related to programs or when you're not actively using it.

Part 2. How to Erase WPS Cache on Mac Quickly?
If you haven't used a piece of software or an item on your Mac or Windows computer for a time, iMyMac PowerMyMac gives you the option to delete it from the system altogether. You may be able to learn how to remove WPS cache on your Mac by using the PowerMyMac Junk Cleaner that is included with iMyMac. As a direct result of this, you will have access to a bigger amount of storage space. In order for you to clear WPS cache on Mac quickly and easily, PowerMyMac Junk Cleaner will also guide you through the process step by step.
- Choose SCAN out from the options of a Junk Cleaner program on either your Mac or your PC to look for objects that are using an excessive number of random-access memory (RAM). Next, search for any files that aren't essential.
- Once the analysis is complete, select any files that aren't needed and then remove them from your computer.
- Choose the things you want to delete; removing all at once is accomplished by choosing all.
- Unwanted data may be removed instantly by selecting "CLEAN" once again from the menu. Once the cleaning is done, a notice that says "Cleaned Completed" appears. The entire number of storage memory in your computer which may be retrieved from storage alongside the quantity of ram that is currently being utilized is going to be shown. You will be able to remove more files if you choose "Yes" from the overview menu item found under the Displays menu option.

Part 3. Manual Steps to Remove WPS Cache from Mac
Take note of these steps if you want to manually clear WPS cache on your Mac:
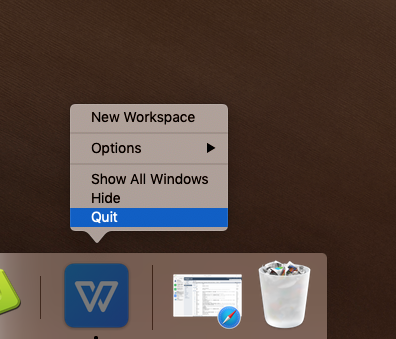
- Make sure that your WPS software is closed before attempting to erase its cache. This step is necessary in order to prevent any data loss. In the event that the application window is still visible, choose"WPS" from the primary menu bar and then click the "Quit WPS" option to close the program.
- To open the Finder, either choose the Finder icon in the Dock or the Finder icon on the desktop and then select "Finder" from the bar of menu options that is always shown at the very top of the screen.
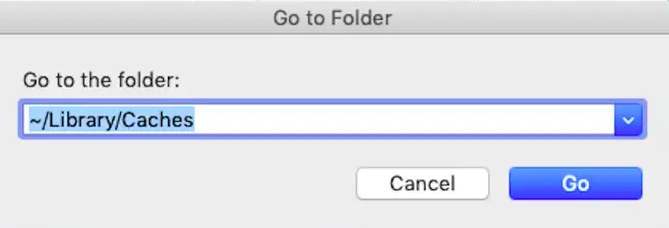
- The files in the Library may be accessed by selecting the "Go" menu link in the Finder window, selecting "Go to Folder", entering "
/Library", and then pressing the Enter key. - Find the WPS Office directory and get access to it by first browsing the Library directory's "Caches" folder and then going to the directory that you found there.
- Eliminate the files that have been cached: By choosing every one of the "WPS Office" files, you may send them all to the trash can.
- Empty your Trash: After moving the cache data towards the Trash, right-clicking the trash indication on the Dock and selecting the Empty Trash option from the context menu will permanently delete the files.
- Restarting your computer will help ensure that any and all information that has been cached will be deleted from memory.
You may be able to clear WPS cache on your computer at any time.
- Launch the Finder
- Just choose Go then Go in Folder.
- Just enter
Library/Caches/and then click the Go button. - Open each directory, and decide what should be deleted from it. You might filter the results with Data Modified to find out what has not been included in the most recent additions.
- Move cached files to the trash can by dragging them there.
- Make sure you clear out your garbage regularly by deleting the contents there.
Part 4. Conclusion
By removing cached files, it may be possible to gain a significant amount of storage space. In addition, clearing them can sometimes help your computer run more swiftly and without any problems. You might also try using cleaning programs to search for and eliminate unneeded files that are stored on your computer, like deleting Microsoft Teams cache. Make use of the PowerMyMac Junk Cleaner that was discussed in this post in order to swiftly clear WPS cache for your Mac.

