


Video tutorials are one of the best ways for you to be able to show presentations on other projects. It is also one way for some people to learn new things on a specific device, programs, and more. And if you are going to try on searching the internet, you will also be able to find that there are several recording and screen capturing tools that you will be able to use. However, they vary from what their functionalities are.
But the real question here is that how to record screen on Mac anyways? Well, if you would want to know on how you can record your screen on Mac, then this article is definitely for you. We are going to show you here ways on how you can do so. This way, you will be able to finish up your presentation or your video tutorial – if you are doing one.
TIPS:
Article GuidePart 1: Three Ways on Recording Your Screen on Your MacPart 2: How to Keep Your Mac Clean
Part 1: Three Ways on Recording Your Screen on Your Mac
As we have mentioned earlier, we are going to show you three different ways on how you can certainly record your screen on your Mac.
Method #1: Record Screen Using QuickTime Player on Mac
There are actually a lot of Mac users who do not know that Apple was able to add a screen recording feature which you can actually found on your QuickTime Player in Snow Leopard. This feature will be able to help you in recording your screen on your Mac. Aside from that, you can also share your activities with other people.
For you to be able to know how this works, here is step by step method that you can easily follow.
Step 1: Go ahead and launch QuickTime Player on your Mac.
Step 2: And then, choose File.
Step 3: From there, go ahead and select New Screen Record.
Step 4: Then after that, you will be able to see a screening window on your screen. But before you go ahead and record your activities on your screen, you can go ahead and click on the arrow down button located at the right side of the window for you to adjust some settings.
Step 5: Then after adjusting some settings, you can now go ahead and simply click on the record button for you to be able to start recording your screen on Mac. You will also be able to have two options on how you would want to record your screen. It is either you record your whole screen or you can also choose to record just a small portion of it.
Step 6: Then, once that you are done recording your screen, you can simply click on the Stop button to stop the recording. After that, you will then be able to preview and export the video that you recorded.
NOTE: You can also record audios and movie using the QuickTime Player.
Method #2: Record Screen on Mac Using Any Video Converter Ultimate
Aside from the QuickTime Player, there is another software that you can use for you to be able to record your screen on your Mac. This is by using the Any Video Converter Ultimate. This software will be able to help you in recording the screen on your Mac. Using the Any Video Converter Ultimate, you can also be able to record streaming videos, online videos, live sport, and so much more. You can all do this at a fast speed that comes with a good quality of audio and video.
For you to know how you can record screen on Mac using the Any Video Converter Ultimate, here is what you need to follow.
Step 1: Go ahead and launch the Any Video Converter Ultimate on your Mac.
Step 2: And then after that, go to the “Record Screen” section for you to be able to choose the record mode.
Step 3: Then go ahead and choose the Capture Parameter on the right pane.
Step 4: Then go ahead and click on the Start Record button for you to be able to start recording your screen.
Step 5: For you to be able to stop the recording, there are actually three options that you can use.
- You can choose to click on the Stop Recording button from the Record Screen list.
- You can choose to click on the Stop button from the Task-Pending-Recording list.
- You can also use the shortcut method which is by pressing the Shift + Command + 1 key on your keyboard.
NOTE: The Any Video Converter Ultimate also allows you to covert the video that you have recorded into other formats like WMV, MP4, AVI, 3G2, MP3, FLV, MPG, 3GP, WMA, SWF, and more on your Mac. 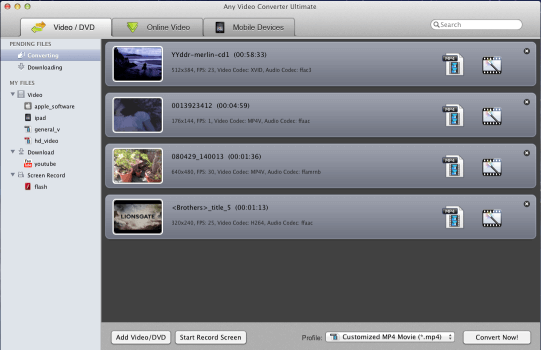
Method #3: Record Screen on Mac Using Camtasia Mac
The last thing that you can use for you to be able to record screen on your Mac is by using the Camtasia. This software is designed by the TechSmith company. This is one tool that you can use that has the best combination when it comes to screen recording and as well as on video editing.
The Camtasia is said to be just a simple screen recorder. It also gives you an additional tool that you can use for you to be able to have your recorded video customized and edited on your own. The Camtasia is considered to be as the best screen recorder that you can use. However, it also costs more than the first two that we have mentioned earlier.
Now, for you to be able to know on how you can record screen on Mac using the Camtasia, here is a simple and easy guide that you can follow.
Step 1: Go ahead and launch the Camtasia on your Mac and you will be able to see the settings window.
Step 2: Then, go ahead and select the preset region of your video recording. Then go ahead and simply click on the Record button located on the right side of the window. This will allow you to view and preset the recording region.
Step 3: Then go ahead and start recording your screen activity by simply clicking on the Rec button.
NOTE: Once that you are actually done with recording your screen on your Mac, Camtasia will then take you to the video editing window. From there, you can go ahead and edit the video by choosing some special effects, trimming, cutting annotations, and a lot more.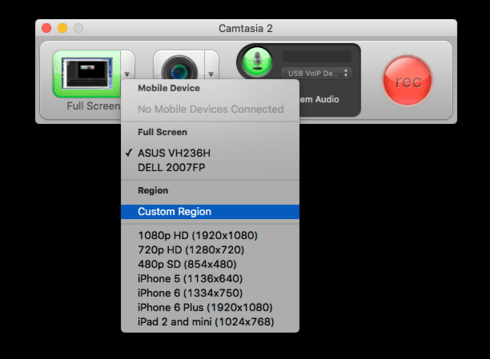
Part 2: How to Keep Your Mac Clean
As you are using any of the programs that we have mentioned above and recording screen activities on your Mac, then you will then need more space for you to save those videos of yours. So, for you to be able to clean up your Mac and remove all the things that you no longer need, then you will be needing the perfect program that can surely do the job.
You know, having your Mac maintained will help you in having the best experience with using any of the programs that were mentioned. And the tool that you can count on when it comes to cleaning up your Mac and getting more space is by using the iMyMac PowerMyMac.
The iMyMac PowerMyMac is one of the most effective tools that you can use for you to maintain the performance of your Mac and as well as on freeing up space on your Mac. This is a powerful tool that you can use in order for you to optimize your Mac as well.
Now, in order for you to clean up your Mac and free up some space, here is a quick step by step method that you can follow.
Step 1: Download and Install
First, you have to download the iMyMac PowerMyMac from our official website. And once that the download is complete, go ahead and have it installed on your Mac.
Step 2: Launch the Program
After successfully downloading the program, go ahead and launch it. On the main interface of the program, you will be able to see the system status of your Mac. This status consists of your Memory usage, RAM usage, and your Disk Space. 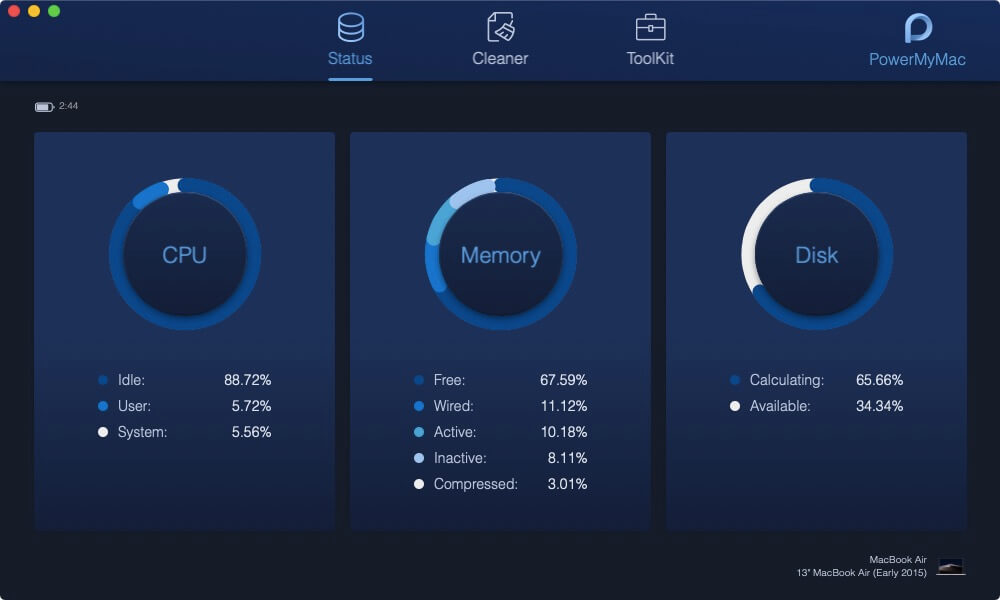
Step 3: Choose A Module
Also on the main screen, you will also be able to three different modules. The Status, Cleaner, and Toolkit. Now, for you to remove all unwanted files from your Mac, all you need to do is to choose the Cleaner module.
Step 4: Select An Option
From the Cleaners module, the PowerMyMac will then show you different options that you can choose from to clean up your Mac. From that list, just go ahead and choose System Junks for a start. This is where you will be able to clean up all of your System Cache, Application Cache, System Logs, User Logs, Localization.
Step 5: Scan Your Mac
After choosing System Junks from the list, the iMyMac PowerMyMac will then ask you to scan your Mac. From here, all you have to do is to click on the Scan button. Then the scanning process will then start. You will see a full circle on the left side of your screen once that the scanning process is complete.
Step 6: View the Scanned Result
Once that the scanning process is complete, you will then be able to see the scanned result. For you to be able to do this, all you have to do is to click on the View button.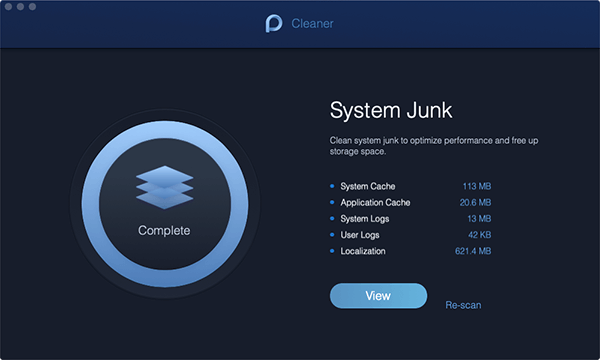
Step 7: Choose the Files to Delete
The PowerMyMac will then show you a list of category list shown on the left side of your screen. From there, go ahead and choose the category that you want and click on it.
Once that you have chosen a category, files under it will then be shown on the right side of your screen. From there, go ahead and choose all the files that you want to remove from your Mac.
Step 8: Clean Up Your Mac
After choosing all of the files that you would want to remove from your Mac, go ahead and click on the Clean button located at the lower right corner of your screen. Then confirm the cleaning process by clicking on the Confirm button from the pop-up box that will appear on your screen.
The cleaning process will then start so all you have to do is to patiently wait for the iMyMac PowerMyMac to finish up the cleaning process. And once that it is done, then all of your caches and logs will then be completely removed from your Mac and that you have free up some of your space.
Using the iMyMac PowerMyMac, you can also do a lot of things and remove a lot of unwanted files or applications from your Mac that you no longer use. You can also uninstall apps and clean up all the files that come with the application. You can also remove all of your Large and Old files, Duplicate Files, Manage your files, and so much more.
All of the things that you need to optimize your Mac is all here with the iMyMac PowerMyMac. This is because the iMyMac PowerMyMac is considered to be an all-in-one tool that is meant for you to give your Mac a better performance, and for you to be able to have more storage space on your Mac as well. 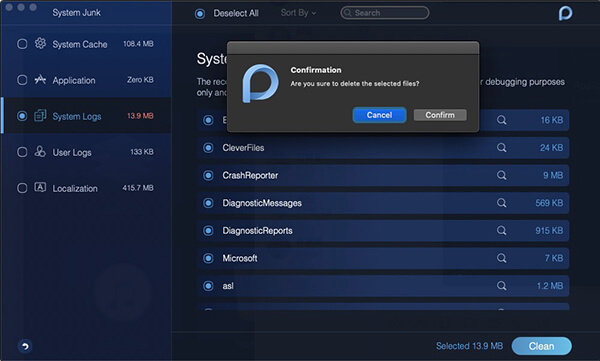
As you can see, recording your screen on your Mac is actually a very easy job that you can do. Plus, this will allow you to have a better presentation of what you do on your Mac. This is also one way for you to educate other people easily by visually showing them some simple tips and tricks that they need to do on their Mac.
And also, do not ever forget to clean up your Mac so that once that you do another recording, you will still be able to use your Mac smoothly and have a better experience in using it.

