


If you have installed MAMP on your computer, you may want to uninstall MAMP Mac. Maybe you want to go for another server environment with more features. Or maybe, you just want to free storage space by removing some unwanted apps from Mac. This article will talk about manual and automatic methods of removing it on your computer. Then, we will also teach you how to reinstall it again in case you may need it.
Contents: Part 1. Where Is MAMP Installed on Mac?Part 2. How to Fully Uninstall MAMP in Mac?Part 3. How Do I Uninstall and Reinstall MAMP On Mac?Conclusion
Part 1. Where Is MAMP Installed on Mac?
MAMP is one useful local server environment tool that supports development and testing purposes. On a Mac, MAMP (Macintosh, Apache, MySQL, PHP) is typically installed in the /Applications directory. Here’s how you can find it:
- Open Finder.
- Go to the Applications folder (you can do this by selecting "Go" from the top menu and then "Applications" or by pressing
Shift + Command + A). - Look for a folder named
MAMP.
Inside the MAMP folder, you'll find all the necessary components and directories, including htdocs (where you can place your web files), bin, and other essential files for running the MAMP server.
Part 2. How to Fully Uninstall MAMP in Mac?
There’s actually an easier way to uninstall MAMP on Mac. Third-party uninstallers are available to help you get rid of apps completely. The best one is iMyMac’s PowerMyMac tool. Why is this so? Well, the software allows you to remove everything associated with the app, including caches, logs, and other related files.
Here are the steps to use PowerMyMac to uninstall MAMP on Mac:
- Grab the tool called PowerMyMac from imymac.com.
- Install it and launch it on your computer.
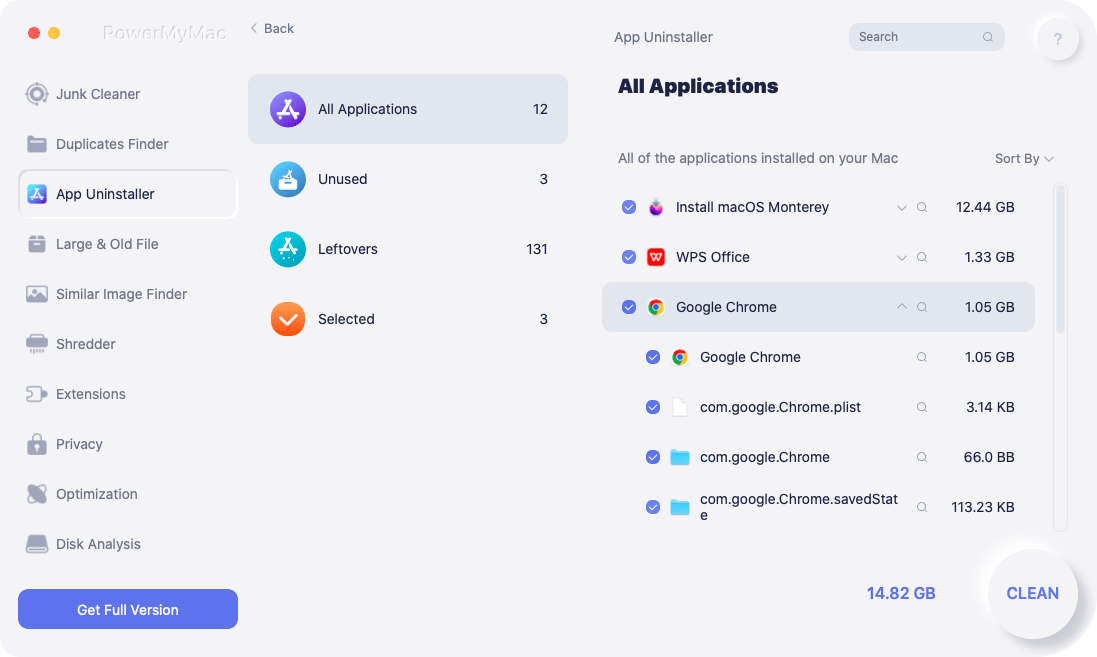
- On the left panel, look for the App Uninstaller mini tool. Click this tool.
- Now, click the SCAN button at the lower middle portion. The tool will locate all apps installed on your Mac.
- To uninstall MAMP, locate the MAMP tool and click it. Make sure all the associated files and folders are selected.
- Now, press the button called CLEAN at the lower portion.
- Wait until PowerMyMac confirms that the uninstallation is done.
Now, that’s the easy way to uninstall MAMP from Mac. You’ll notice that you won’t go through files deep on your Mac to do the process.
Part 3. How Do I Uninstall and Reinstall MAMP On Mac?
So, this section will teach you how to uninstall MAMP on Mac through the manual method. This method involves using the uninstaller given by MAMP for Mac computers. In addition, you have to remove associated files that will remain on your Mac.

Check out the steps below uninstall MAMP on Mac through the burdensome manual method:
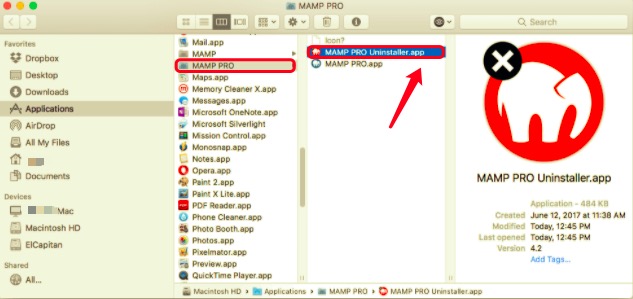
- Visit the Application folder on your macOS computer.
- Locate the MAMP PRO folder.
- Within that folder, locate the app for the uninstaller. It is named as
MAMP Pro Uninstall.app. - Open the Uninstaller. After that, press Uninstall.
- Input your admin password in order to start the uninstallation process. Now, files and folders associated with MAMP Pro will be removed. Its associated MySQL databases will be deleted as well.
- Now, go back to the folder for Applications.
- Delete the MAMP folder by moving it towards the Trash.
- Now, press the buttons
CMD,SHIFT, andGaltogether. - In the search bar that appears, input
~/Library. - Press Go.
- Locate all the folders and files related to MAMP. Delete them all by moving them towards the Trash. Typically, these can be found in:
~/Library/Application Script~/Library/Preferences~/Library/Container~/Library/Caches~/Library/Application Support
- Make sure the trash is emptied after you have deleted all these files and folders.
- Then, reboot your computer to make a complete process.
Reinstall MAMP On Mac
After you have completed uninstall MAMP on Mac, you may want to reinstall it back again. Make sure your computer meets the system requirements of the app. The system requirements are as follows:
- macOS Sierra 10.12 or higher versions
- A user account within your Mac computer that’s part of its actual Admin Group. This can be checked with System Preferences. On that section, click Users & Groups to ensure that the account is part of its Admin Group
Now, follow the steps below to install it again:
- Go to info and grab the MAMP & MAMP PRO installer. Download the package on your Mac.
- Now, open the
MAMP_MAMP-PRO_6.x.pkfwithin your folder for Downloads. Double click this file. - The installation window will appear. Follow the prompts on the screen to complete the installation.
- Now, a folder named MAMP can be found within your Applications folder. Make sure this folder isn’t renamed. MAMP PRO app will be found in the same folder as well.
Now, you have finished the process of uninstall MAMP on Mac. After that, you have learned how to reinstall it back again. Fortunately, the uninstallation process, the automatic method through PowerMyMac is a great thing to do. And you can benefit from other tools included in the main package as well.
Conclusion
This article has discussed how to uninstall MAMP on Mac. Of course, the manual method takes a lot of time and effort. Plus, you have to dig into all the folders of your Mac computer just to locate the associated files. So PowerMyMac is here to help you find the app and all related files automatically to remove them easily so that you can save lots of energy.
In the latter part of this article, we taught you how to reinstall your MAMP app on the Mac computer. In case you need MAMP or MAMP PRO in the future, this guide can be useful. Or, if you simply want to uninstall MAMP due to a faulty installation process, you can follow this guide as well.

