


Everybody wants to ensure that their data is safe. One thing you can do to protect your data is by creating a backup. Fortunately, we have iCloud for Mac computers. Some have used IDrive, which is technically not created by Apple. So, if you use iCloud already, you may want to uninstall IDrive Mac.
Since iCloud offers automatic backups and has a lot of features, you can simply disregard IDrive. Or, if you want to still use the platform but encounter a faulty installation, you may want to uninstall IDrive and then reinstall it again.
Fortunately, you’re in the right place. This guide will teach you how to remove IDrive from Mac. First, we will talk about the IDrive tool. Then, we will teach you the manual method of removing the app on your computer. Finally, we’ll give an overview of a bonus tool you can use.
Contents: Part 1. Does IDrive Work on Mac?Part 2. How Do I Remove IDrive from Mac Completely?Part 3. Conclusion
Part 1. Does IDrive Work on Mac?
So, do you want to uninstall IDrive on Mac? What is IDrive in the first place? We know that Mac has iCloud, so what is this other tool about?
IDrive is also a cloud storage service worked on Mac and targeted to both enterprises and end consumers. It enables its users to share files with family members, friends, and colleagues. You can put data into storage and it is saved in the cloud. After that, the files will undergo real-time syncing so they can be accessed through different devices such as Windows PCs, Android smartphones, Apple devices, and more.

Before you uninstall IDrive on Mac, you have to know that it still has great functions and features. It enables sharing, access, and management of data and its backups. Plus, it helps protect against malware and ransomware. Some of IDrive’s integrated services include Linux backup, IDrive Express, Sync, and Disk Clone.
IDrive sets itself apart from competing products by giving you free service. This is a huge bonus because you don’t have to pay monthly or annual fees to get free storage. Plus, they don’t require a credit card to create an account. Like iCloud, this tool offers free storage worth 5GB. You have the option to increase the storage by paying a certain amount.
Part 2. How Do I Remove IDrive from Mac Completely?
There are several ways to do it. Of course, if you want it the manual way, you have to know that this will be tedious. IDrive didn’t come with an uninstaller. Plus, uninstalling apps from Mac is different compared to Windows. And before you want to uninstall the tool on your Mac, you must ensure that you really want to do it. And, you must have a copy of your files and folders located in the IDrive account.
But, if you really want to uninstall IDrive on Mac, follow the steps below:
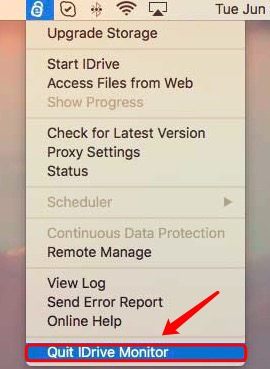
- Visit the menu bar. Click the icon for IDrive. After that, press the option to exit the IDrive Monitor.
- Launch Mac’s Activity Monitor. From there, choose IDrive Daemon. After that, press the icon for close. This is located in the upper right part of its interface. Then, reboot your actual Mac computer.
- Open the computer again. Visit the Applications Now, scan all the apps and locate the IDrive app. Make sure you drag this towards the Trash and drop it.
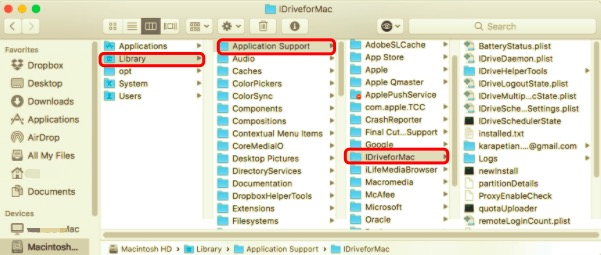
- Now, visit the Library folder of your Mac. To do this, launch Finder and visit Go. After that, click Go To Folder. In the window, type
~/Libraryand press the Go button. - Within the Library folder, locate all associated to manual uninstallation. Delete these files and folders. Typically, these can be found in the subfolder below:
~/Library/Preferences/com.prosoftnet.iDrive.plist~/Library/LaunchDaemons/com.prosoftnet.idrivedaemon.plist~/Library/Application Support/iDriveforMac
- Empty your Trash.
- After that, make sure your reboot your Mac to complete the process to uninstall IDrive on Mac.
Auto IDrive Remover on Mac
You can also uninstall IDrive by using a dedicated uninstaller tool. So what tool are we referring to? We’re talking about the best optimization tool for Mac computers, PowerMyMac.
In essence, iMyMac developed PowerMyMac as an all-in-one tool to help you optimize your computer and make it run faster. This can be done through its modules such as Master Scan, Privacy, Uninstaller, Duplicate Finder, and Toolkit.
Here, we will discuss the Uninstaller module. This module was developed to uninstall apps on Mac, and other apps as well. As a whole, the entire app, including its logs, caches, service files, and more, are removed from the computer.
Here are the steps to use PowerMyMac to uninstall IDrive on Mac:
- Grab the tool. First, get PowerMyMac and install it in your laptop or desktop.
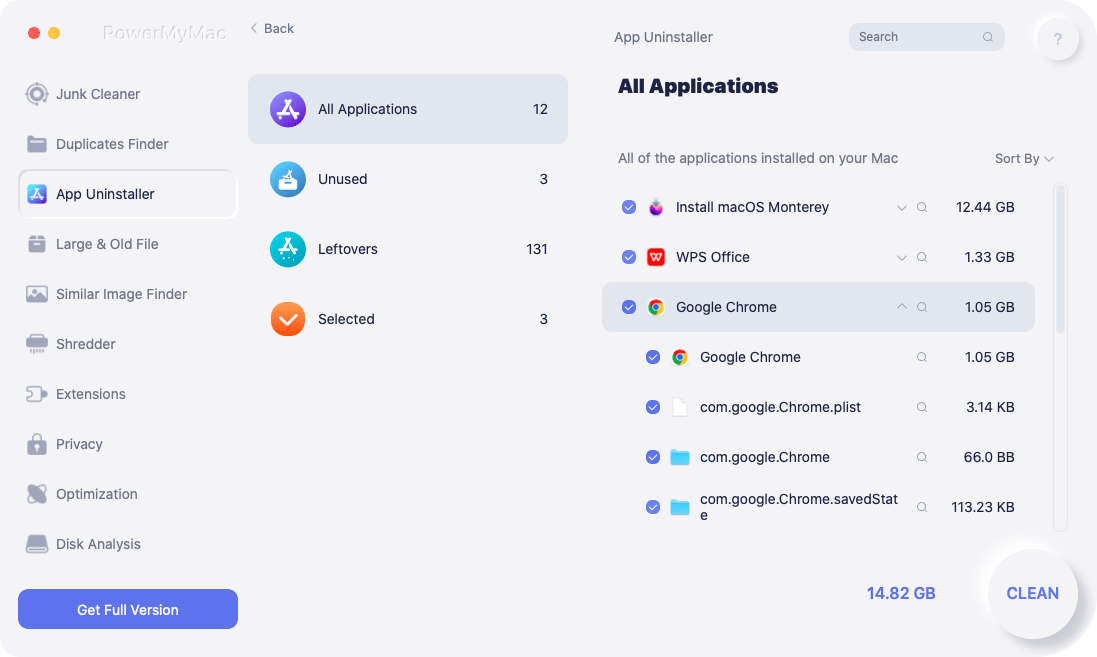
- Launch the tool. Open the tool or app. Then, click App Uninstaller on the left panel.
- After that, click the SCAN button.
- Select app. Now, select the app, in this case, IDrive, to delete it.
- Click the CLEAN button to start the uninstallation.
- Wait until the tool confirms that the uninstallation is done.
Part 3. Conclusion
This guide has given you the methods to uninstall IDrive on Mac. Remember that the manual method can be difficult to implement, especially if you don’t have that much technical knowledge. You have to go through important system files and folders. And, you can mistakenly delete system files crucial to the operation of your computer.
PowerMyMac is a great uninstalling tool for Mac developed by iMyMac. With this tool, you can easily uninstall apps, including IDrive, on your computer. Plus, it helps free more space on your device with other optimization tools. Grab PowerMyMac today!

