


SPSS is a data analysis program used by academics in a variety of industries. You can easily collect and evaluate your data because the interface may be adjusted. However, there are some complaints in regards to using the app. Many users keep on getting error messages when they try to run specific analyses. To solve this problem, they would choose to uninstall the app and reinstall or find another alternative software.
How to uninstall SPSS on Mac is a complex procedure that requires basic skills, but if you are a beginner and barely know how, you can follow this tutorial to completely remove unwanted apps from your Mac.
Contents: Part 1. Where Are SPSS Files Stored on Mac?Part 2. How to Uninstall SPSS Software on Mac Manually?Part 3. How to Completely Uninstall IBM SPSS on Mac?Part 4. How to Install SPSS on Mac?Conclusion
Part 1. Where Are SPSS Files Stored on Mac?
SPSS, now known as IBM SPSS Statistics, is an excellent software for interactive and batched statistical analysis. With an install package that is 800 MB in size, the said software will take up a significant amount of hard drive space on your Mac. Always remember to remove its install package once it has been installed.
When users are trying to remove SPSS from Mac, they find that even when they think they've completed the removal, related data and traces can still be discovered on your Mac.
So where the SPSS app is located and its related data and files? SPSS files are stored in the following folders:
- Applications folder
~/Library/Application Support~/Library/Caches~/Library/Preferences
To know the different ways on how to uninstall SPSS on Mac, please read the instructions below.
Part 2. How to Uninstall SPSS Software on Mac Manually?
Although Mac OS X does have its own uninstalling tool, you can manually do the software removal. Because the SPSS generates a large number of data and files on your Mac, you must be careful and expect plenty of time to complete such manual cleanup. Below are the instructions on how to uninstall SPSS on Mac manually.
- Check to see whether SPSS still is active on your computer and shut it down.
- Click Go on the top portion menu of the Finder, then click Applications.
- Find and open the IBM directory, and then reveal the contents of the package to see just how many documents are in it.
- Place the entire contents of the folder in the Trash.
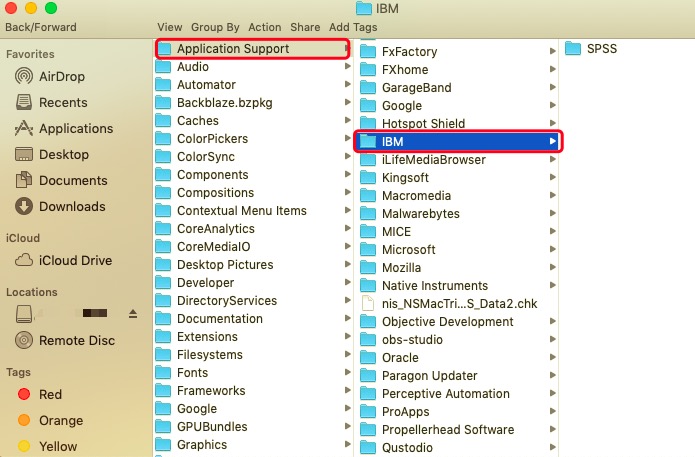
- Then, select Go which can be found on the Finder's menu bar top portion, and click Go to Folder...
- Enter "
~/library/" within the box and press the Return button. - Double-click the
Application Supportto open it, then remove the SPSS folders and files. - Continue to explore and inspect the Library's
CachesandPreferencesdirectories, as well as the SPSS app's documents and residues. - Select Empty Trash or Secure Empty Trash from the context menu once you right-click the Trash.
- Restart the computer.
If certain files are unable to be located and removed from your Mac, the partial removal may prevent a future successful re-installation.
Part 3. How to Completely Uninstall IBM SPSS on Mac?
You may use PowerMyMac's App Uninstaller to assist you in completing this program removal. This automated uninstaller can search out all linked components and remove them swiftly using its robust algorithm within uninstalling function. This software may also be used to remove any apps from the Mac OS X that you don't wish to keep.
Follow the guidelines below to know how to uninstall SPSS on Mac automatically:
- Quit the SPSS app first and any other processes that are running on your Mac.
- Before you can use the application, you must first download and install it.
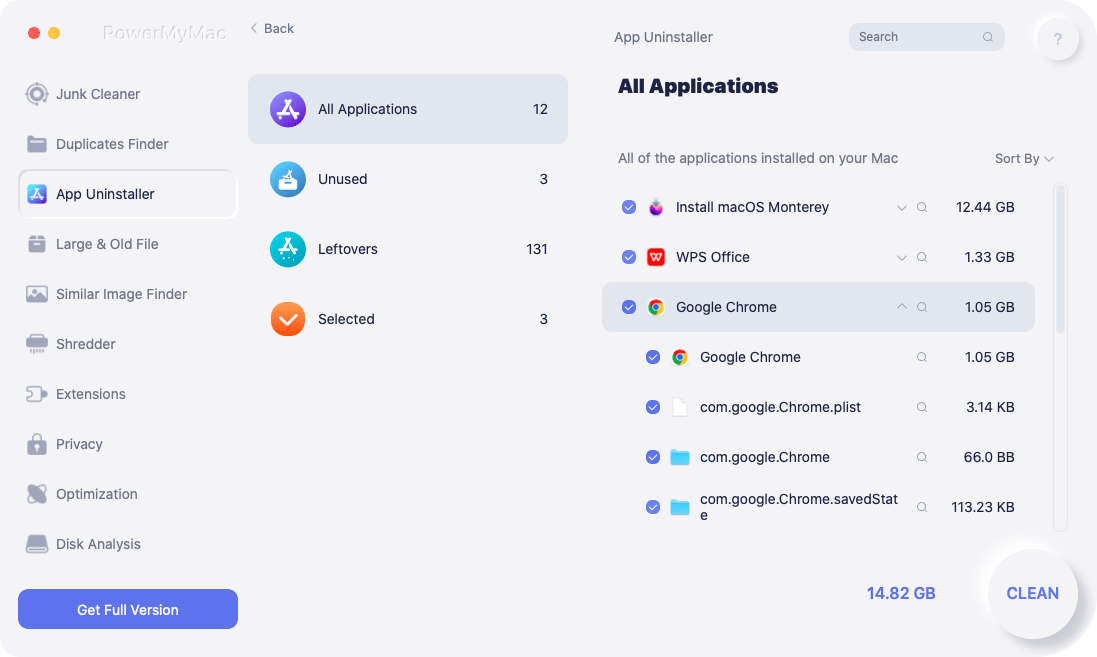
- After you've clicked the App Uninstaller tool, do a scan. Wait for the scanning process to finish.
- A list of programs will show on the right side after scanning. Type the name of the SPSS application into the search box to discover it quickly. The documents and folders linked with the software will display below when you choose the app.
- Choose all of the files you want to get rid of and then select Clean to complete the uninstallation. Wait for the "Cleanup Completed" pop-up dialog to appear. To finish the operation, restart your Mac.
Part 4. How to Install SPSS on Mac?
You may want to install SPSS on your Mac again after uninstallation, just follow these steps:
- Go to the IBM SPSS website or your institution's software portal. Download the Mac version of the SPSS installer.
- Go to your Downloads folder and double-click the SPSS .dmg file to open it.
- In the window that opens, double-click the SPSS installer icon. If prompted, enter your Mac administrator password.
- Follow the on-screen instructions to complete the installation. Choose the installation location and agree to the terms.
- After installation, launch SPSS and enter your license key if prompted (provided by IBM or your institution). Alternatively, choose the trial version if applicable.
- Once installation is finished, SPSS should be ready to use on your Mac.
Conclusion
Even with other apps, it may be confusing where to start, especially if you are a beginner. This article will help you and guide you on how to uninstall SPSS on Mac properly. Many users make mistakes by just dragging the app on the Trash, they would call it finished and complete removal already.
Knowing how it affects the system, others may not know about it. In removing the app, there are two ways: manual and automatic removal. A manual approach would mean doing everything on your own, which is more complex since automatically uninstalling SPSS would require a professional tool that can quickly and safely remove the app effortlessly.

