


Are you looking ways on how to uninstall Thunderbird on Mac? Thunderbird, like any other piece of software, has restrictions in terms of the maximum quantity and size of files that may be represented.
There's a lot of problems that the users of Mozilla Thunderbird encountered. Having no calendar or task list accessible to use. There are no drag-and-drop functions available, some functionalities are no longer supported and the user interface is outdated. More bugs and glitches such as clicking a subject line will send you to the wrong email and a temporary subject sometimes just disappears.
Contents: Part 1. Where Is Thunderbird Stored on Mac?Part 2. How Do I Uninstall Thunderbird on Mac Manually?Part 3. How Do I Completely Remove Thunderbird from Mac?Part 4. Conclusion
Part 1. Where Is Thunderbird Stored on Mac?
Thunderbird is stored in various locations on your Mac depending on whether you're looking for the application itself or its associated data files. Here's where to find them:
- Application Files
/Applications/Thunderbird.app
- User Data (Profiles, Emails, etc.)
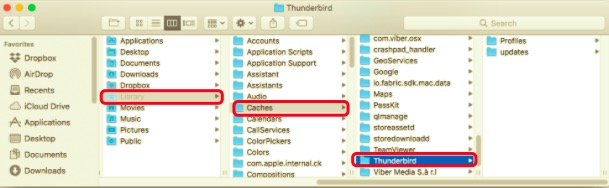
~/Library/Thunderbird/Profiles/. Each profile will have its subfolder, with a name like xxxxxx.default, containing all the user-specific data such as emails, address books, extensions, and settings.
- Preferences and Configuration Files
~/Library/Preferences/org.mozilla.thunderbird.plist
- Caches
~/Library/Caches/Thunderbird/
- Application Support
~/Library/Application Support/Thunderbird/
What Happens If I Uninstall Thunderbird?
Will I lose my emails if I uninstall Thunderbird? Because it keeps the profile and program files separately, you may uninstall Thunderbird on Mac without losing your messages or settings, and if a Thunderbird update fails, your information will still be available. IMAP emails are linked 'live' with the server where your emails are stored, it will only have an effect if you remove the IMAP emails inside Thunderbird.
To be clear, it's a big no-no to use Thunderbird to delete emails. Depending on how it is configured, the emails stored via webmail servers like Gmail will be removed as well.
It would be more advised to open Gmail in Chrome and confirm that all of your archived data is still on Google's servers (it should be). Then you may safely uninstall Thunderbird from Mac and remove all local data on your hard disk. And it is more recommended to back up your Thunderbird profile first, before any uninstallation.

Part 2. How Do I Uninstall Thunderbird on Mac Manually?
Every application that is launched produces service files on your hard drive. So, if you want to uninstall an unwanted app from Mac, you need also to erase all of its remnants. To accomplish the process on how to uninstall Thunderbird on Mac, you must manually locate and remove any files and folders bearing the Thunderbird app's name.
- To begin, close Thunderbird. Open the Applications folder, find app, right-click it, and choose Move to Trash. Empty the Trash by right-clicking its icon and selecting "Empty". Please note that all other files on your trash will also be permanently deleted so make sure to restore them before proceeding on this step.
- You may now erase the Thunderbird remnants from your Home folder. The app's service files are often kept in the secret Library folder.
- Open this folder to have access to it. Finder → Select Go on the menu bar → Click Go to Folder → in the search bar, type
~/Library/→ click Go. - In these folders, locate and remove the Thunderbird program's unnecessary service files:
~/Library/Thunderbird/~/Library/Caches/Thunderbird/~/Library/Preferences/org.mozilla.thunderbird.plist/
- It should be noted that, based on the application choices with Thunderbird, the service files may also be found in the following directories:
~/Library/Application Support~/Library/Logs~/Library/LaunchAgents~/Library/LaunchDaemons~/Library/StartupItems
- Examine these subfolders to see if there are any remnants and delete them. Then, to remove Thunderbird completely, empty the Trash bin.
Part 3. How Do I Completely Remove Thunderbird from Mac?
To uninstall Thunderbird on Mac completely, you need to delete its support files and components. If you are not that tech-savvy, you might be uncertain which files or directories belong to Thunderbird. Utilizing a third-party uninstaller to do this properly is much more recommended to avoid any error or problems from faulty uninstallation.
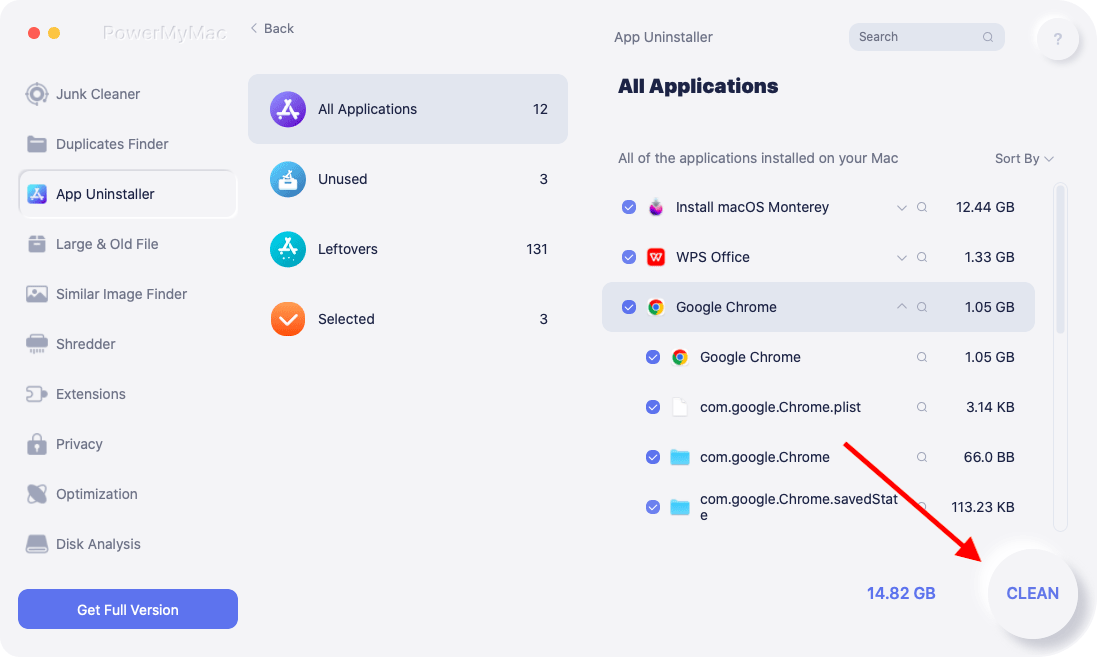
Alternatively, you may use PowerMyMac, a simple tool that makes things clear and uncomplicated. PowerMyMac has a user-friendly interface that allows even untrained users to remove unwanted apps and any associated data. Its innovative App Uninstaller Module is capable of quickly locating and safely removing any Thunderbird-related components in just several steps.
- Run PowerMyMac and choose the App Uninstaller.
- Click the SCAN button to locate all of the programs installed on your Mac.
- Locate and choose Thunderbird to remove.
- Click the CLEAN button, and PowerMyMac will erase it as well as any associated files.
- Once Thunderbird has been successfully removed, the software will terminate immediately.
Part 4. Conclusion
Isn't it simple and quick to uninstall Thunderbird on Mac totally from your computer with PowerMyMac? There is no need to manually validate the Library or delete its excess files. In actuality, all you need to do is do a simple select-and-delete operation. You are welcome to download this great uninstalling software for Mac - PowerMyMac and start enjoying the amazing user experience right now since it is quite handy for anyone who wants to get rid of any unwanted programs automatically!

