


Downloading new MacBook and Mac desktop apps is effortless with the Mac App Store. But how many of those applications do you utilize on a regular basis? Is it just that they're taking up space? If that's the case, deleting unneeded applications to clear the clutter could be the best option, for instance, in removing Silverlight Mac.
There are different reasons why you would wish to remove a program from your MacBook. Maybe a program you installed a long time ago is taking up too much room on your desktop. Perhaps you downloaded an app that you don't use anymore and want to get rid of it. Whatever your reason for doing so, you'll need to remove a previously installed program from your Mac, and this article will teach you how.
Article GuidePart 1. What is Silverlight?Part 2. Manually Removing Silverlight from MacPart 3. Automatically Removing Silverlight from MacPart 4. Conclusion
Part 1. What is Silverlight?
What is Silverlight, and how does this app work? Similar to Adobe Flash, Microsoft Silverlight (or just Silverlight) is an obsolete application framework for creating and executing sophisticated Internet applications. A compatible Silverlight plugin is required to run such programs on Mac OS, Windows, or Linux.
In 2012, Microsoft stated that Silverlight 5 would be phased out. Furthermore, Google Chrome hasn't supported Silverlight since September 2015, and Firefox hasn't since March 2017. So, if you don't need Silverlight and want to get rid of it from your Mac, here are two options for removing Silverlight from Mac that you can use, whichever you prefer.
Part 2. Manually Removing Silverlight from Mac
Most users thought that uninstalling an app manually included dragging the app and dropping it to the Trash only. It is often ignored that once an app is installed, it has its associated files saved in different folders. When these files are not included in the removal, it may affect the performance of your Mac since these useless files may occupy some or a large portion of your hard drive space.

That is why it is really necessary for you to clean out all the files related to Silverlight for you to assume that it is uninstalled completely. Because Silverlight is a plugin rather than a standalone application, you must uninstall it from the Finder's Plugins subfolder. The methods to manually removing Silverlight from Mac plugin are explained below.
- Quit all the browsers.
- Open Finder → go to Macintosh HD → Library → Application Support → Microsoft. In there, remove the folders: PlayReady and Silverlight.
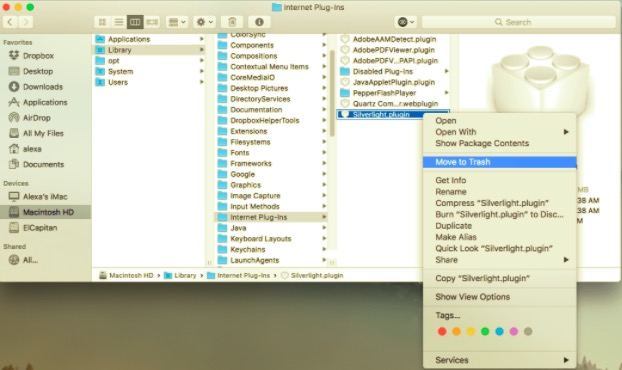
- From the Internet Plug-Ins folder, delete the
Silverlight.pluginfile. - Although Silverlight is a plugin that should be kept in the Internet Plug-Ins folder alone, it also produces an alias file that should be saved in the Applications folder. So after, you must delete the Microsoft Silverlight alias file, as well the cache, cookie files related to Silverlight, including the following:
/Library/Internet Plug-Ins/Silverlight.plugin./Library/Receipts/Silverlight.pkg./Library/Receipts/Silverlight_W2_MIX.pkg./Library/Internet Plug-Ins/WPFe.plugin./Library/Receipts/WPFe.pkg.
These related files can be found in the main Library folder located in the Finder.
- After deleting and moving every file to the Trash, Empty the Trash if you want everything to be permanently deleted. Then, restart your Mac to finish the uninstallation.
Make sure that before you Empty the Trash, you have to check if there are files that have been unexpectedly deleted because it will affect other apps' or your Mac's performance.
Part 3. Automatically Removing Silverlight from Mac
Compared to the manual approach that was discussed above, using a specialized tool makes everything so much easier. PowerMyMac is an example of a professional all-in-one app that also includes an uninstaller tool. It is effective in removing Silverlight from Mac along with all of its related components. Not only it assures the speed of the process, but it also makes sure that the uninstallation process is safe.
Because of this tool, many Mac users have changed from uninstalling manually to using the PowerMyMac's Uninstaller due to its unique features. They found it more convenient for them to use rather than searching all of the files one by one in each folder. To know how to use this app, read further below to proceed in uninstalling Silverlight:
- First, download PowerMyMac, install, then open the app.
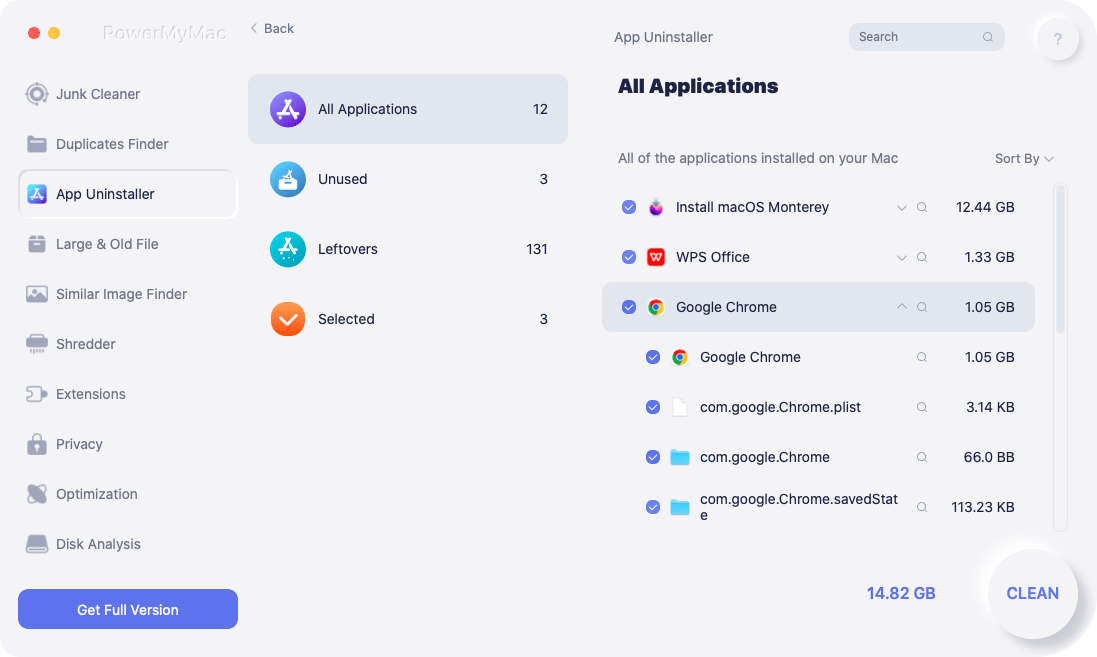
- Open the Uninstaller and select Scan to have the program scan all of your Mac's apps. After, a list of all apps will display on the left side.
- Select the Silverlight from the list, or type its name into the Search box to find it fast. The related files for the selected app will display on the right side of the page when you click it.
- To delete the application and its related files, select Silverlight and hit the Clean button.
When you're finished, a "Cleanup Completed" pop-up window will display on your screen. It will also show how many files were deleted and how much space was saved on your hard disk by PowerMyMac.
As you can see, PowerMyMac is a very useful tool for removing Silverlight Mac or any software completely. You won't have to waste your time searching for the remnants of the app anymore.
Part 4. Conclusion
Silverlight is a tool where you can develop some complex web applications. However, if you are causing problems with the app, you may need to remove it. In this article, two different approaches were introduced in removing Silverlight from Mac. First is the manual approach, where you need to remove the app and manually find all the associated files with Silverlight and delete them as well.
The second one is using a tool that is less time-consuming and safer. PowerMyMac was introduced as the professional tool used to uninstall an app along with its related files in different locations. Aside from avoiding wasting too much time, it also ensures that the process is safe and effective for your device. Thus, some Mac users have also made positive feedback in regards to using a specialized tool since the process can be done in just a few clicks.

