


Depending on the specific Adobe programs it is installed alongside, Adobe Media Encoder offers several video output formats. Like other programs from the company, this is going to take up a lot of space. So, you may want to uninstall Adobe Media Encoder on Mac and also remove applications that are taking up space.
Lucky for you, we have the best guide you can get to remove Adobe Media Encoder from Mac. We will give the top tool for uninstalling apps on macOS computers. Then, we will talk about the manual means of removing the app from your device.
Contents: Part 1. Quickly Uninstall Adobe Media Encoder on Mac & Delete LeftoversPart 2. How Do I Manually Uninstall Adobe Media Encoder on Mac?Part 3. About the Adobe Media Encoder ProgramPart 4. In Conclusion
Part 1. Quickly Uninstall Adobe Media Encoder on Mac & Delete Leftovers
The iMyMac PowerMyMac software makes it simple to remove apps from your computer. It offers a selection of practical apps to optimize Macs. The uninstaller, which enables you to completely remove any unwanted software from your Mac, is one of its benefits. It looks for any potentially harmful software or lingering data.
Using PowerMyMac, you can take charge of your computer by identifying and deleting any unnecessary files that are slowing it down. Duplicate files can be removed, applications can be uninstalled, and extensions may be changed.
This magical cleaner tool seeks to help users clear up space on their Mac by helping them remove useless files and programs. You may considerably improve the amount of disk space that is available by uninstalling useless software and its leftovers such as removing Adobe After Effects easily, etc.
The following techniques can be used to uninstall Adobe Media Encoder on Mac by using PowerMyMac:
- Choose App Uninstaller from the window's left-side menu.
- Click the SCAN button to examine all installed utilities and apps on your Mac laptop or desktop.
- After completing those processes, choose Adobe Media Encoder from the list of accessible applications.
- Click CELAN to be certain that the software is fully deleted from your Mac and that no files are left behind.

Part 2. How Do I Manually Uninstall Adobe Media Encoder on Mac?
Method 01. Manually Remove Adobe Media Encoder
To manually delete the application from your macOS device, follow these instructions. The procedures to delete the residual files are also listed below:
Step 01. Close Adobe Media Encoder and any related processes.
Adobe Media Encoder must first be stopped from starting and running. If Adobe Media Encoder is turned on, a warning message will appear in the upper-right corner of your screen. Use the right-click menu to select Quit from the icon's menu.
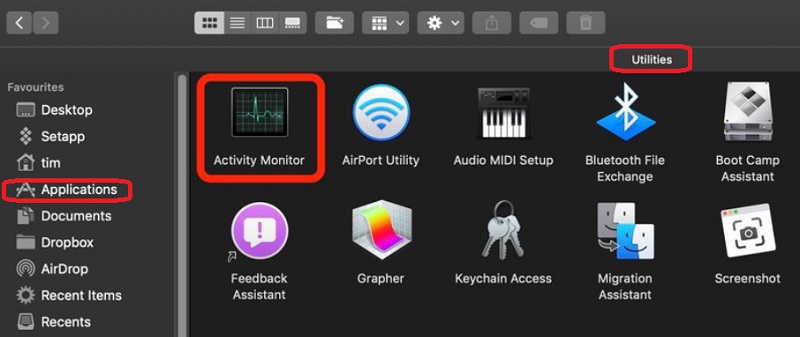
Go to Applications on your Mac to go to the Activity Monitor. The next step is to confirm that all background tasks and activities connected to the application have been ended. Navigate to the Applications folder and choose the Utility folder to accomplish this. Next, choose Activity Monitor.
You must pick CPU from the Activity Monitor's menu. The next step is to select the Adobe Media Encoder program. Simply click the X in the corner to erase. Stop on your own, or force yourself to stop if necessary. The associated processes of the software will all be terminated using this method.
Step 02. Uninstall Adobe Media Encoder on Mac Device.
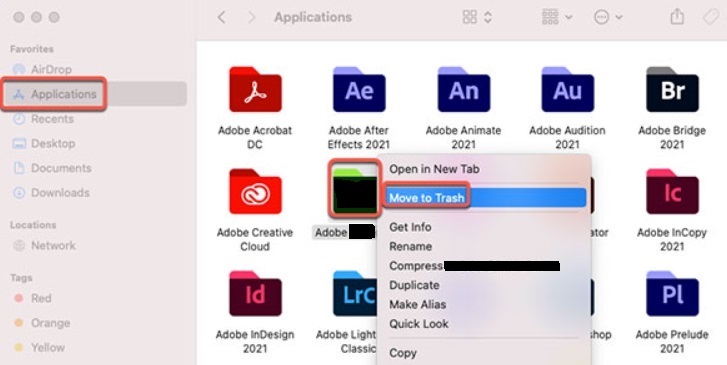
The primary program file for Adobe Media Encoder must now be deleted from your Mac. To open the Applications folder, click Finder. Right-click the software or application icon after that. The choice is "Move to Trash," and doing so just takes a little while.
Step 03. Take off Any Remaining Related Files
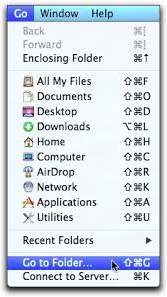
We should also manually delete any further associated files. On the Finder, choose "Go to Folder" from the Go menu. Then enter "Library" in the search box and click Go. Find and delete any files related to your software in the subfolders listed below.
/Caches//Preferences//Logs//Application Support//LaunchAgents//LaunchDaemons/
Go to the Trash folder on the Dock to empty the trash on your Mac. To complete this, restart your Mac computer. Now you have finished the process to uninstall Adobe Media Encoder on Mac.
Method 02. Uninstall Adobe Media Encoder from Creative Cloud Desktop
To make sure the app isn't still on your macOS device, you may also delete it from your Creative Cloud desktop. Use the Creative Cloud desktop client rather than the Trash or Recycle bin to uninstall any outdated programs. To achieve it, adhere to the following guidelines:
- Activate Creative Cloud on your computer. Select the "Infinity" icon from the menu bar on your Mac.
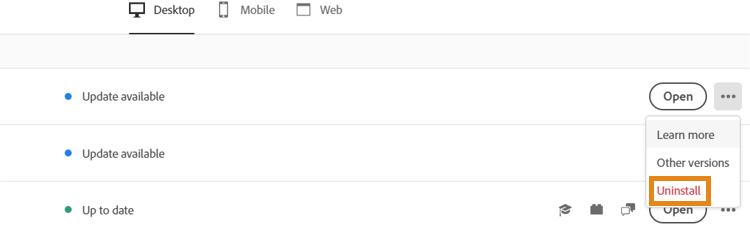
- The "More Actions" option must be selected, as shown by the three dots next to the software you want to delete. This is accessible from the "All Apps" tab.
- The following step is to choose Uninstall from the drop-down option that appears.
- You may choose whether to retain anything by clicking on it.
- REMOVE - When a program is destroyed, all of its interface settings, plugins, alerts, and preferences are also erased.
- KEEP - The program will be deleted, but the user interface settings, plugins, alerts, and preferences will all be retained.
- The procedure to uninstall Adobe Media Encoder on Mac will begin. Keep an eye out for the process' completion.
Method 03. Uninstall Adobe Media Encoder on Mac Using Its Uninstaller
Use the uninstaller file that may be found in the program's main folder to remove Adobe Media Encoder from your computer. Follow these steps to accomplish it:
- On your macOS device, open the main Adobe Media Encoder folder.
- Next, search your computer's list of files and directories for the "Uninstaller" software. You could discover the Uninstaller by performing a Finder search within the same folder.
- To begin the removal procedure, utilize the Uninstaller.
- To delete the program from your computer, adhere to the onscreen instructions.
- Wait till the removal process is finished. After that, restart your macOS computer to complete the removal of Adobe Media Encoder.
Part 3. About the Adobe Media Encoder Program
After introducing how to uninstall Adobe Media Encoder on Mac, we will talk more about this program in this part. An audio/video media processing tool called Adobe Media Encoder enables users to convert data into other sorts of files, such as MP4 to WAV. Adobe applications including Character Animator, After Effects, Audition, Premiere Pro, and Prelude all function in tandem with Media Encoder.
Almost any format you can think of can be exported, input, transcoded, and proxy-created. Utilize presets, Watch Folders, and Destination Publishing to automate your operations. Without needing to reopen projects, use Time Tuner to covertly change the duration and apply LUTs and Loudness modifications.

Video editors need Media Encoder because it enables them to keep working in After Effects or Premiere Pro while projects are actually being encoded. If editors don't have Media Encoder, they will be forced to wait while the encoding process took hours or even days, depending on the file.
A video rendering program called Adobe Media Encoder is integrated with After Effects within the Creative Cloud. You may continue working in After Effects while your compositions render in the background thanks to AME, as the hip kids call the feature that lets you delegate rendering to another program.
Part 4. In Conclusion
The best techniques to uninstall Adobe Media Encoder on Mac devices have been discussed in this post, including removing the app's primary folder from your computer. Using PowerMyMac is the most effective way to remove the aforementioned program from your macOS machine.
You may entirely uninstall apps from your Mac to make sure you enjoy using your selected applications and that you free up space on the computer. As a result, try this utility immediately!

