


Finding a way to uninstall Kindle from Mac? Like any other software, Kindle has its shortcomings. Because Kindle screens are tiny and PDF text is difficult to reflow and alter fonts, size, and other things, reading documents and books in PDF format on the device isn't easy. Amazon offers a PDF conversion service that works very well on academic papers but it is far from flawless. Table of contents or indexes are typically neglected, graphical components such as tables frequently yield poor results, and so on.
Kindle also does not accept ePub formats which are commonly used for books and other digital scripts that work splendidly on mobile devices and tablets. Just like uninstalling any unwanted apps from Mac, if you feel like it is time to switch to another e-reader software, let us show you how to uninstall Kindle from Mac.
Contents: Part 1. How to Uninstall Kindle for Mac?Part 2. How Do I Completely Remove Kindle from My Mac?Part 3. How to Reinstall Kindle App on Mac?Conclusion
Part 1. How to Uninstall Kindle for Mac?
If reading (poorly designed) PDFs isn't a priority for you, nor are colors, a Kindle is a must-have. If you are a heavy user of PDF and ePub, Kindle is not for you. You might have a better experience using Apple Books for your Mac.

That being said, just follow these steps to uninstall Kindle from Mac.
- Close/Quit Kindle. If the Kindle app is open, right-click on its icon in the Dock and select Quit. You can also go to the top menu bar and select Kindle and click Quit.
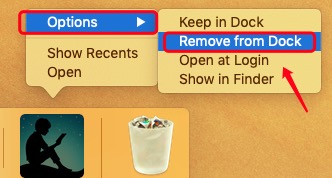
- After you close Kindle, click on its icon again in Dock, hover on Options, and select Remove from Dock.
- Go to Finder. In the left pane of the window, click Applications. Find the Kindle app file in the Applications folder. Right-click on its icon and move it into Trash.
- Locate Kindle in the Applications folder, right-click on its icon, and choose Move Trash. on the other hand, you can also just drag the app in Dock and drop it into the Trash icon
You can also uninstall Kindle from Mac using Launchpad. This approach needs OS X Lion or later and is only available for App Store apps.
- Open up Launchpad and type "Kindle" into the search box.
- Hold the mouse button down on the Kindle icon until it starts to shake. Then, underneath the icon, an "X" button will appear. Select "Delete" to uninstall.
It is now more or less technically uninstalled from your computer. Regrettably, Kindle creates components and service files to provide some assistance and make it run properly. All Kindle-related files must also be deleted to completely uninstall Kindle from Mac. These files are usually hidden by default from the users but can be located if you go through them manually on Mac's Library.
- Open up the Go menu on the top bar and select “Go to Folder” that appears from the list.
- Type the path "
~/Library" in the search box and press the "Go" button. In the upper right corner of the folder, click Search and type Kindle. - When the search results appear, select Library from the drop-down menu below the search field.
- Locate all folders and files in the Library folder that have Kindle names on them and choose Move to Trash.

Empty the Trash container to remove Kindle from your Mac. Then, right-click on the Trash icon and select "Empty" to remove Kindle Mac. Make sure you restore any files in the Trash that you don't want to be permanently deleted before emptying it.
Part 2. How Do I Completely Remove Kindle from My Mac?
You might be wondering if there is a better way to bypass this complicated method. The thing is, there is! Using a simple-to-use uninstaller instead of manually uninstalling programs and their remains might save you time and effort. PowerMyMac is a lightweight but effective Mac uninstaller that allows users to rapidly remove undesirable programs and remove the files linked with them from the system.
See how easy it is to uninstall Kindle from Mac using PowerMyMac:
- Begin by downloading PowerMyMac from the iMyMac website.
- Try the free trial and then install it on your Mac computer and try it right away.
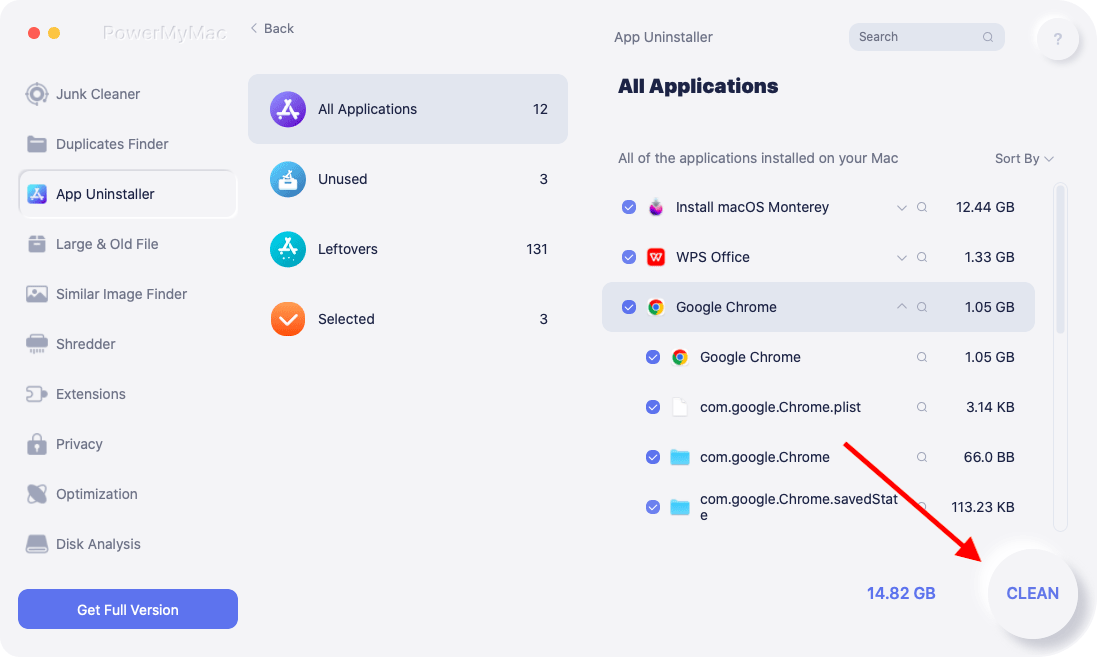
- Choose the module you want to utilize. In this case, we'll utilize the App Uninstaller which may be found on the left-hand side of the menu.
- To scan all of the programs that have previously been installed on your Mac, go to Uninstaller and hit SCAN.
- Choose Kindle and any associated files and folders. Click the CLEAN
- Wait until PowerMyMac alerts with a "Cleanup Completed". Now Kindle has been successfully removed from your Mac.
Part 3. How to Reinstall Kindle App on Mac?
Reinstalling the Kindle app on your Mac is a straightforward process. Here’s a step-by-step guide to help you:
- Go to the Kindle app page on the Mac App Store or visit Amazon's Kindle for Mac download page.
- Click Get or Download and follow the on-screen instructions to download and install the app.
- After the app is installed, launch it and sign in using your Amazon account credentials to access your Kindle library.
Conclusion
This article instructions on how to uninstall Kindle from Mac. First, we discussed how to manually remove the Kindle software and its accompanying leftover files. Then, we've suggested the most effective method for uninstalling Kindle from Mac.
This is done with the PowerMyMac utility from iMyMac. This optimization utility includes a great uninstaller for Mac that makes it simple to remove the software from your Apple computer. This program can assist you in removing applications without leaving behind any traces. You may get the tool right now from iMyMac's official website.

