


Most believe that The Unarchiver is as easy to uninstall like any other application on Mac. But in fact, it is the opposite. In addition, these people are wrong with other programs and have probably run programs like The Unarchiver with a simple "move to the trash".
Now you probably want to know how to properly uninstall The Unarchiver on Mac or we hope that you are interested in removing software completely and without residues in the future. Don't worry. This article shows you how to remove The Unarchiver from Mac manually or using an uninstaller. Here we go!
Contents: Part 1. What is The Unarchiver?Part 2. Quick and Easy Way to Completely Uninstall The Unarchiver on MacPart 3. Manually Uninstall The Unarchiver on MacPart 4. Conclusion
Part 1. What is The Unarchiver?
The Unarchiver is free software for decompressing compressed data and archive files. More than 30 file formats can be extracted. Including numerous older formats that are supported. It supports more formats than some competing providers, as well as the unpacking built into Mac OS. It can also handle filenames with characters from non-English character sets.
The current version requires Mac OS X version 10.7 or higher for operation. The Unarchiver is the first free software to support RAR archives. From version 2.7 it can also be obtained from Apple's App Store.
Now, despite these handy features, let's learn how to completely uninstall The Unarchiver Mac.

Part 2. Quick and Easy Way to Completely Uninstall The Unarchiver on Mac
As mentioned earlier, it seems pretty easy to uninstall programs on Mac at first. The Unarchiver can be removed by dragging it into the trash. But this method will leave a lot of related files on Mac. To completely uninstall The Unarchiver on Mac, you will need a third-party uninstaller.
Here we recommend you the best uninstaller – PowerMyMac (from iMyMac). It enables you to uninstall apps completely and safely remove them from Mac along with all of their data. As a professional and powerful all-in-one software for your Mac, PowerMyMac can uninstall The Unarchiver in one click.
Step 1. Click App Uninstaller and then press SCAN to allow PowerMyMac to begin scanning any apps that are already installed on your Mac.
Step 2. After the scanning process is complete, you will see the following categories on the left side: All Programs, Unused, Program Leftovers and Selected. The list of all apps is displayed on the right side of the All Programs page. Find your unwanted app in this list or just type its name in the search box in the top right corner to find it quickly.
Step 3. Choose the software you want to uninstall. You can view the related files by clicking the expand icon and view more details by clicking the search icon. Just hit the CLEAN button, the apps and related files will be removed.
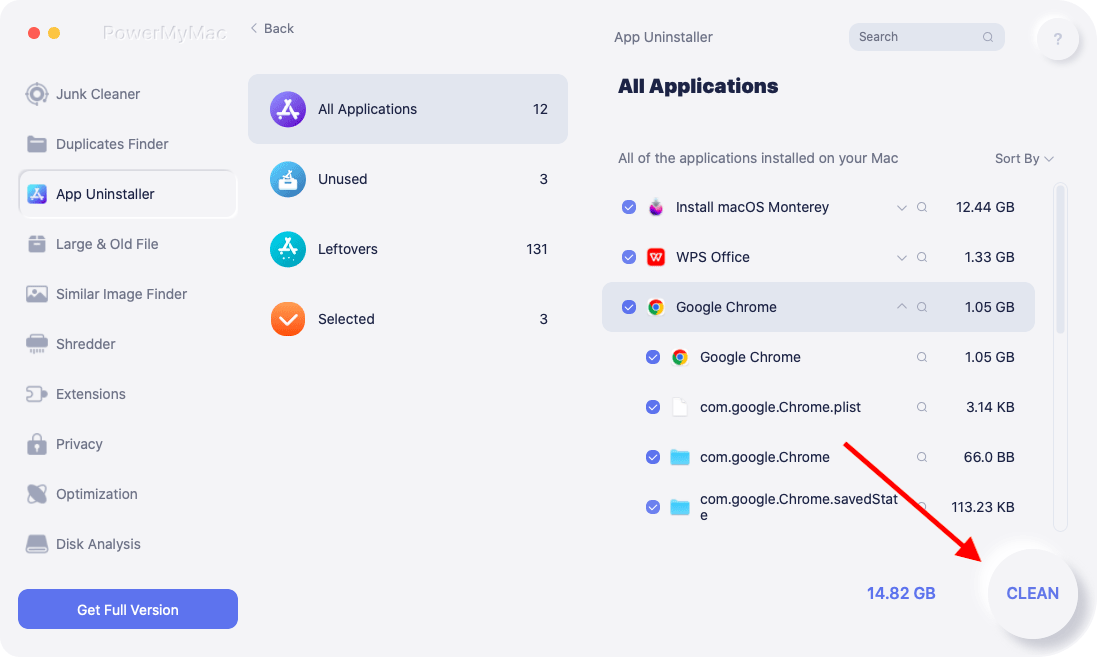
Step 4. A Cleaning Complete window will show you how many files have been cleaned and how much space is now available on your hard drive. If you have any more apps to remove, just click the "Review" button to return to the scan results page.
Part 3. Manually Uninstall The Unarchiver on Mac
If you want to uninstall The Unarchiver manually, you must first uninstall The Unarchiver on Mac in the usual way and then delete the leftover apps that are in different folders.
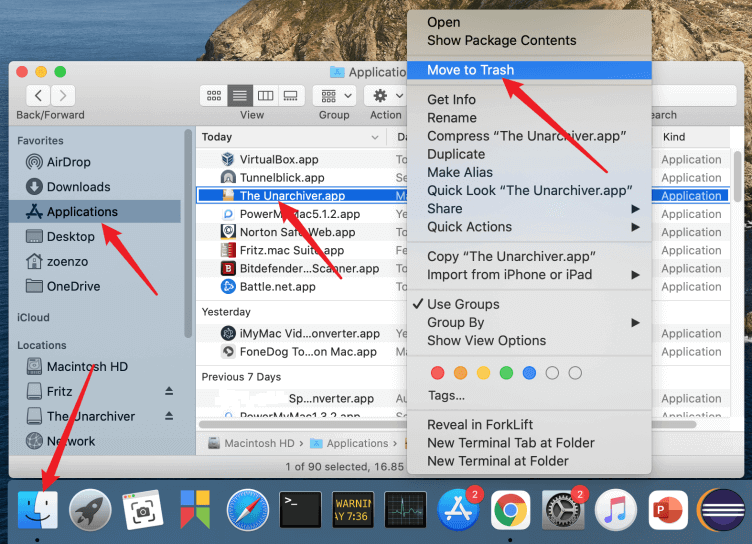
Follow the steps below with the Finder:
- Start Finder.
- Select Applications in the sidebar.
- Find The Unarchiver.
- Right click on this application. Choose Move to Trash.
- If a pop-up appears, enter your login password to confirm.
Follow the steps below with Launchpad:
- Open Launchpad.
- Look for The Unarchiver in the search box.
- Hold the mouse over The Unarchiver until the icon shakes and X is displayed. You can also press ALT until all of the displayed apps fidget.
- Now start Finder.
- Choose Empty Trash.
Remove The Unarchiver related files from your user Library folder:
How can I completely remove data from The Unarchiver on Mac? To do this, follow the steps below:
- In the Finder, press
Command + Shift + h. - Enter
~/Library/Preferences. Click on "Go" - In this directory, delete the following file:
com.macpaw.site.theunarchiver.plist
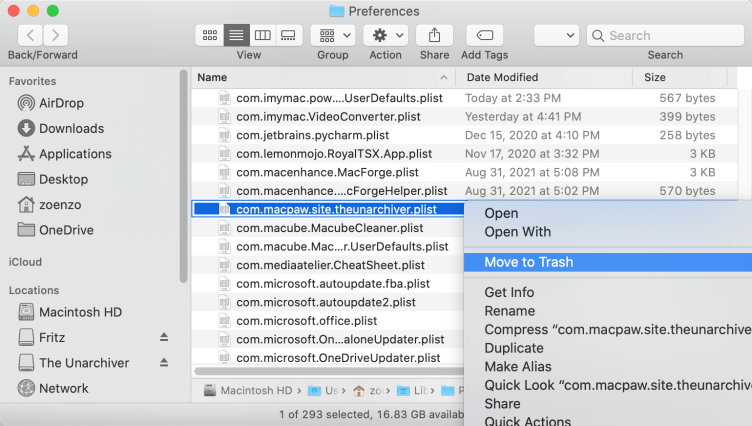
To be on the safe side, use the search function to search for “theunarchiver” in the ~/Library folder and delete any other data.
Part 4. Conclusion
Uninstalling The Unarchiver on Mac is a long and careful process as manual uninstallation refers to deleting related files from The Unarchiver. Fortunately, with the help of the best uninstaller, you can perform PowerMyMac. The Unarchiver can be removed completely and quickly.
As all-in-one software for your Mac, PowerMyMac can solve a number of problems. It has a lot of useful features - these are critical to optimizing and cleaning your Mac. This multi-tool has a performance monitor for assessing memory and CPU capacity. It can also quickly delete junk files, duplicates, system files, caches, cookies, and uninstall unnecessary applications. As a winning combination, PowerMyMac can maximize the life of your Mac and maintain top performance.

