


Virtual machine programs can be helpful if you want to virtualize your desktop. But it doesn’t work optimally all the time. One such software is the VMWare Fusion. If you have this app and it doesn’t work well, you can uninstall VMWare Fusion Mac.
To uninstall an application from Mac is not an easy feat. First of all, Mac computers don’t have built-in uninstallers as Windows does. Plus, there are a lot of associated files you have to remove from your computer. Those residual files can be very hard to locate. You can risk deleting important system files if you don’t know what you’re doing.
We have taken the liberty to help you remove VMWare Fusion from Mac. In this way, we can help you do the job easily without making mistakes. Let’s start uninstalling apps.
Contents: Part 1. Why Uninstall VMWare Fusion on Mac?Part 2. How Do I Get Out of VMware Fusion on Mac?Part 3. How to Completely Uninstall VMWare Fusion on Mac?Conclusion
Part 1. Why Uninstall VMWare Fusion on Mac?
There are several reasons why you might want to uninstall VMware Fusion on your Mac:
- You may no longer need to run virtual machines (VMs) or Windows applications on your Mac.
- Virtual machines created by VMware Fusion can take up a significant amount of storage, especially if you have large VMs.
- VMware Fusion or virtual machines may slow down your Mac, especially if they use a lot of memory or processing power.
- You may want to switch to other virtualization software like Parallels Desktop or VirtualBox.
- A corrupted or outdated version of VMware Fusion could cause issues or fail to work properly.
- VMware Fusion might have compatibility issues with the latest macOS updates or certain applications.
- If you no longer need to use other operating systems (like Windows or Linux) on your Mac.
You may install and uninstall VMWare Fusion whenever you want to. In case you find that it doesn’t fit your virtual machine needs, then you may want to uninstall VMWare Fusion from your Mac and use an alternative.
Part 2. How Do I Get Out of VMware Fusion on Mac?
So, how do we uninstall VMWare Fusion on Mac if we don’t need it? Well, if you do it manually, it won’t be very easy. Remember that Mac doesn’t have uninstallation packages like that of Windows operating systems. Plus, apps like VMWare Fusion have associated files such as logs, caches, and preferences. These can be kept (and take up a lot of space) if you just move the app to Trash.
Fortunately, below are the complete set of steps you need to uninstall VMWare Fusion manually:
- The first thing you have to do is to exit the VMWare Fusion app. Double-check if it is really closed through the Activity Monitor.
- Launch the Applications Folder on your computer. After that, choose the app for VMWare Fusion. Right-click this app. After that, click the option to Move To Trash.
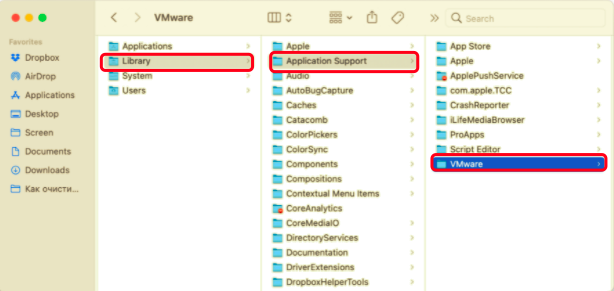
- Remove the service files to do a complete process. Typically, these can be located within your Library folder. So, visit Finder and open the Library of your Mac. To do this, you have to press Go within the menu bar. Then, press Go To Folder. After that, type
~/Libraryin the window and press Go. - Then, locate the following subfolders and delete all VMWare Fusion associated files in it:
Library/PreferencesLibrary/Application SupportLibrary/Saved Application StateLibrary/Preferences/VMware FusionLibrary/Logs
- Empty Mac’s Trash afterward. To finish the uninstalling process, you can reboot your computer.
Uninstall VMWare Using Its Own Uninstaller
Here’s how to uninstall VMWare Fusion on Mac using its built-in uninstaller:
- Launch Finder on your computer and press the key for Option. Press the Go found at the menu within the upper part of the interface,
- The folder for Library will appear. Visit the Application Support folder and then go to the folder labeled VMware Fusion.
- A script to uninstall VMWare Fusion will be found there. It is named Uninstall VMware Fusion. Run this script.
- Press the Uninstall Then, input your admin password. After that, press OK if the uninstallation process is done.
It is important to note that this process can be used for VMWare Fusion versions 3. x and earlier. Remember that if you uninstall VMWare Fusion, the virtual machines created in the past won’t be deleted. So, you have to search for these using your Finder and then move them towards the Trash. Typically, this can be found in the folder within Documents/Virtual Machines/.
Part 3. How to Completely Uninstall VMWare Fusion on Mac?
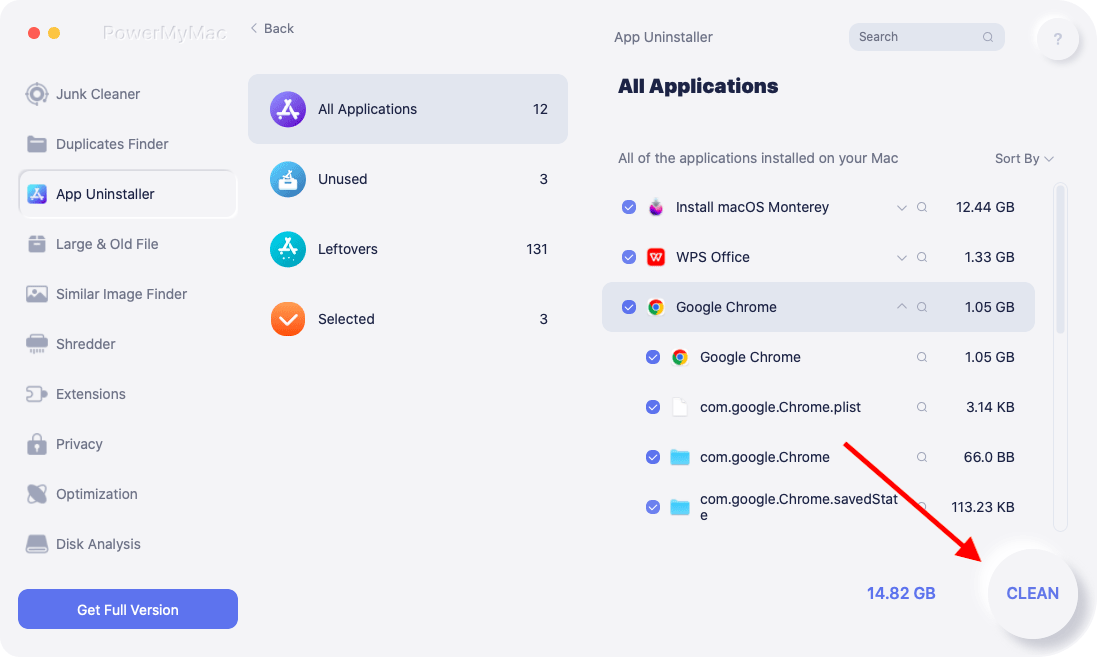
To completely uninstall VMWare Fusion from Mac, you can use the tool called PowerMyMac. This is a great software to uninstall apps and optimize your Mac computer. It has various mini tools to help free up space on Apple computers.
Here are the steps to use PowerMyMac in order to uninstall VMWare Fusion on Mac:
- Get the PowerMyMac tool from its official website on iMyMac. Then, you can install and launch it on your device.
- Click App Uninstaller on the left-hand side of the interface. Once that is opened, click SCAN to find all apps installed on your Mac.
- Then, select VMWare Fusion app and all its related files.
- After that, press the CLEAN button and wait for the tool to confirm that the process is done.
Conclusion
This has been a great source of information on how to uninstall VMWare Fusion on Mac, we have helped you get rid of the software through manual means.
Finally, we recommended the most effective way to uninstall VMWare Fusion from Mac. This is through the PowerMyMac software. This can be used to implement effective uninstallation processes of apps. Plus, it doesn’t leave trace files or associated files. So, you are ensured that the entire app is eliminated. Check out PowerMyMac now and see the power of optimizing your Apple computer.

