


Trimming videos on Mac is necessary, especially if you want to edit your videos to make them more appealing to the eyes of the viewers. Moreover, not all videos you record are immediately beautiful shots that’s why we also trim videos.
For those aspiring video makers, we will show you 3 tools that can help you easily cut or trim a video on Mac without doing that much effort. If you want to learn more about the video editors and trimmers, feel free to check it out by reading the rest of this article.
Contents: Part 1. How to Trim a Video on Mac?Part 2. QuickTime/iMovie Won't Let You Trim?Part 3. The Best Video Trimmer for Mac/Windows PCPart 4. Conclusion
Part 1. How to Trim a Video on Mac?
There are many apps today that can help you edit your videos. However, not all apps can help you convert and edit your files in just one go. Aside from that, some apps need to be purchased first before you can use some of their features.
Some examples of these apps are QuickTime Player and iMovie. Here we will show you how to use these different apps to cut or trim a video on Mac.
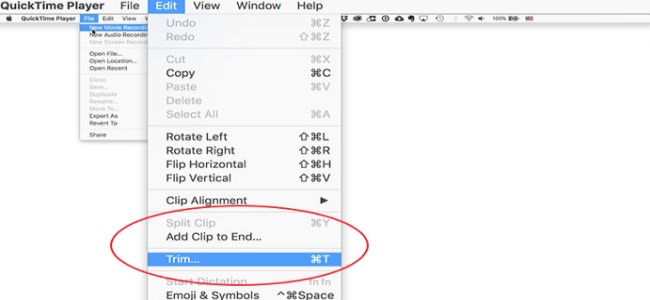
Method 1. Trim a Movie or Clip Using QuickTime Player
- For Movie files:
- Open the QuickTime Player app on your Mac
- Select and open the movie you want to trim
- Choose Edit and click Trim
- Drag the yellow handles on the trimming bars so you will know which part to start and end
- Then click the Trim button to trim a video on Mac
- For Clips:
- Open the QuickTime Player
- Click View and then click Show Clips
- Double-click the clip you want to edit and trim
- Drag the yellow handles again to set where to start and end your clip
- Then, click Trim
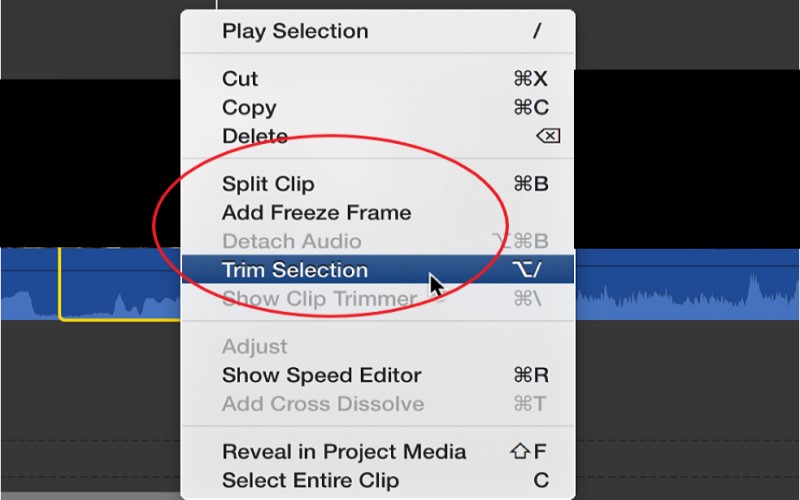
Method 2. How to Trim a Video on Mac Using iMovie
- Open your iMovie app
- Click the button Create New and choose Movie
- Tap the Import Media and import the video you want to trim
- Select OK and load it on iMovie
- Go to the Media page and click Modify
- Then click Split Clip or Trim Selection
- Set the start and end for the clip
- Tap the Share button and choose File to trim the video
Using any of these methods will allow you to easily trim a video on Mac. However, this is only possible for Mac users who have iMovie and QuickTime Player on their computers. So, if you don’t have one, you will have to use a third-party tool. If you want to use a third-party tool that we like to recommend, make sure to read the next sections below.
Part 2. QuickTime/iMovie Won't Let You Trim?
Before we introduce to you the best tool to use, let us first tell you the reason why sometimes you can’t trim a video on Mac using QuickTime Player or iMovie.
QuickTime or iMovie won't let you trim your files? Sometimes, these two apps can encounter issues that will stop you from using them. If you encounter these issues, trimming a video or just basically doing what you want with them may be impossible.
For one, many users experience the app freezing all of a sudden which affects their video editing. Aside from that, many also experience the apps going into a white screen mode which affects the overall performance of your computer.
That’s why we highly recommend using a third-party video trimmer. You can also use VLC to trim a video on Mac or Windows computers. To learn more about the best video trimmer tool, read the section below.
Part 3. The Best Video Trimmer for Mac/Windows PC
The iMyMac Video Converter is the best video trimmer today. Why? Because it can help you convert and edit your videos and other media files in just one app. If you want to trim a video on Mac or Windows PC, this tool is the best choice for you.
The iMyMac Video Converter has two main features that you can use - the converting feature as well as the editing feature. The tool is considered the fastest converter/editor today and has a success rate higher than other competitors. This is why many users from all over the world love using it.
For one, it can help you convert your audio or video files from one format to another in the fastest and easiest way. And it can also allow you to add background music, subtitles, effects, and other ways you want your video or media to look more of your style. You can also cut, crop, and rotate your videos.
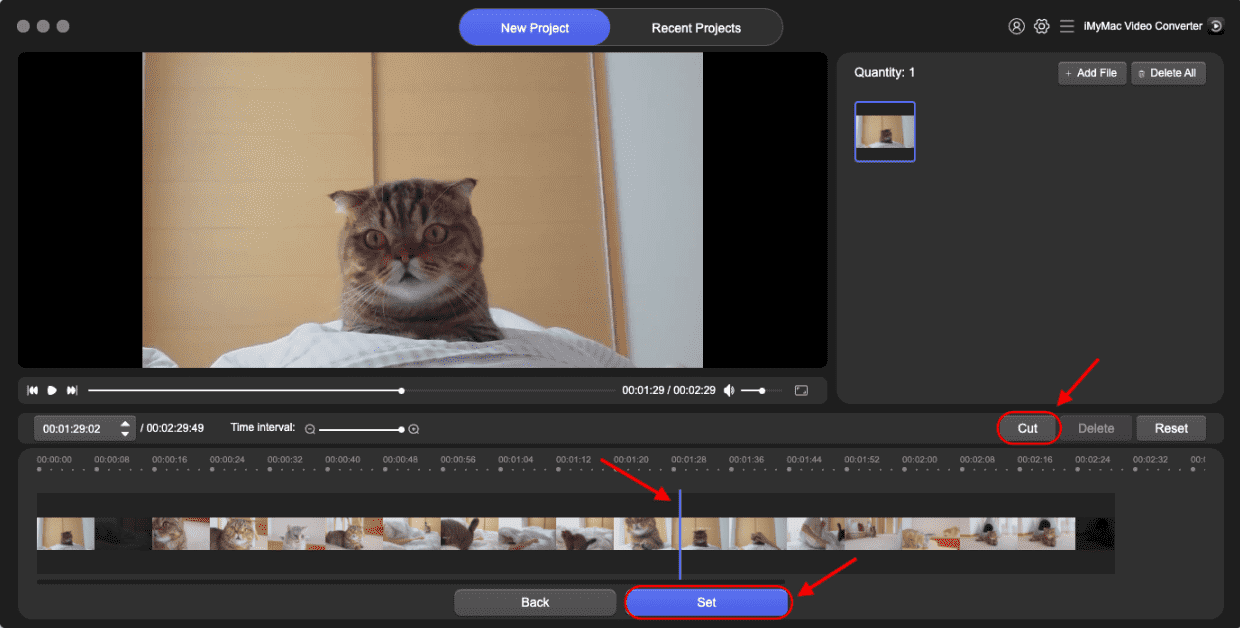
If you want to learn how to use the iMyMac Video Converter and trim a video on Mac, follow these steps below:
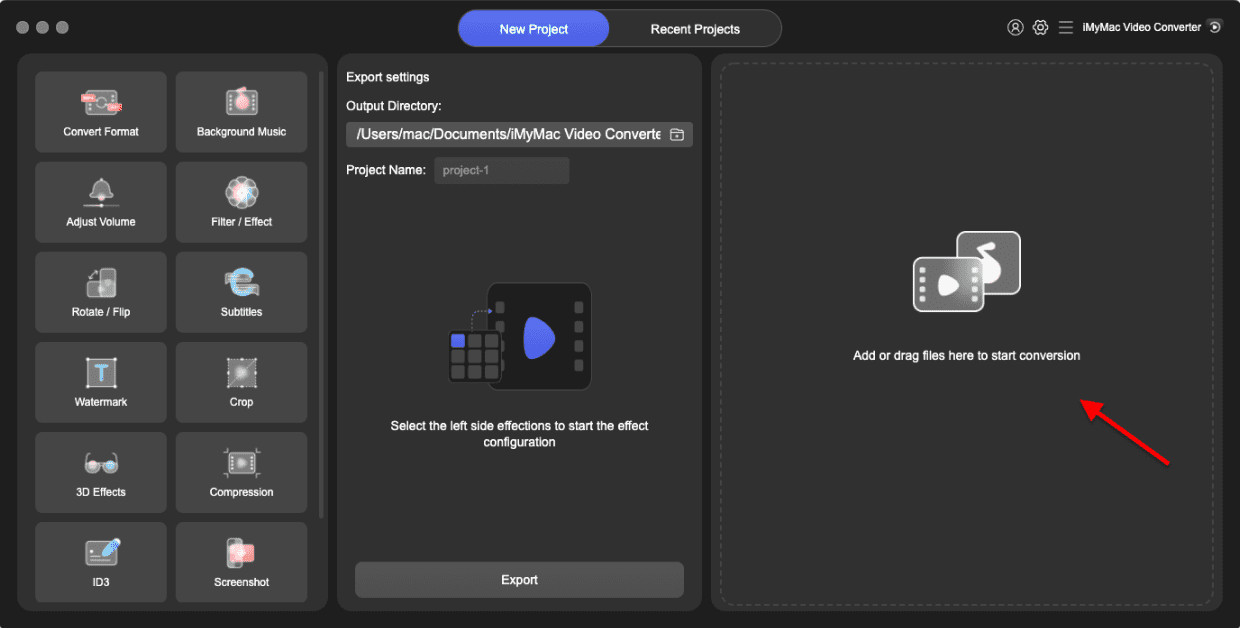
- Download and install the trimmer on your Mac device
- Open the app and click Add File button “+” to start adding files you want to trim or cut, or you can just drag and drop the files you want to edit on the window
- You can now edit some of the settings of the app and then don’t forget to click the Save button
- If you want to trim or cut your video, put your mouse icon at the bottom left part of the interface until a scissor icon pops up
- Click here to start and end the video and then choose Cut
- You can also cut a long video into several clips. After completing the trimming, click the Set button, then you will see all cut video clips in the main interface.
Part 4. Conclusion
If you want to trim videos on Mac, there are many easy ways to do it. Either you use the innate apps on the Mac device like the QuickTime Player or the iMovie app. But if you encounter problems with these apps, you can always use the iMyMac Video Converter instead.
This tool is filled with many features that you will surely love to use when editing or converting your files. For those who want to trim a video on Mac without any problems, we highly suggest using this best video trimmer.
