


The one situation that we do not want to happen is having to lose something that is really important to you. With this being said, it could be a devastating situation when someone stole our Mac or if we simply lost it, right?
Once that you experience this situation, the first thing that you would feel is hopeless that you would still find it. Who knows, your Mac could really be far away from you by now. However, do you know that you still have a chance of finding your Mac or tracing where it is?
Indeed it is true. Many people who tend to steal something, especially if they are opportunists would not think of shutting down your Mac immediately. What they might do is go somewhere far from you and try to use your Mac and connect to an internet connection.
If this is the case, then Find My Mac will be able to help you locate your stolen Mac.

Contents: Part 1. Set Up Find My MacPart 2. Protect Your Sensitive Files and Data on Your MacPart 3. How to Locate a Stolen MacPart 4. Other Ways To Track Your Mac – Not Using Find My MacPart 5. Things To Remember Part 6. Conclusion
Part 1. Set Up Find My Mac
Of course, it is always a great idea to be prepared for whatever may happen in the future. So it is a great idea that you set up Find My Mac on your Mac just to make sure that you will still have a chance of finding it if ever it gets stolen or lost.
For you to set up Find My Mac, all you have to do is to follow the guidelines below.
1. Go to your Apple menu and then select System Preferences
2. Once you’re in, go ahead and click on the iCloud pane.
3. If you are not yet logged in to iCloud on your Mac, go ahead and enter your login credentials (iCloud name and your password).
4. On the right side of your screen, go ahead and locate Find My Mac
5. Ensure that there is a checkmark beside it.
6. After that, hit the Allow button.
That’s it! Once that your Mac gets stolen, iCloud Find My Mac will be able to help in locating your Mac.

Part 2. Protect Your Sensitive Files and Data on Your Mac
Here is a good tip for you. Just in any case that you would be bringing your Mac to a public place, you must first secure all the of your sensitive data stored in it. You can do these by deleting them.
What we highly recommend for you to do this is by using the iMyMac PowerMyMac's File Shredder. It is the software that you can actually use for you to remove your files from your Mac permanently to protect your privacy. Once that you used this tool and your Mac is stolen, they will not be able to recover any data from it.
It will allow you to choose all the files that you wanted to shred. It also has the capability of shredding multiple files at the same time. And the files that you shred will then be overwritten so that no one will be able to recover anything from your Mac. Here is how to use the Shredder.
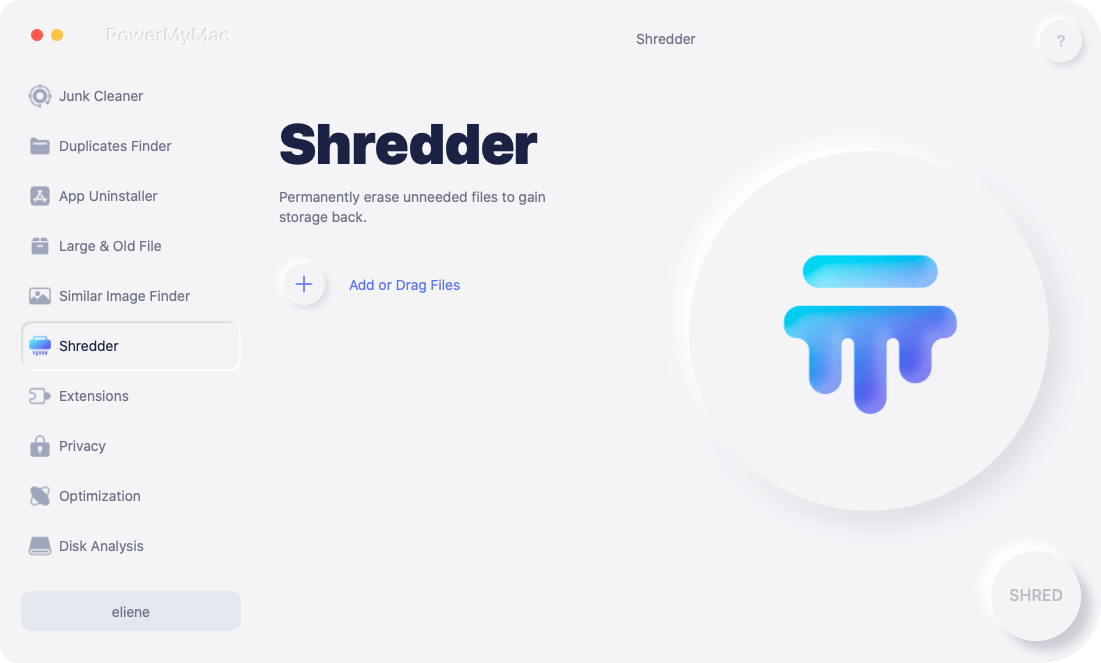
Step 1. Download, Launch iMyMac PowerMyMac and Select Shredder Option
The first thing that you need to do is for you to download the iMyMac PowerMyMac from its official website at www.imymac.com. After that, go ahead and install the program on your Mac.
Launch it. On the left panel of your screen, you will be able to see a list of features that PowerMyMac can do. From that list, select Shredder.
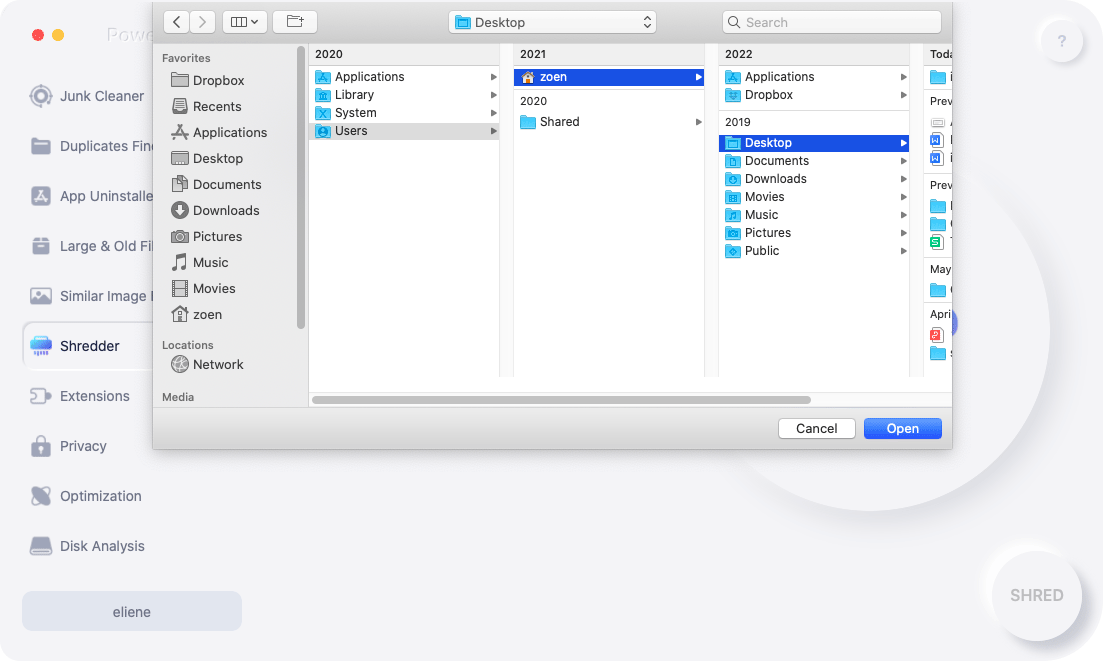
Step 2. Choose File to Destroy
Click on the “Add or Drag Files” button. Then the program will show you all the files that you have on your Mac. From those files shown on your screen, go ahead and choose all the files that you want to shred.
Here, you will have an option to selectively choose the files that you want to permanently remove from your Mac. You can also shred one file at a time if you desire.
Step 3. Shred the Selected Files
Once that you are done choosing all the files that you want to shred, go ahead and simply click on the “SHRED” button to start removing all your files completely from your Mac. Once that the process is all done, there is no way that you will be able to recover them in the future.
People Also Read:How to Securely Delete Files on MacHow to Format A Flash Drive on Mac
Part 3. How to Locate a Stolen Mac
Now that you are done setting up the Find My Mac option on your Mac and once that it gets stolen, you can now easily locate where it is.
In locating your stolen Mac, you can choose to use another PC or Mac or any device that has the ability to run a web browser. Or you can also choose to use the Find My Mac application using your iPod or your iPhone device.
If in case that you have chosen to use another Mac or any PC for you to locate your Mac, then you have a two-factor authentication that is turned on. And the other one is that you can use another device that is actually registered on your account.
After that, go ahead and follow these guidelines.
Tracking Your Mac Using A Web Browser
1. Go ahead and launch any web browser on your PC.
2. After that, go ahead and access iCloud.com.
3. Then, go ahead and enter your Apple ID and your Password.
4. On the device that you are using, go ahead and click on the “Allow” button.
5. Once that you have the six digit code, go ahead and enter these codes into the box.
6. If in any case that the PC that you are using is not yours, go ahead and select “Do Not Trust”. This is for you ensure that no one will be able to log in your account without having those codes.
7. Once that the main cloud appears on your screen, then go ahead and click “Find iPhone”.
8. From the “All Device” menu, go ahead and click on your MacBook. Once that your Mac is online or is connected to a Wi-Fi, you will be able to see a map on your screen and the location of your Mac. You will also see the range of time that the “Find My Mac” is confirmed to be in that location.
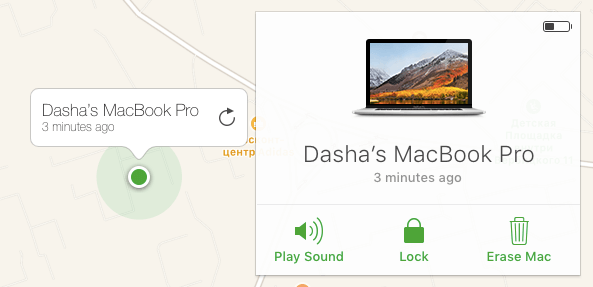
After doing all these steps, you will be able to see on your screen three different choices that you can do to get your Mac back.
1. Play A Sound – This option is applicable if you saw that your Mac is still near you as this will allow your Mac to play a sound that you can hear. It can also be a way for you to scare whoever took your Mac because of this alert.2. Lock – This option will allow your Mac to lock so that the thief will not be able to have any access on your Mac unless they have your six-digit passcode.3. Erase – This option is your very last option. You can use this if in any case that you are already losing hope that you can still find your Mac. By doing this option, it will wipe out all the data that your Mac have.
Tracking Your Stolen Mac Using Your iPhone
1. Launch the Find iPhone app on your iPhone device.
2. Then, go ahead and log in your iCloud account.
3. Then, go ahead and tap on your MacBook in the device list on your screen.
4. See if there is a map on your screen. If it does, then that means that it has found your Mac.
5. After that, go ahead and tap on the MacBook located at the middle of your screen.
6. After that, you will also have the same options that you can do just like using a web browser – Erase, Lock, Play Sound.
Part 4. Other Ways To Track Your Mac – Not Using Find My Mac
If in any case that you were not able to set up Find My Mac on your MacBook, then there is no way that you can locate your Mac using the methods that we have said above.
But do not worry because there are some other online services which tell the email address of your device. If in any case that you connected to any email address and it is logged in to your Mac, then it will get the IP address of your Mac.Here are some ways for you to find the IP Address for some services.
1.Dropbox
(1) Go ahead and go to dropbox.com using a browser.(2) After that, go ahead and log in your credentials.(3) Then go ahead and hit the picture on your account which is located at the right top corner of your screen.(4) After that, go ahead and tap on Settings.(5) The go ahead and click on the Security tab.(6) Then, go ahead and scroll down until you reach “Devices”.(7) Go ahead and look for your MacBook from the list shown on your screen.(8) Then, point the cursor of the mouse on the “i” icon under “Most Recent Activity. It will then show you the IP address of your Mac.
2.Facebook
(1) Go ahead and log in your Facebook account to any web browser on any device.(2) Then, click on the down arrow located in the toolbar.(3) After that, go ahead and select Settings.(4) Then choose Settings and Security located in the sidebar from the left side of your screen.(5) After that, go ahead and check the “where you've logged in” list for you to see if it has an indication that says “Active Now”. If so, go ahead and hover the mouse cursor for you to see its IP Address.
3.Gmail
(1) Use any web browser and then go to gmail.com for you to log in your Gmail account.(2) Once that you are logged in, go ahead and scroll down until you reach the bottom of your messages in your inbox.(3) Then, go ahead and hit on the “Details” tab located under the “Last Account Activity” option.(4) Then, an IP Address will be shown on your screen in a new tab. This IP Address will let you know where your account was recently accessed.
Part 5. Things To Remember
1.Report to The Police
Once that the Find My Mac was successful in locating your Mac device, then you should go and see a police officer. Though you might think that you can retrieve your Mac on your own but you also have to consider that whoever took it will not give it back to you that easy. So what you need to do is to go to the police and then let them go and get your Mac back.
2.Check On Your Email
If in case that the person who took your Mac dropped it when he was stealing it from you, chances are they will get it fixed by going to an Apple service center. If this happens, Apple will then send you an email for them to confirm you about the repair. Once that you get that email, then go ahead and contact Apple immediately for them to know that your Mac that will get a repair is yours and it has been stolen.
3.Take Necessary Precautions
We know that losing your Mac is a horrible thing that could happen to you as well as losing all of your data. That is why you need to back up every data that you have stored on your Mac and then make use of the iMyMac File Shredder for you to remove those files permanently on your Mac. This way, all of your sensitive data will not be accessed when your Mac gets stolen.
Part 6. Conclusion
The Find My Mac is really a good help for every Mac users in this kind of situation. Using Find My Mac will be able to help you locate your stolen Mac easily.
This goes the same with the iMyMac File Shredder. That is why you should make it a habit of shredding your data before bringing your Mac into the public place so that in the event that this situation happens to you, your data will all be safe and sound. Of course, you should consider backing them up first before you shred them.

