


Your Mac is one of the gadgets that you have that you often used. Most of the time, your Mac is used when you are in the office or if you are making some presentations or projects, or maybe for your school’s paper works, or if you are just merely browsing the internet and more.
Because of this, you will not even know that there are actually a lot of files, applications, and data that you have on your Mac and is quickly piling up.
Due to these files and other things that you have on your Mac, you will then start experiencing your Mac getting slow or running out of storage space so you must free it up.
Often times, you will not know which files or applications are eating up your storage space or which is the culprit as to why your Mac is getting slow.
In this article, we are going to show how to see what’s taking up space on Mac and what are the things that you can do about it.
Contents: Part 1. How To See What’s Taking Up Space On Your Mac?Part 2. What to Do When Your Out Of Space on Your Mac?Part 3. Preventing Your Mac Space to Get FullPart 4. Conclusion
People Also Read:Top 2 Ways to Remove Mac Purgeable SpaceHow to Clear up Space on Mac?
Part 1. How To See What’s Taking Up Space On Your Mac?
Checking the space left on your Mac and the data that is eating up your space is very easy. However, this will depend on the OS X version of the Mac that you are using. But do not worry because here are the steps that you can follow for you to see what is taking up your space on your Mac.
- For Mac OS 10.7 or Later Version
- Click on the Apple icon and then choose “About This Mac”.
- After that, go ahead and click on the “More Info” button
- Then choose “Storage”. A window will then appear on your screen wherein you can see the data that you have on your Mac and which of them is eating up a huge amount of space on your Mac.
- For Mac OS 10.6 or Earlier Version
- Go ahead and launch Finder on your Mac.
- From the left side of your screen where you can see the sidebar, choose your hard disk by having it clicked once.
- Then from the menu “File”, go ahead and click on “Get Info”.
- A new window will then appear on your screen which will show you the space available on your Mac’s hard drive.
Note: The interface of the Mac OS 10.6 and those earlier versions is different with the interface of the Mac OS 10.7 and later version. This is because you will not see any slick interface on the Mac OS 10.6 but you will still see if you are running out of space or not.
Part 2. What to Do When Your Out Of Space on Your Mac?
Now that you know how to see what is taking up space on your Mac, then its time for you to do something about it. This only means that you need to clean up your Mac.
There are actually two methods with how you can clean up your Mac. One is the manual way, and the other is the easiest and quickest way. You can choose from the two methods of what you want to use.
Method 1. Cleaning Your Mac – Quick and Easy
As we all know, cleaning your Mac the manual way will take a lot of your time depending on the number of junks that your Mac have. However, there is another way for you to get the job faster and easier. This is by using the iMyMac PowerMyMac.
PowerMyMac has that ability to remove all the junk files that your Mac contains. This way, you can free up more space on your Mac.
This tool also helps you to find and permanently remove all of your unused email attachments, the multi-languages on your Mac that you no longer need and as well as your unnecessary iTunes backup.
PowerMyMac can also help you scan and remove all of your old and large files that you do not need. It can also help you de-clutter your Mac which will make your Mac look tidy.
Here is a guide for you with how you can use this tool and begin cleaning up your Mac to get more space.
Step 1. Download and Install
Have the PowerMyMac downloaded from the official website at www.imymac.com. Once that you have successfully downloaded the program, go ahead and proceed with the installation.
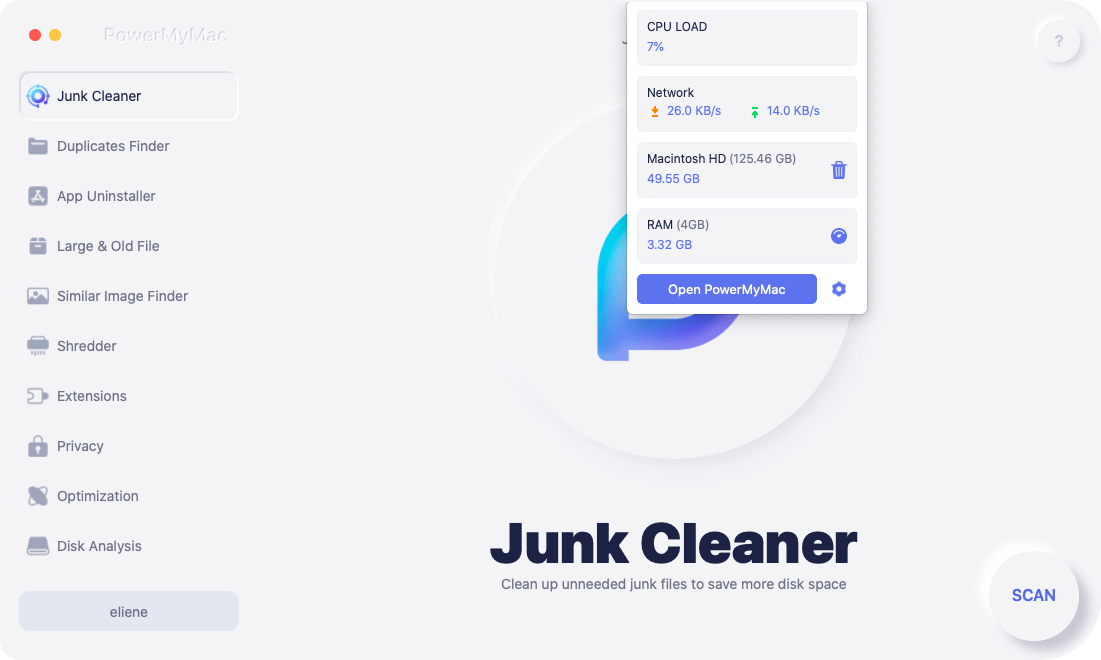
Step 2. Launch the PowerMyMac
Once that you have successfully installed PowerMyMac on your Mac, go ahead and run the program. You will also see on the left side of the screen the different modules that the PowerMyMac can do.
Step 3. Choose Junk Cleaner Module
For you to start cleaning up your Mac, go ahead and choose a module from the list on the left side of your screen. From that list, go ahead and choose “Junk Cleaner”.
Step 4. Scan Your Junk Files
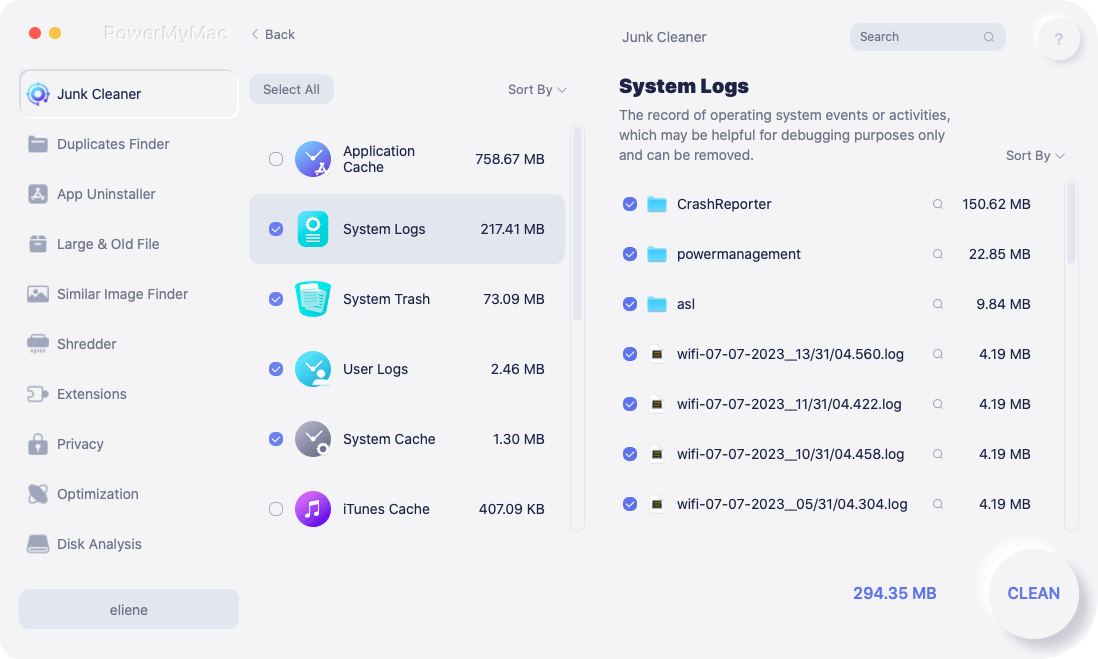
After choosing the module, go ahead and extract all of the junk files that you have on your Mac by clicking on the “Scan” button. PowerMyMac will then start scanning all the junk files that you have on your Mac.
Step 5. Choose All the Junks to Remove
Once that the scanning process is complete, PowerMyMac will then show you all the junk files that you have on your Mac. These junk files will be shown in a category form. You will see on your screen categories such as Application Cache, Photo Cache, Email Cache, System Logs, System Cache, User Logs, System Trash, and more.
Once you click on a certain folder category, all the items that it contains will be shown on the right side of your screen. Check and see all the items that each folder contains for you to make sure that you can remove all unnecessary files from your Mac.
Step 6. Clean Up Your Mac
Once that you have successfully reviewed all the files that it contains and you are satisfied with it, go ahead and click on the “Clean” button. PowerMyMac will then start removing all the junk files that you have on your Mac. Once that the cleaning process is complete, you will then see an indication beside each folder that says “Cleanup Completed”.
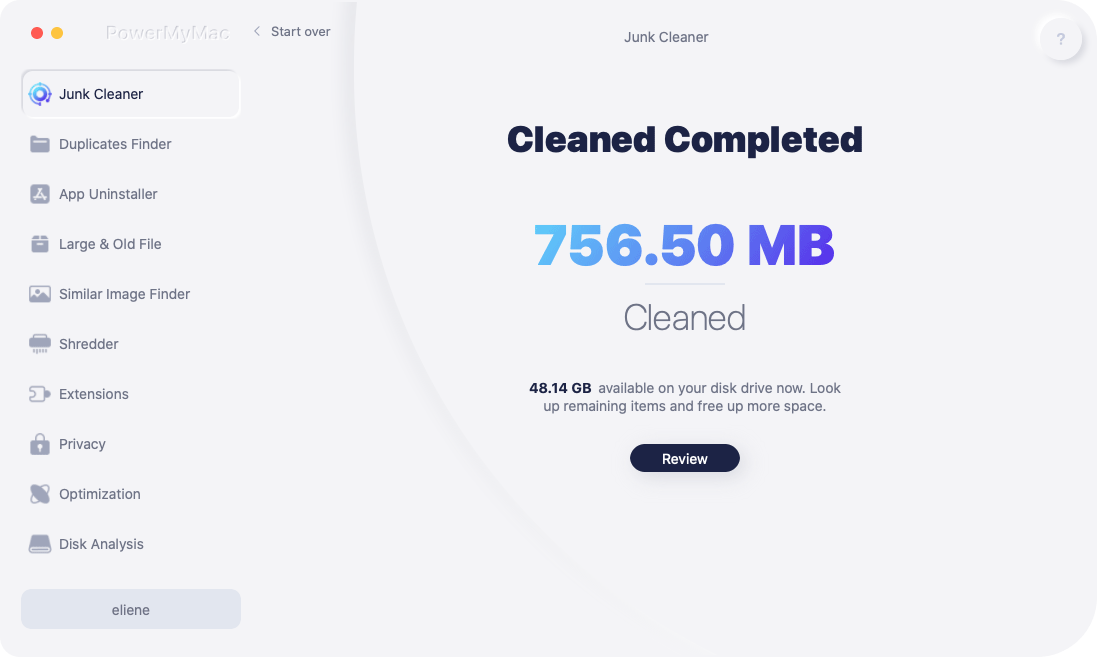
However, there are some folders that will not have this indication because these are auto recreated folders. No worries about these folders because rest assured that all of your junk files were removed completely from your Mac.
NOTE: You can also do the same steps if you want to choose “Dupliacte Finder” and “Large and Old Files” module from the list.
Method 2. Cleaning Up Your Mac Manually
Cleaning your Mac manually is also a good way, however, you have to make sure that you have all the time in the world for you to do this. If so, then here are the things that you should do.
- Cleaning up the cache on your Mac.
The cache on your Mac is considered to be its blueprint. It is the one responsible for loading up your programs faster.
However, over time, these caches can pile up and can cause your Mac to run slow this is why you have to take them out sometime. Here is how you can clean up the cache on your Mac.
- Go ahead and launch “Finder” on your Mac.
- Then go ahead and click on “Go” from the menu bar.
- After that, click on “Go to Folder”.
- Then type in ~/Library/Cache and then remove all the files or folders that are actually eating up a lot of your space.
- After that click on “Go to Folder”
- Then key in the following: /Library/Caches and then remove all the folders that are eating up a huge space on your Mac.
- Remove All Multi-Languages on your Mac
The multi-languages on your Mac usually comes with all the applications that you have on your Mac. These are one of the things that you actually do not need to have on your Mac so it’s a good idea to remove them. Here’s how.
- Go ahead and launch “Finder”.
- Then go and choose “Applications”.
- Then press the Ctrl button and click on the application at the same time.
- Then go ahead and choose “Show Package Content”.
- Then go ahead and go to “Contents” and then “Resources”.
- From then on, just go ahead and look for files that end with .lproj.
- Remove Your Old iTunes Backup
As what we all know, having a backup of all your data is one of the best things to do just in case that something will happen to your device.
However, when you tend to do a backup on a regular basis, it actually piles up and commonly ends up as an unneeded file. This is one reason why you should remove those old iTunes that you no longer need.
- All you have to do is to go to “Finder”.
- And then click on the “Go” button from the menu bar.
- Then choose “Go to Folder”.
- After that, type this: ~/Music/iTunes/Previous iTunes Library.
- Those files all have dates so just choose all the files that you no longer need and delete them.

- Clean Up Your Desktop
Cleaning up the desktop is one of the most important things that you should do. This is because of the need to organize your desktop for you to know if there are things that you no longer need.
And at the same time, it can also help your Mac to look better and at the same time, it can help your Mac to work faster.
- Empty Your Trash Out
Most Mac users would think that if you remove an application or delete a file they will all go directly to their trash bin and will not eat up any more space. But let me tell you something.
Those files that you put into your trash as actually still considered as an existing file and still takes up some space on your Mac.
Now, if you would want to remove them permanently on your Mac, all you have to do is to empty out your trash bin.
But be reminded that once you remove or empty your trash, all the files and other data that it contains can no longer be recovered.
Part 3. Preventing Your Mac Space to Get Full
Now that you know how you can see the things that are taking up your Mac, then it is time for you to clean up.
You have to make sure that all the files, applications, folders, and other data that you no longer need will be removed from your Mac.
Always remember that once that these files that you no longer need are stored on your Mac, they will eventually be the cause as to why your Mac will work slow.
Part 4. Conclusion
So there you have it! Now you can see the things that are taking up your Mac. And by using the PowerMyMac, you will be able to remove all of the things that you no longer need.
This way, you can gain more storage space for your new files or applications. And at the same time, you will boost up the speed of your Mac.
Have the PowerMyMac on your Mac and rest assured that cleaning up your Mac will become easier and faster.
It will also be safe and efficient. Have this program downloaded and we will assure you that everything will be easy on your part.

