


Skype for Business is a software service offered as part of Microsoft Office 365. This assists the audio, text, video chatting, and other Microsoft units such as SharePoint and Exchange. But sometimes commodities aren’t managing well like what you expect. Apparently, this feature is used to stay connected with some of your comrades for business purposes and other related benefits.
This article will show some working steps and guidelines on how to uninstall Skype for Business to fix problems, either you supervised Skype for Business or you help some users to solve their problems. Uninstall an app from Mac could be very troublesome.
Attached to this article are the details and points on how to uninstall Skype for Business on your device completely and effectively. It is important to understand that Skype for Business is not that easy to remove on your device unless you discard the reset on Microsoft Office.
Contents: Part 1. What Is the Difference between Skype and Skype for Business?Part 2. How Do I Completely Remove Skype for Business from My Mac?Part 3. How to Uninstall Skype for Business on Mac Manually? Part 4. How to Uninstall Skype for Business in Windows 10?Part 5. Conclusion
Part 1. What Is the Difference between Skype and Skype for Business?
There are several things in common between Skype and Skype for Business. They can be the same but they also have the difference between some connections and functionality. Skype for Business is stand-alone assistance that offers video and audio conferencing, with different call functions and video sharing.
It is a broad organization that allows you to expand and enhance people for online meetings, security, and manage the worker’s account. If you're confused about which one you’re operating go to the Help assistance and choose About, it will indicate which one you are using.
Here are some of the differences between Skype and Skype for Business.
Meeting Online
- Skype- up to 20 employees.
- Skype for Business- 250 guests.
Merge Office App
- Skype- separate in the office.
- Skype for Business- fully merged with Microsoft 365, SharePoint, and Outlook.
Set up for Meeting
- Skype- limited
- Skype for Business- civilized
Use
- Skype- home
- Skype for Business- for work
Cost
- Skype- free to download
- Skype for Business- several selections
Security
- Skype- Encrypt
- Skype for Business- Encrypt but you need some authentication and grade security.
How to Stop Skype from Starting Automatically on Mac?
For you to start Skype on your Mac automatically, you need to ensure that your device is ready to accept the incoming calls and messages. But you have this issue that your Skype is automatically starting up and operating in the background and as a result, it occupies the storage space and consumes the resources of your Mac.
Skype makes communication easy, reasonable, and productive in relation to its cost. But you are numbing when you expect to open an application directly. Instead of having a separate priority for an application, Skype uses the general start-up setting.
How do I disable Skype for business totally? If you want to stop Skype from starting up, we have here provided different methods. You also can delete Skype on your Mac if you don't use it anymore. If you are having problems with the delay of functioning your device after you stored the Skype try to go to the Open and login option and mark for the Skype.
- Go to your Skype application on your dock.
- Go on to the Options click on Open at login and make sure to uncheck the option. This method will prevent Skype from automatically starting the program.
Another method is using the Mac setting:
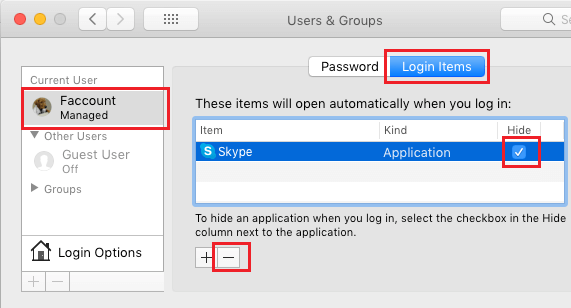
- Go to the Apple icon at the menu bar, click the System Preferences, and drop the menu.
- Click on the User and Groups under the System Preferences.
- On the User and Groups window choose your Account Name then go to the login items.
- Under the login items select the Skype application then click the minus icon to uninstall the Skype application from the directory.
Let’s now proceed with how to uninstall Skype for Business on Mac. Continue reading this article to learn more.
Part 2. How Do I Completely Remove Skype for Business from My Mac?
Looking and finding ways to uninstall Skype for Business on your device is a risky thing to do, as you can see to the manual steps there is a lot of commands to go through before you complete the process of uninstalling Skype for Business on Mac, aside from that it takes so much time for you to reach on what the real problem is but using and choosing the right tool it’ll be a hard task for you.
We highly recommend the iMyMac PowerMyMac because it is a single cleaning application with lots of useful and helpful features for your Mac. You don’t need to go for a hundred dollars to keep your Mac optimized and utilized. It deletes useless apps completely and easily.
Here’s how to uninstall Skype for Business on Mac follows each step to complete the process:
- Download and install the PowerMyMac to your device.
- Choose the App Uninstaller feature on the left side of your display screen.
- Click to Scan your Mac device.
- Then click on the View button to see the result.
- Choose Skype for Business.
- Click Clean then wait for the process to complete.
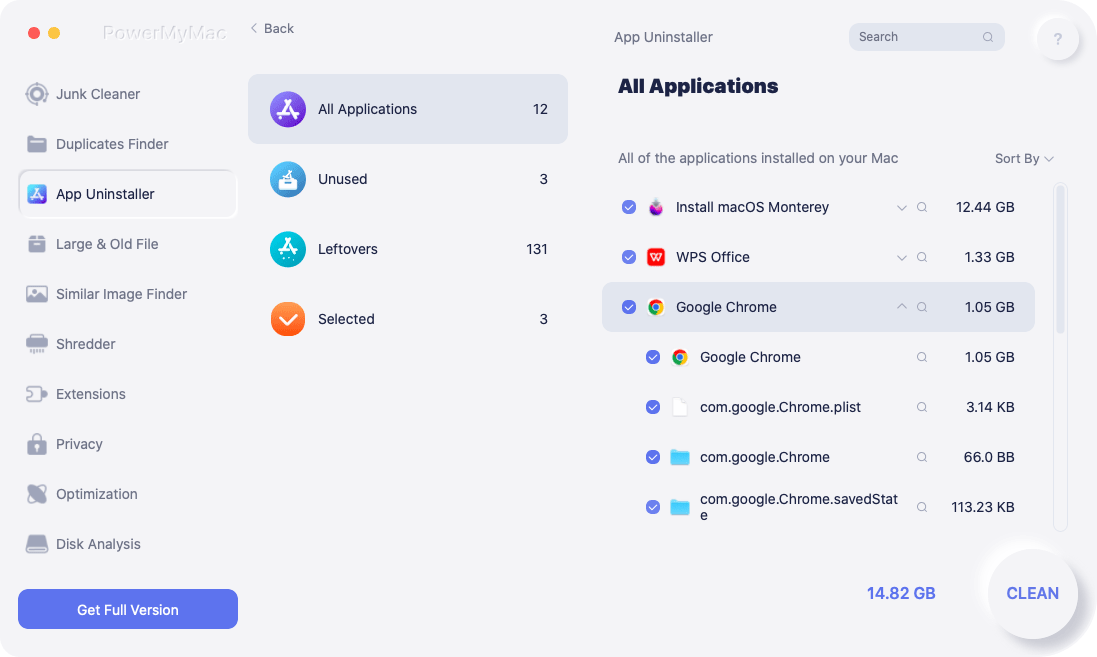
You're all done, that’s how easy on to delete Skype for Business with PowerMyMac.
Part 3. How to Uninstall Skype for Business on Mac Manually?
This will show you how to uninstall Skype for Business on your Mac Manually. You have come to the right place to completely remove the application on your Mac whatever the purpose is.
So, it’s worth thinking about whether or not to drop the access to this application if you don’t have any lively subscription on Skype and thus aren’t dropping any cash.
Follow these steps and make sure that there are no running programs at the background of your Mac.
- Using the administrative credentials log on to your device.
- Quit on the Skype for Business application if it’s running.
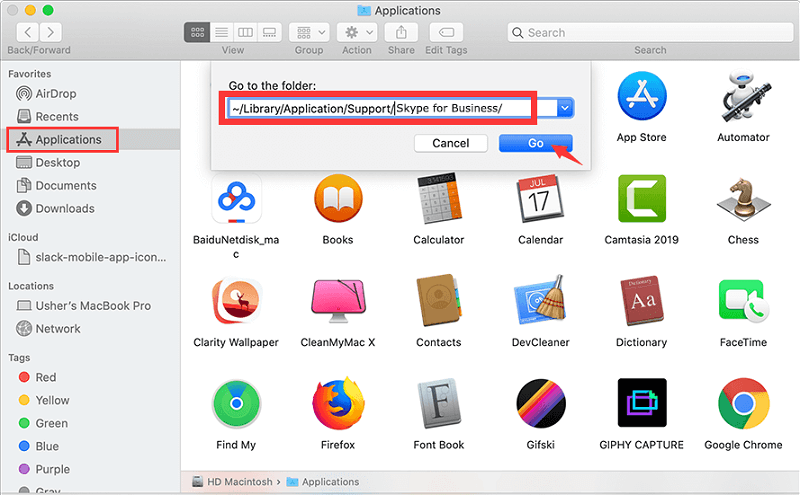
- Go to the Application folder, find the Application, and drag it to the Trash.
- Go to the Finder window and click on the Go menu.
- Select the Go to the folder and in the box type
~/Library/Application Support/Microsoft - Find the Skype for Business file and drag the file into the trash.
- Now go to the
~/Library/Preferences. - Find this file “
com.Skype.Skype.plist” and “com.Skype.Skype.Helper.plist” then move it to the trash and empty the trash. It is now removed on your Mac.
Here’s another additional step in how to Uninstall Skype for Business on Mac Manually.
- Open the Finder on your dock.
- Go to the Toolbar click the Go option.
- Continue by choosing the utilities.
- Choose the Terminal window.
- Now run the command one by one in your terminal window.
sudo rm -rf /Applications/Skype\ for\ Business.appdefaults delete com.microsoft.SkypeForBusiness || truefind -f /private/var/db/BootCaches/* -name "app.com.microsoft.SkypeForBusiness*" -exec sudo rm -rf {} +rm -rf ~/Library/Containers/com.microsoft.SkypeForBusinessrm -rf ~/Library/Logs/DiagnosticReports/Skype\ for\ Business_*sudo rm -rf /Library/Internet\ Plug-Ins/MeetingJoinPlugin.pluginrm -rf ~/Library/Saved\ Application\ State/com.microsoft.SkypesavedStaterm -rf ~/Library/Preferences/com.microsoft.Skypeplistrm -rf ~/Library/Application\ Support/com.apple.sharedfilelist/com.apple.LSSharedFileList.ApplicationRecentDocuments/com.microsoft.Skypeforbusiness*rm -rf ~/Library/Application\ hSupport/CrashReporter/Skype\ for\ Business_*rm -rf ~/Library/Cookies/com.microsoft.SkypeForBusiness*sudo rm -rf /private/var/db/receipts/com.microsoft.SkypeForBusiness*rmdir ~/Library/Application\ Scripts/com.microsoft.SkypeForBusiness
Another way to uninstall Skype for Business on Mac is using the most new command listed from the Microsoft support website.
- Go to the Finder window.
- From the toolbar look for the Go menu.
- Then the utilities.
- Continue by choosing Keychain access.
- Now delete Skype for Business under keychain access menu.
Part 4. How to Uninstall Skype for Business in Windows 10?
How do I remove Skype for Business in Windows 10? Here are 3 methods to do it.
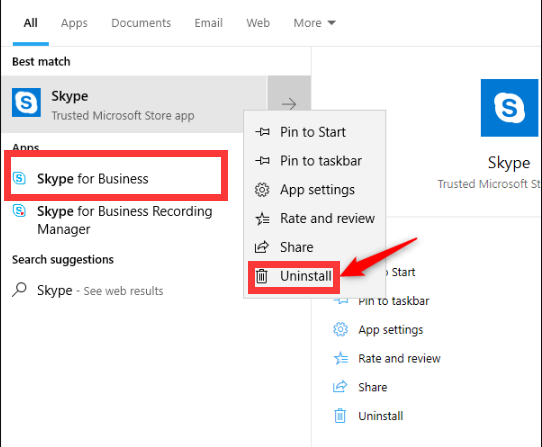
How to Delete Skype for Business Using the Windows Setting
- Go to your start menu.
- Click on the settings.
- Click on the Application in under the Setting.
- Look and choose Skype for Business then click on the uninstall button.
- Click again the Uninstall in a pop-up and confirm the process.
How to Uninstall Skype for Business Using the Control Panel
- 1 Head on to the Control panel of your computer click it. Then locate the Programs and features.
- Find the Skype for Business from the list and click on the uninstall button
How to Uninstall Skype for Business Using the Registry
- Go to Regedit or the registry editor on your computer go to the taskbar and look for the registry editor right-click on the Run as Administrator.
- Find Skype for the business folder and double-click on the Uninstall String registry setting. Copy the file and exit on the registry editor.
- Then Right-click on the start menu then click to run.
- In the box, copy-paste the file or
CTRL+Vthen click OK.
Part 5. Conclusion
Overall after we completely removed Skype for Business on your device, and used all the techniques we have found out that using a third-party tool will still make the process easy and you have way more time to do the other things. Whatever the reason is you still need to check all your stored applications to avoid occupying the large space of your storage.

