


 Is your MacBook Pro slowing down? There could be many potential reasons why your device is lagging or slowing down. Most of the time, it may be because the hard drive is full or could be some files cluttering inside your system. Whatever it is, be sure to safely diagnose the problem first to save your money and effort! Read this post to find out how to upgrade MacBook Pro SSD and ways on how to speed up its performance. Are you planning for MacBook Pro SSD upgrade?
The following article will teach you how to upgrade your MacBook pro using SSD.
Contents: Part 1. What You Need to Know Before UpgradingPart 2. Do You Really Need an Upgrade?Part 3. What You Need to Know in Getting a New SSDPart 4. How to Upgrade Mac Book SSDPart 5. Summary
People Also Read:What is SSD Life?How to Partition A Hard Drive on Mac?
Part 1. What You Need to Know Before Upgrading
If you aim for better Mac Book Pro performance, then simply upgrade the SSD and you will get almost 5X than the usual. However, before you upgrade, make sure that you are well-equipped with proper knowledge and steps.
Getting the Mac Book Pro device details is not enough for you to know and purchase an SSD compatible with your device. What you can do is to check the complete specifications of your Mac:
- Click the Apple logo from the top left corner.
- Select “About This Mac”.
- Under the Overview section, you will see the complete information. By checking this part, you will understand if there is really a need for an upgrade and other vital specs needed for compatibility reasons.
Remember not all Macs are allowed to upgrade especially the newer models. Unfortunately, these are the devices you cannot upgrade the hard drive
1. All Models of Mac Book Pro 15” w/ Touch Bar
2. Mac Book Pro 13” (2016-2017) and w/ Touch Bar (All models)
3. All models of Retina Mac Book
If there is really a need to change the hard drive for technical reasons then you can visit the Apple store for a replacement. Unless of course, a third party vendor manages to develop compatible hard drives.If your Mac is over a year old of you got earlier versions of Mac then you are lucky enough to upgrade your hard drive. Check if your device is on the list:
1. All Models of Mac Pro
2. All models of Mac Mini
3. Mac Book Core 2 Duo
4. iMac and iMac Pro (All Models)
5. Mac Book Unibody
6. All Models of Mac Book Air 11″
7. Mac Book Pro 15″ (from 2008-2012)
8. Mac Book Pro 13″ (from 2009-2012)
9. From 2012-2015 of Mac Book Pro 13″ with Retina Display
10. All models Mac Book Air 13″
11. From Mid 2012-2015 of Mac Book Pro 15″ with Retina Display
12. All Models of Mac Book Pro 17″
Part 2. Do You Really Need an Upgrade?
Now that you know where and how to check the full spaces of your MacBook and you notice that there is still enough space on the hard drive, you may be wondering if an upgrade is the only solution you need. We highly suggest that you try cleaning the entire Mac system to ensure that your device is not clogged up with junks and other stuff.
Before you head out and go for MacBook Pro SSD upgrade, try to use iMyMac PowerMyMac. This software is an all-in solution for Mac devices. This program will clean your system-hogging junks; who knows it might be the only fix you need!
What PowerMyMac Does:
- Free space by removing Junk files, Clutters, and Large and Old Files
- One-click scanning to check system issues
- Displays all results for multiple or selective actions
- A free download version of 500MB
If you notice more errors or too slow performance or any of the following, then you need to consider upgrading the SSD.
- System crashes
- Permission Access errors to some files
- Slower startup than previous
- Latency in specific app boot-up
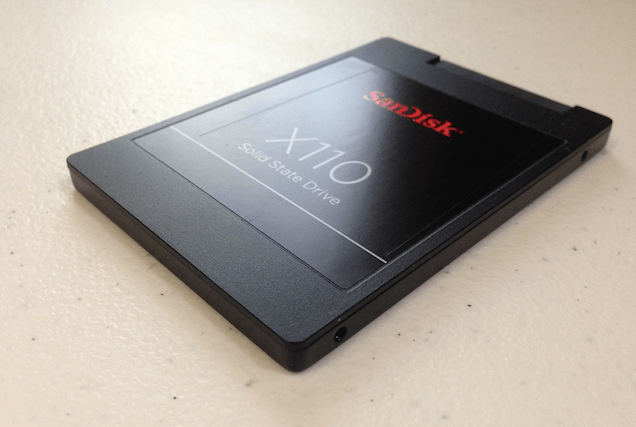
Part 3. What You Need to Know in Getting a New SSD
Before purchasing a new SSD, consider these important factors:
1. Read/Write speed —Remember that when choosing the best SSD, choose those with higher speed because, the higher the speed, the better the performance. Typically, SSDs are rated based on the read/write speed.
2. Capacity — Choose as much space according to your budget, purchase the SSDs above the range of 500MB/s. There are no issues in using higher capacity SSD; it will only give you a better Mac performance.
3. Reliability — Always do your own research and read consumer reviews. You can also watch videos from experts and other customers say its performance and reliability. Brands like Samsung, KingSpec, Crucial, SanDisk, and Transcend are top-rated and reviewed.
4. Memory — It is quite difficult to choose between the price and reliability. If you go for Multi-Level Cell or MLC which is affordable and able to hold more data while a Single-level Cell or SLC is more reliable yet quite expensive.
Part 4. How to Upgrade Mac Book SSD
In order to perform Mac Book Pro SSD upgrade, first, you need to clone the current hard drive to ensure that the new SSD will perform just like the old one after installing and you can continue where you left off. Here is a step by step procedure on how to upgrade Mac Book Pro SSD:
Let us first download iMyMac PowerMyMac first.
Step 1. Clean MacBook Pro
First, you need to clean out the MacBook Pro. Cleaning the entire system will ensure that no junks and other clutters will be transferred to the new SSD. You can use PowerMyMac to automatically erase all these annoying files. By doing this, you are assured that no junk files are transferred to the new SSD and you got a clean and fast performing Mac.

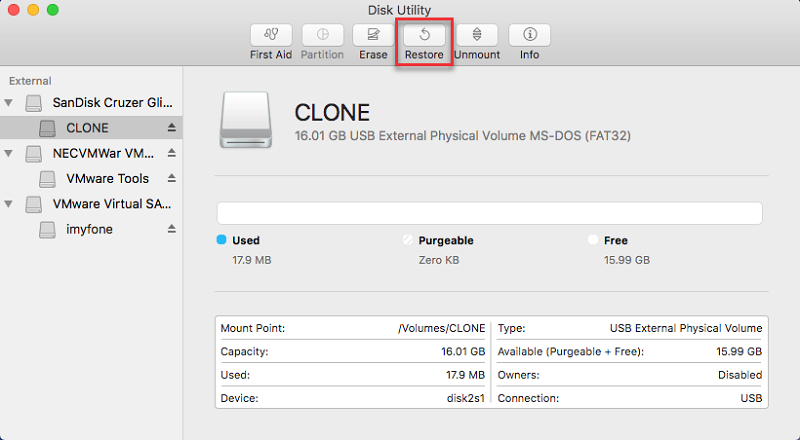
Step 2. Clone Hard Drive via Disk Utility
You can use another tool for cloning the hard drive, however; you can also take advantage of the free tool by Apple which is the Disk Utility.
- First, you need to connect the SSD to Mac via the SATA-to-USB cable.
- Open Applications, find Utilities and go to Disk Utility.
- Click the SSD icon and click Partition 1 from the Partition Layout.
- Click Options and click GUID Partition Table in the next window.
- Click the First Aid tab next to Verify Disk Permissions.
- Click Verify Disk then Repair Disk.
- Power off the Mac Book and then restart it, hold the Option key while restarting. Choose the option to boot to Recovery Disk.
- Click Reinstall Mac OS X and select the SSD as the destination.
- Copy the files over from the first hard drive to the SSD. Choose the currently installed hard drive when asked to restore files from another disk.
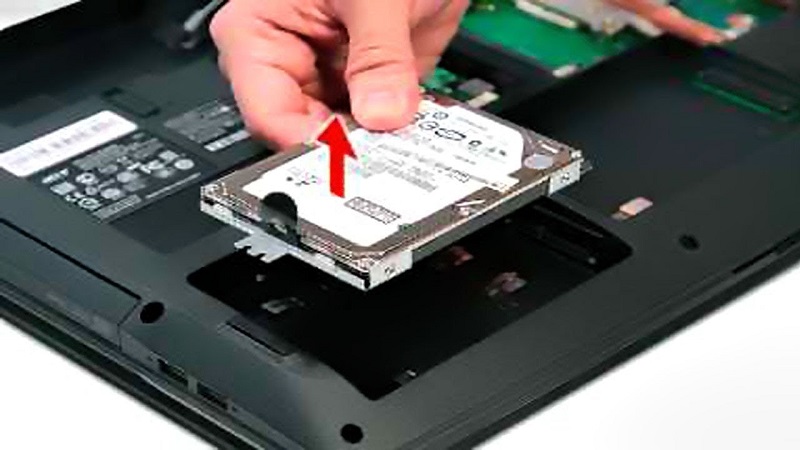
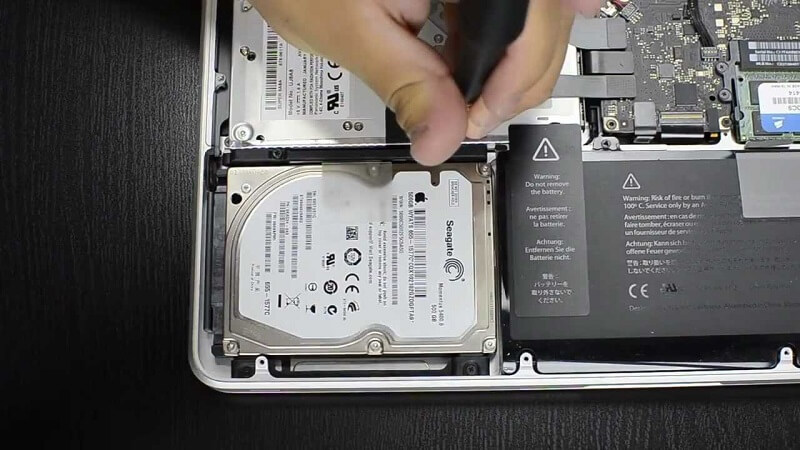
Step 3. Remove the Hard Drive
We’ll get hands-on in removing the hard drive
- First, shut down your Mac Book Pro. Make sure it is totally off.
- Remove all the 10 screws at the back using a Phillips screwdriver or if you have Mac tools, the better. Use a small bowl to store the screws so you will not lose them.
- Remove the back cover, place it in a secured area and once you have opened the back, touch any metal part to release static electricity.
- Locate the hard drive and gently remove the bracket by unscrewing. It has 2 screws securing the drive.
- Gently pull the hard drive out and then disconnect the SATA ribbon. Do not pull the ribbon suddenly; simply wiggle the connector to disconnect.
- Remove the Torx screws that are attached to the hard drive, there are 4 in total and then screw posts into the new SSD.
Step 4. Insert SSD
- Now you need to carefully attach the SATA ribbon unto the SSD.
- Place the plastic bracket back.
- Put the Mac Book cover back and screw in securely.
- Turn on Mac Book Pro and once on, go to System Preferences and click Startup Disk. Make sure the SSD is selected.
- Restart the Mac Book Pro.
There you have it! You have just perfectly upgraded your Mac Book Pro SSD and surprisingly, the steps are so easy. But, if you are having a hard time following the instructions, you may ask for assistance from any of your friends with a technical background or find a technician that will help you out. Do not continue performing the upgrade if you are not familiar with the parts and process.
Part 5. Summary
After reading this article, for sure you are ready for a Mac Book Pro SSD upgrade. Be sure to follow all the instructions we mentioned in order to safely and easily perform the upgrade.
For optimum speed and performance, always use PowerMyMac. This tool is the best partner for any Mac models. This program will also help you check the status of your Mac whenever latency and slowness are being experienced.
You may share it with friends too, so they can be experts in upgrading SSDs and enjoy faster and well-performing Mac.

