


Notifications are pretty useful. They come in handy especially when you need to be reminded of certain things on your Mac. The thing is, they come at the most inopportune time. The good news is that you can always learn how to turn off notifications on Mac.
This is not to say that you should ignore the notifications on Mac because you shouldn’t. The notifications you get on your Mac are important. They alert you on certain updates. You pretty well know that updates are critical. To keep your Mac secure, you need to make sure that the system and the apps on it are all updated.
With the variety of apps that you have installed on your Mac, you’re bound to get a lot of notifications that could pretty much annoy you. That’s the reason why you need to know how to turn off notifications on Mac. Continue reading to learn how you can do it.
Contents: Part 1. Types of Notifications on MacPart 2. How to Turn off Notifications on MacPart 3. Bonus: How to Avoid Suspicious Notifications Part 4. Conclusion
Part 1. Types of Notifications on Mac
There are three types of notifications on your Mac. The first type of notification is an alert. This shows up on the top, right-hand corner of your screen. It remains there until you do something about it.
The second type is the banner. Just like an alert, it appears on the top, right-hand of the screen. However, it does not stay there for a long time. It disappears from the screen right away.
The third type of notification comes in the form of a red badge. This appears with a number that represents how many notifications you have.
So, it’s like a notification for all your notifications. No matter what type your notification is, it could get pretty annoying at some point.
Part 2. How to Turn off Notifications on Mac
You can disable or turn off notifications on Mac. The various methods on how to do it are listed below.
Method #1. Enable Do Not Disturb
Enabling the Do Not Disturb is one way to turn off notifications on Mac. The steps below will show you how to enable it.
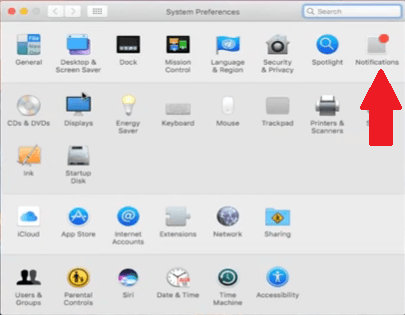
Step 1. Go to System Preferences
Take your cursor to the Apple icon. You will see this particular icon on the top, left-hand side of the screen. Then choose System Preferences, which will appear on the drop-down list.
Step 2. Open Notifications
Once you’re inside System Preferences, look for the Notifications icon. You will find it toward the left-hand side of the screen. Once you see it, click on it.
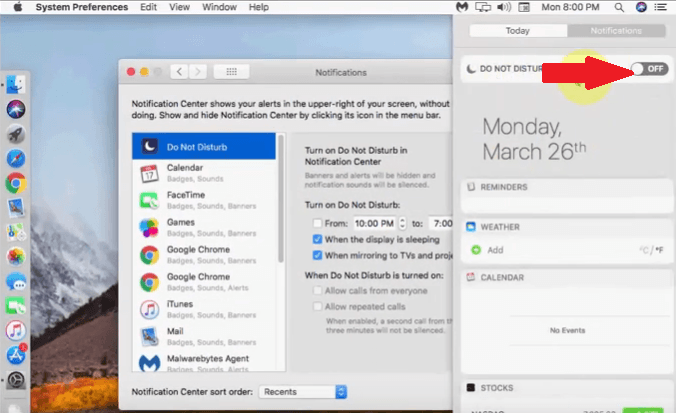
Step 3. Look for Do Not Disturb
Once you click on the Notifications icon, you will see the Do Not Disturb option on the top, left-hand side of the screen. Click on the small image you see under Turn on Do Not Disturb in the Notification Center.
Another screen will appear where you can enable Do Not Disturb. Just slide the button until you see the word off. That will enable Do Not Disturb which will eventually turn off notifications on your Mac.
There is also a shortcut to enable Do Not Disturb. You just need to hold the Option key on your keyboard and then click on the Do Not Disturb icon in the menu bar.
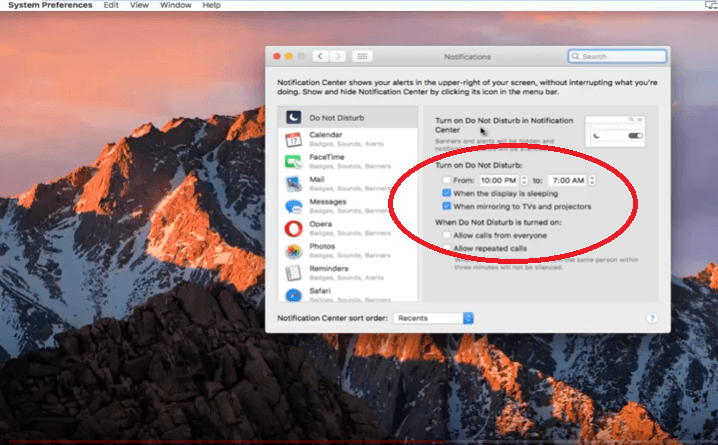
Step 4. Manage Do Not Disturb
You can also manage Do Not Disturb by setting the time. Just take your cursor to the Turn on Do Not Disturb area to adjust the time. That will temporarily turn off notifications on your Mac.
Method #2. Turn Off Notifications from Apps
You can also turn off notifications from the apps that you’ve installed on your Mac. The steps below will show you to do it.
Step 1. Go to Your System Preferences
Take your cursor to the Apple icon on the top menu and click on it. Choose System Preferences from the drop-down list
Step 2. Click on Notifications
Look for Notification once you have launched System Preferences. Click on Notifications to see the list of apps you have on your Mac. Select an app and choose None as an alert type.
Step 3. Go to App Store
You can also go to the App Store. Instead of clicking on Notifications, click on App Store instead. You will be taken to another window where you can uncheck Automatically check for updates.
Method #3. Switch off Notifications from Websites
Websites that you’ve signed up to will also send you notifications. These websites have the ability to send you a push notification that will inform of their latest post. There is a way to switch this particular notification off. The steps below will show you how you can switch off notifications from websites.
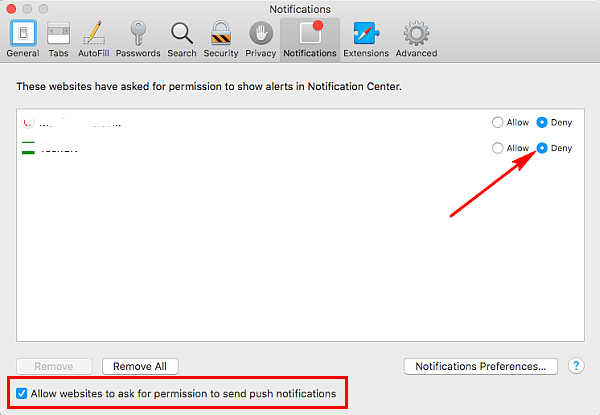
Step 1. Go to Notification
Take your cursor to the Safari. You will see this on the top, right-hand side of the screen. Then choose Preferences from the drop-down list. Then click on the Notifications tab.
Step 2. View Websites
Once you click on the Notifications tab, you will be able to view all the websites that you usually visit. Most likely, these websites have tried to send you a push notification.
Step 3. Disable Push Notification
Select a website from the list. To disable push notification from that website, take your cursor to the right-hand side of the screen and hit on Deny.
Method #4. Turn off Push Notifications from Chrome
Chrome will also send you to push notifications. Unfortunately, some of these notifications are coming from dubious websites that are spreading a lot of adware. The good thing is that you can turn them off as well. The steps below will show you to do it.
Step 1. Go to Google Chrome Settings
Go to Google Chrome settings. You will find this on the right upper part of Google Chrome in the form of three vertical dots. Then select Settings, which you will find on the lower part of the drop-down window.
Step 2. Go to Advanced
Once the Settings window appears, scroll down to search for Advanced. Once you see it, click on it. Scroll down the page and click on Content settings.
Step 3. View Websites
Once you click on the Content settings, you will see Notifications. Click on it to see the list of websites that are allowed to show notifications. Some of these websites might not be safe. Remove them to stop receiving notifications. Click on the three dots opposite each website. You will see the option to remove. Just click on the word Remove.
Method #5. Turn off Notifications from Firefox
If you can get notifications from Chrome, you can get from Firefox as well. the steps below will show you how to disable web notifications in Mozilla Firefox.
Step 1. Open Mozilla Firefox
Open Mozilla Firefox and type in about:config in the address bar. You will see a warning message. Just ignore the message and click on the tab that says I accept the risk!
Step 2. Search for Notifications
You will be taken to another page. Go to the search bar and type in Notifications. A list of options will appear on the screen.
Step 3. Choose an Option
Once you see the list of options on the screen, select dom.webnotifications.enabled and double click on it to turn it off.
Part 3. Bonus: How to Avoid Suspicious Notifications
The various methods above can help you turn off notifications on your Mac. If you want an easier way to avoid suspicious notifications from websites, then you can just use the iMyMac PowerMyMac.
This way, you won’t have to spend some time navigating to the settings of both Chrome and Firefox. As you have seen above, the navigation for both Chrome and Firefox differ. PowerMyMac is a more convenient way to remove dubious websites that send annoying notifications.
Once you launch it on your computer, you will see the App Uninstaller module. You can just click on it to start scanning the apps that you have visited on your Mac. Once the scan is done, you will see a list of apps. Just choose the apps you want to uninstall and click on the CLEAN tab.

That’s how easy it is to get rid of those dubious websites that can possibly send you annoying notifications. Instead of trying to memorize the navigation of both Chrome and Firefox, why not just rely on the PowerMyMac?
Part 4. Conclusion
At this point, you pretty much have a good idea as to how to turn off the various notifications that appear on your Mac. Keep in mind that the iMyMac PowerMyMac can do a lot to prevent these annoying notifications to appear on your Mac.
Do you turn off notifications on your Mac? How do you usually do it? Feel free to share with our readers some of your tips and tricks.

