


Did you ever wonder what a firewall can do on your Mac? Would you like to know the advantages and disadvantages of having the Mac firewall on or off?
The firewall in Mac OS X is not automatically turned on not the same as Windows and it is installed to your Mac for security to prevent your machine from being hacked and from different viruses and malware.
Though you have an option to turn it on or turn it off, here are some guidelines and tips about your firewall on your Mac.
Contents: Part 1. What is Firewall on Mac?Part 2. How to Clean Up Mac Before Changing Firewall SettingsPart 3. How to Turn On and Turn Off Firewall on macOS and OS X V10.6 or laterPart 4. Conclusion
Part 1. What is Firewall on Mac?
Firewall is a built-in software on your computer that is designed to prevent malware, viruses, and hackers to get into your computer and it is highly recommended that the firewall is always turned on.
On the other hand, Firewall can also be a barrier to some legitimate network, messaging application or websites that you would like to use and can prevent you from using. Since it may automatically detect that it is not safe depending on the settings and configuration on how you set it up.
So you may want to adjust your firewall settings on just how you want it to secure your computer, or you must manually add these networks on your list to bypass the security protocol of Firewall. It can be tedious at times especially if you are in a hurry or having to add a network every now and then, this process can be eliminated by simply turning off your firewall.
But remember that by doing so, you are removing an added layer of protection on your computer and may make it vulnerable to malware, viruses, and hackers.
Part 2. How to Clean Up Mac Before Changing Firewall Settings
If you want to enable your firewall and move freely on your computer to eliminate the tedious process, you can use the iMyMac PowerMyMac in just one click, it will perform a deep scan on your computer that will eliminate the unwanted files.
But don’t worry it will give you the list of the items, applications or attachments that you no longer needed, and you may select which ones to remove and to keep. The deep scan also includes the status of the CPU, Memory, Disk and even the state of the battery.
How to Clean Up Mac
Step 1. Download and Launch PowerMyMac
Download the PowerMyMac from our official website https://www.imymac.com/powermymac/. Then launch it.
Step 2. Select an Option
Once you get on the main page of the program you will see different options on the screen, then hover your cursor on the left side of the screen and click on Junk Cleaner.
Step 3. Scan Junk Files
Press the SCAN button, and when it is done it will show you the list of the files that can be eliminated. Once finished it will also show a “Rescan” icon only if you wish to have your iMac/MacBook/MacBookAir/MacBook pro again.

Step 4. Review Junk Files
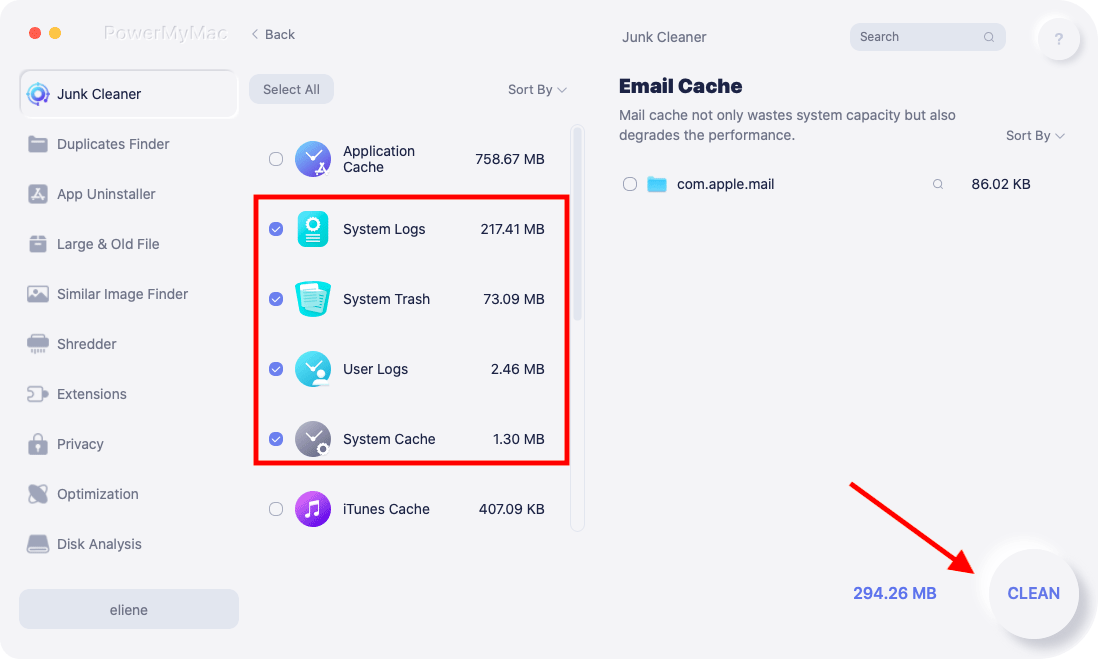
The software will allow you to review the files per category such as Application Cache and System Cache, User Logs, Photo Cache, System Logs and other files that are not supplemental on your computer.
Step 5. Clean Up Junk Files
On the right side of the screen, you will see tick boxes and it’s automatically populated with a checkmark on the left side of each category. On the extreme right side of the category, it will also show you the amount of storage that category is consuming.
Now if you do not wish to delete a file say example the “Assistant” category, you could just simply “Untick” the box if you wish to retain the file.
After you finish your review, there is an icon CLEAN at the bottom right of your screen, just simply hover your mouse and click on the icon. It will then again take a couple of seconds to clean the file, once its clean-up is completed it will show you how storage was cleaned and the newly available space on your disk drive.
If you wish to clean up more space, there is a REVIEW icon at the bottom of the page just hover your mouse and click on it. It will repeat the process and you could just simply redo it.
After you cleaned your computer, you may now Turn On or Turn Off your firewall.
Part 3. How to Turn On and Turn Off Firewall on macOS and OS X V10.6 or later
Method 1:
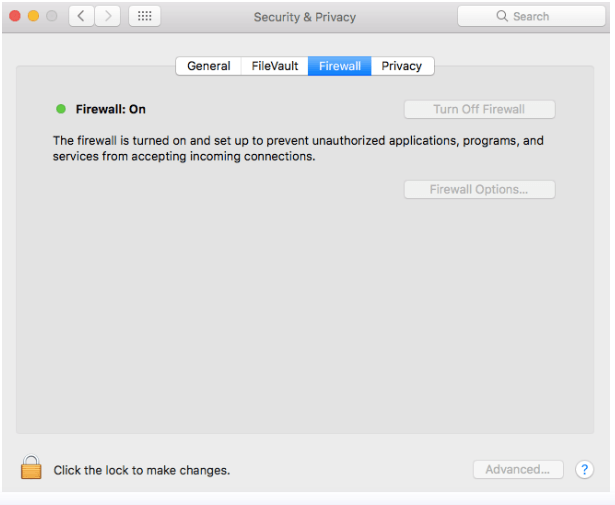
- Click on the Apple Menu then select System Preferences
- Then on Security and Privacy, click on the Firewall tab
- At the bottom left of the window you will see the lock icon, click on it and it prompts you to enter the Administrator Password then press ENTER
- Hit on Turn On Firewall in OS X it may show up as START
Method 2:
In some version it may have a small difference on how to Turn On the firewall:
- Click on the Apple Menu then select System Preferences then Security
- Select the firewall tab
At the bottom left of the window click on the lock icon, and it will prompt you to:
- Input your administrator password
- Then hit on the START button
Now if you wish to Turn Off your firewall it’s easy just like the steps above, by just hitting the Turn Off Firewall button.
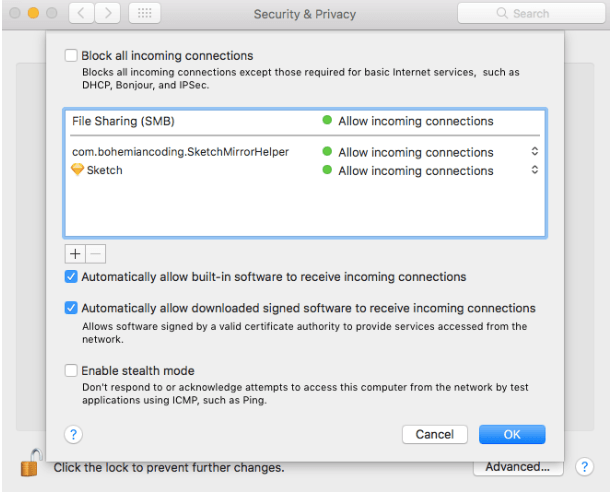
BONUS TIP: Advanced Settings Configuration
If you wish to change some settings, you may click on the Firewall Options button (you may see Advanced for OS X) then you will see additional options on how you would like your firewall to perform.
You will then see a list of all the applications that can send and receive on your network traffic. You may highlight the application by clicking on it, also if you wish to remove an application from the list you can hit the “-“ button, also you can add an application on your list by clicking the “+” button.
There are also three options that you may choose:
- Block all incoming connections – This will just allow the connections that only require basic internet services.
- Automatically allow signed software to receive incoming connections – This only allows software that has a valid certificate to send and receive network
- Enable Stealth Mode – It restricts Mac to respond to various probing requests.
Simply tick on the boxes if you wish to enable the option and untick the box if you do not wish your firewall to perform the option.
It has always been a good practice by keeping your Mac firewall turned On, but if you wish to turn it off for quite some time always use the PowerMyMac before making any changes to get rid of the unnecessary load on your computer.
Part 4. Conclusion
There are pro’s and con’s whether the firewall is turned on or turned off, though it has always been advisable that it is turned on at all times.
For an extra layer of security and your peace of mind as well, it’s better to have an application like iMyMac PowerMyMac readily installed at all times and make it a habit to deep clean your computer and make no room for possible malware.

