


Some updates are turned on by default but if you would like to know how to turn off automatic updates on Mac you may also do so. There are some advantages and disadvantages of automatic updates, this includes it might affect the performance of your Mac.
While an automatic update is done in the background this could cause a lot of work on your CPU (central processing unit) and slow down your Mac while you are using it.
Contents: Part 1. What is Automatic Update on Mac?Part 2. Guide to Disable the Automatic Update on MacPart 3. Bonus Tip: How to Optimize your Mac’s PerformancePart 4. Conclusion
Part 1. What is Automatic Update on Mac?
Since it is automatic update this functionality does not require user intervention for some software or apps to update on its own.
This feature will detect if there is a new version released by the developer without having the user to manually check if there is an update and download it as long as your Mac is connected to the internet.
It is nice to know that we can modify the settings on our devices, and we have the freedom to choose whether to have the software updated or not, this is also to keep those old Mac models to function even though they have the old operating system.
Pro’s and Cons of Automatic Updates
It can be really convenient for the user to have some automatic updates turned on, it crosses out one of the user tasks to check if there is an update and update it manually.
Also, you can make sure that your apps and software are always up to date to avoid security breaches as well.
However, some updates are not compatible with your Mac or device since most of the updates include added features and it may require larger storage space on your system to function properly and prevent it from crashing.
There may be some features that the users do not prefer to have, example the simpler versions interface is easier to navigate than the updated ones. That is why some users prefer to do the updates on their own and here’s how you can do it too.
Part 2. Guide to Disable the Automatic Update on Mac
There is a bit of a difference when disabling automatic updates per software on your Mac. Here’s the list of some operating systems and the steps on how to do it.
Disabling Auto Update in macOS Mojave 10.14 and Latest
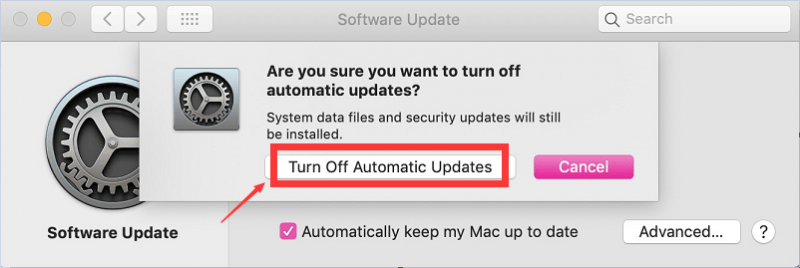
- Select the Apple Logo that can be found on the top left of the screen then > Select System Preferences
- Open the App Store > You will see some options on how to disable the automatic updates
- Untick the boxes next to Automatically Check for Updates
By doing this any application that you have installed via app store will just prompt or notify you if there are any updates, it will not update on its own until you confirm and do it yourself.
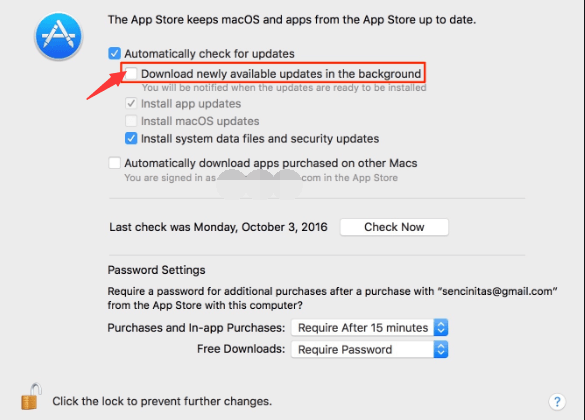
Disabling Auto Update in Mac OS X, Sierra, High Sierra, Yosemite, El Capitan, and Mavericks
Since this is some older operating system the steps are a bit different, for the process see the steps below.
- Launch the Apple Menu > Select the App Store > Click Preferences
- Remove the checkmarks on the Tick Boxes for Automatically Check for Updates, Download newly available updates in the background and Install App Updates
- Remember to let these boxes ticked for the security of your Mac which is Install System Data Files and Security Updates
Disabling Auto Updates for Stand-Alone Apps
Not all of the apps are we can only get via App Store, some can be downloaded straight from their websites, to do this you will be needing to locate the option on the app itself.
Do not worry if you think not all of the stand-alone apps have this kind of option, it is set by Mac operating systems standards that every app should have this option.
Part 3. Bonus Tip: How to Optimize your Mac’s Performance
Having the automatic update turned on in your Mac can somehow affect it's systems performance since there is an update happening in the background at the same time you are using it, this will cause your Mac to work double at a time.
Though enabling the automatic update can help you save some time and effort, you can definitely leave it turned on. What you can do to make sure that your Mac’s performance is still good while there is an automatic update is to free up some space to make your Mac faster.
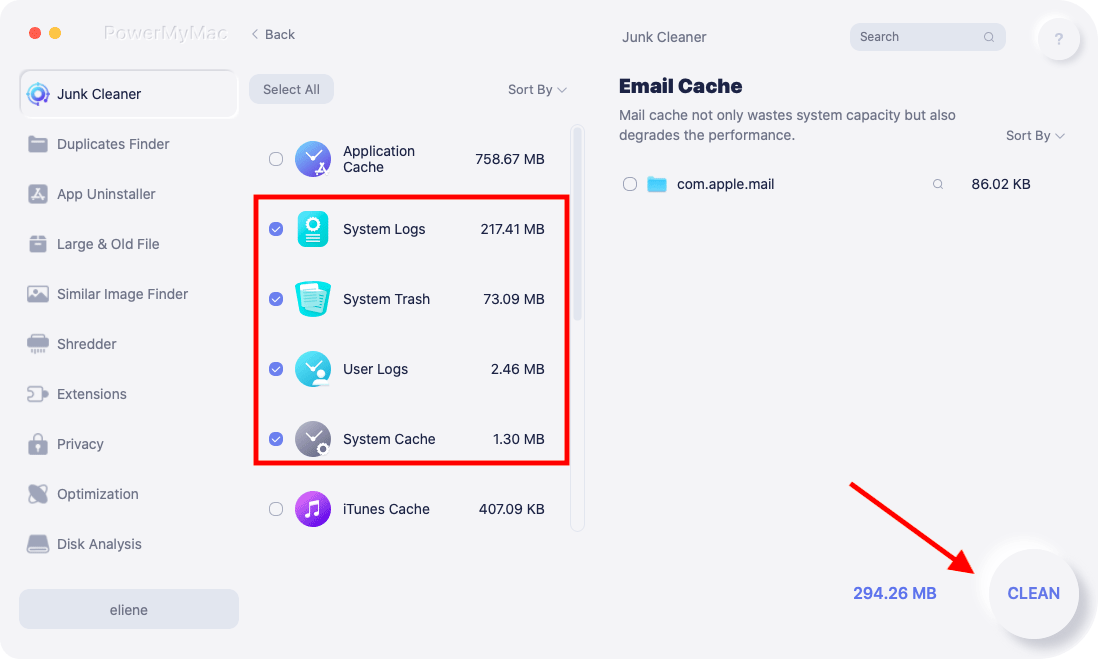
Use iMyMac PowerMyMac to help you clean up those junk files, large files that you no longer need and broken apps and software that is taking extra space on your storage.
- Download and Launch PowerMyMac from imymac.com
- The left side of the screen will show a list of categories > then Select Junk Cleaner> Click on SCAN
- Tick the boxes for User Logs and System Logs to remove all unnecessary files and records
- Click on Select All at the top of the screen > Select CLEAN on the bottom right corner of the page
- A new screen will show you how many numbers of files that was deleted and your remaining storage
Part 4. Conclusion
Keeping in control in automatic updates is good, and it allows you to update your operating system or not especially if you are still using an old version of Mac.
But keep in mind that this might not last forever and you may need to purchase a newer Machine because every time that there are updates developers might stop supporting the old versions that mean it will be open to security issues.
Whether you are using an old version of the operating system or not its always good to keep your Mac clean internally to keep its pacing and optimize its performance by using iMyMac PowerMyMac.

