


Backing up your files is a great way to make it more secure. Your data is kept safe in another storage platform and it ensures that you don’t lose it in any way. One way you can back up your data is through an external hard disk drive (HDD). However, sometimes your Mac device does not recognize your external hard disk drive. This can cause you to panic. However, you shouldn’t be so. Your data will still be intact inside your hard disk drive. But, you just can’t access it for reasons that might not be apparent at first. There are methods you can follow to get your hard disk drive to work again. Let’s get started right now.
Article GuideMethod 1. Removing Apps That Might Be In Conflict With ItMethod 2. Change The Settings Of FinderMethod 3. Mounting External Hard Disk Drives On Your Mac Device ManuallyMethod 4. Running First Aid to Fix External Hard Drive Not Showing upMethod 5. Repairing Disk Permissions
If you have already plugged in a flash drive or a hard disk drive and it’s still not recognized by your Mac device, it must be because your USB port or cable is faulty. Bonus: Before you do the troubleshooting methods we will outline here, you should begin with basic stuff:
01 - You have to check out if the drive is actually plugged into the Mac device.
02 - You have to check out the USB connector. Does the USB connector look damaged? Or does it look misshapen?
03 - If your external hard disk drive is actually plugged into one outlet, you have to try it with a different outlet.
04 - You should also try to use a different USB cable. Cables that might not be visibly damaged can actually be damaged already.
05 - There could be an issue with the hardware. That’s why you have to plug in your hard drive’s cable to another USB port.
06 - Try plugging the external hard drive in another Mac device. If it works on another Mac device, then your current Mac device might have the problem with its USB ports.
07 - You should also try to plug in the external hard drive in a Windows PC. If it works in it, the hard drive might be formatted for a Windows PC that’s why Mac cannot read it.
08 - Reboot the Mac device. Sometimes, turning it off and then on is the easiest way to fix this.
09 - Reboot your USB drives. Do this by shutting your Mac device down. Afterward, restart it while pressing Command + Option + R + P. Once you hear a sound come off and once you see a flash on the screen, release the said keys. Then, allow your Mac to boot up with the usual process. Now, if you’ve done everything that we’ve outlined above and your hard drive (or flash drive) still won’t work, then it’s time to put it to hard work.
Method 1. Removing Apps That Might Be In Conflict With It
If the problem is actually recent, like when your hard drive still worked a few days ago, then there might be an application that conflicts with it. What you should do is to delete apps you have just downloaded one by one. Uninstall them one by one and connect each hard drive after every uninstallation procedure, to check out if the problem has been fixed.
You can actually delete apps by dragging their icon towards the Trash or by utilizing Launchpad. However, these two methods are not actually recommended. Even if your app is deleted through these two methods, they can still contain app leftovers that might conflict with your hard drive.
Instead, you should use a tool called iMyMac PowerMyMac. Below are the features and advantages of the said tool:
01 - It helps speed up your Mac by getting rid of unwanted apps and freeing up more space on your device.
02 - It shows you the system status of your device including CPU, Disk Space, and Memory, among others.
03 - It helps you delete apps and unnecessary files without causing trouble to your Mac device. It helps you delete unnecessary files of apps (including leftovers) that take up much disk space and slows down your Mac device with just a few simple clicks.
04 - Its one-click feature allows you to comprehensively scan your Mac device quickly and uninstall apps easily.
05 - It is very powerful in nature. It comprehensively scans an entire Mac device without leaving any application unchecked.
06 - It allows you to select which apps you want to keep and which ones you want to delete. Everything is under your control.
07 - It is 100% secure. It doesn’t contain any malware or virus that can cause trouble to your Mac device.
08 - It gives you a free trial for the first 500MB. Now, you can enjoy the benefits of this tool without having to pay for it. You can try it out before you make an actual purchase.
09 - You are given one-on-one support. You can also get support via email in case you encounter problems with the tool.
Here’s how to use it to uninstall step-by-step:
Step 1: Download and Install iMyMac PowerMyMac on Your Mac
Download iMyMac PowerMyMac from the official website of the tool. Launch the said program on your device.
On the main interface, you will see the system status of your device. Go to the top side, click Uninstaller.
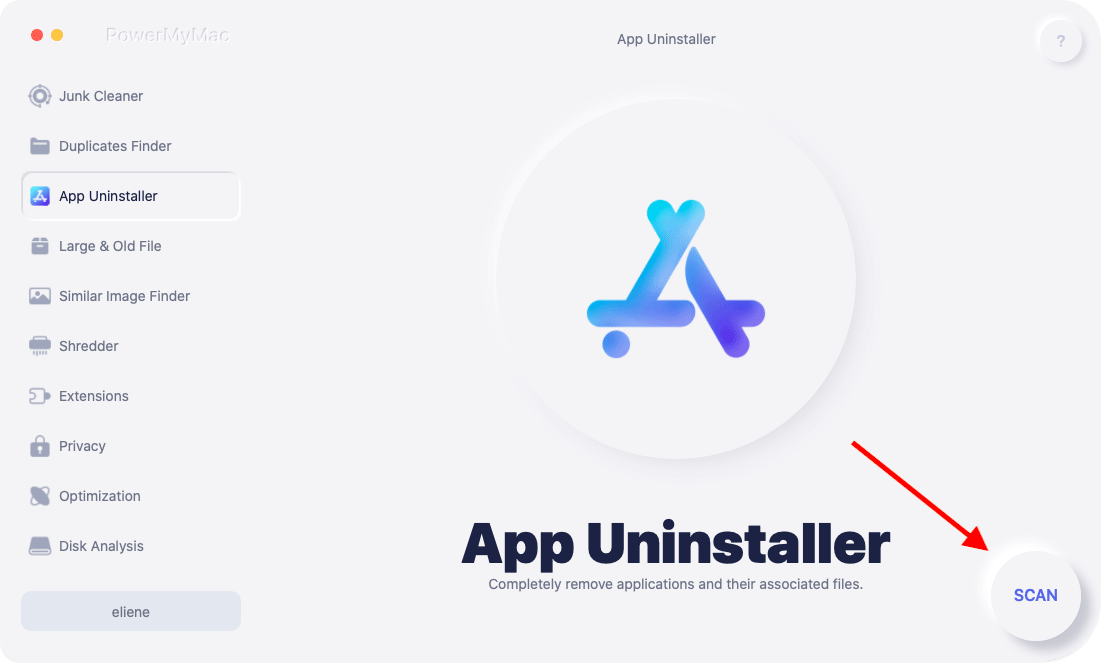
Step 2: Scan The Softwares on Your Mac
Press the Scan button. Applications on your device will be scanned automatically. After the scanning process is done, the software will be listed on the interface.
Step 3: Clean The Unneeded Software
Select the application you want to delete. Press the Clean button. If you have tried all the methods above and there’s still a problem, then your hard drive must have crashed. Or, it might be completely damaged. When this happens, you need heavy lifting.

Method 2. Change The Settings Of Finder
One of the main reasons why Mac doesn’t recognize external hard disk drives (HDDs) is because the system is not programmed to show hard drives on its desktop interface. Here’s how to fix this step by step:
Step 01 - Launch Finder.
Step 02 - Visit Preferences.
Step 03 - Go to General.
Step 04 - Make sure that option labeled External disks is activated.
If this still doesn’t work, you have to manually mount your external hard disk drive or USB drive.

Method 3. Mounting External Hard Disk Drives On Your Mac Device Manually
It’s now high time to force your Mac device to recognize your flash drive or external hard drive. Here’s how to do it:
Step 01 - Connect the hard drive to your Mac device.
Step 02 - Visit System Preferences.
Step 03 - Visit Disk Utility.
Step 04 - Check out if the external hard disk is actually listed in the sidebar on the left.
Step 05 - Highlight the name of the flash drive or hard drive.
Step 06 - Choose Mount.
Now, it should be able to appear under Finder’s devices. If it’s still not working, then it’s for you to do the next step:
People Also Read:How to Use Mac Disk Utility to Repair Disk?How to Partition A Hard Drive on Mac?
Method 4. Running First Aid to Fix External Hard Drive Not Showing up
Your Mac device has a built-in tool called First Aid. It is formulated to verify errors and repair these issues especially with those related to corrupted apps and files. Issues also include startup problems, and of course, external hard drive issues.
If your issue is on opening a flash drive that actually being displayed on your Mac device but does not allow you to gain access to its content, you might need to use First Aid.
Step 01 - Visit System Preferences.
Step 02 - Visit Disk Utility.
Step 03 - Highlight the name of your external hard disk drive.
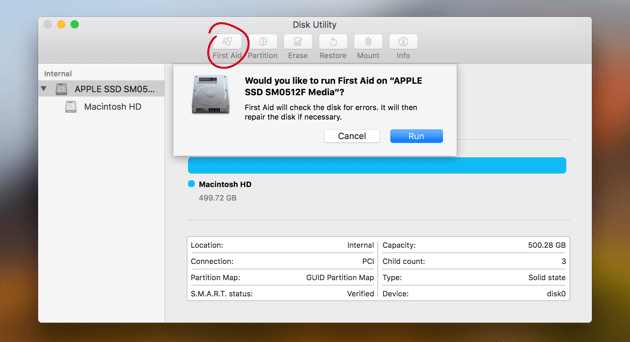
Step 04 - Press First Aid.
Step 05 - Choose Run in order to launch diagnostics and prompt your Mac device to repair any issues that come up.
If your First Aid tool did the trick, your flash drive or hard disk drive might now be available for mounting. If it is still not fixed, try the next option.
Method 5. Repairing Disk Permissions
Disk permissions are used for securing your files in a way where other users cannot simply modify any system file without a permission. Sometimes, permissions can be messed up especially when you install and uninstall certain applications on your system.
If the system performance of your Mac device is kind of strange, it’s always best to troubleshoot disk permissions. Here’s how to repair disk permissions step by step (if you’re running on a version before El Capitan):
Step 01 - Launch Spotlight.
Step 02 - Type out Disk Utility and press Enter.
Step 03 - On the left sidebar, press Macintosh HD.
Step 04 - Click tab named First Aid.
Step 05 - Press Verify Disk Permissions
Step 06 - Pres Repair Disk Permissions.
If disk permission problems have been so bad that your Mac device won’t boot up properly, you can actually gain access to the Disk Utility through Recovery Mode. You can do this by pressing and holding the keys Command + R while your device is booting up.
Backing up your data is always a good thing. One place you can back it up is your external hard drive or your flash drive. But sometimes, your hard drive or your Mac device messes up and it (your hard drive) cannot be recognized. In these cases, you have to follow this guide to help you with the problem. Another thing you can do beforehand is to actually back up your files in cloud storage aside from doing it on your hard disk drive. In this way, if your hard drive messes up, you still get a copy of your files in your cloud storage.

