


The Google Chromecast is considered to be as an inexpensive device that you can use for you to be able to allow to play your Videos, movies and some other media using your smartphone device or even your computer to your television.
However, using Chromecast on Mac is somewhat a bit different than using a Windows on an Android device. So if you want to know how you can set up and use Chromecast on Mac, then this is for you.
Article GuidePart 1. Things You Need to Use Chromecast on MacPart 2. How to Set Up Chromecast on MacPart 3. Optimizing Your Mac for ChromecastPart 4. Conclusion
People Also Read:A Quick Guide on Sharing Files by AirDrop on MacHow Do I Free Up Disk Space on My Mac? [2021 Update]
Part 1. Things You Need to Use Chromecast on Mac
Setting up Chromecast is actually easy using your Mac, iPhone, or your iPad. And in order for you to start the setup of your Chromecast, you will be needing the following items.
- Your Google Chromecast Device.
- Your Mac device.
- Your Google Chrome browser.
And once that you are ready with the items that we have mentioned, then you can go ahead and proceed with the step by step method on how to set up Chromecast on Mac.
Part 2. How to Set Up Chromecast on Mac
To begin the setup process, here are the steps that you will be needing to follow.
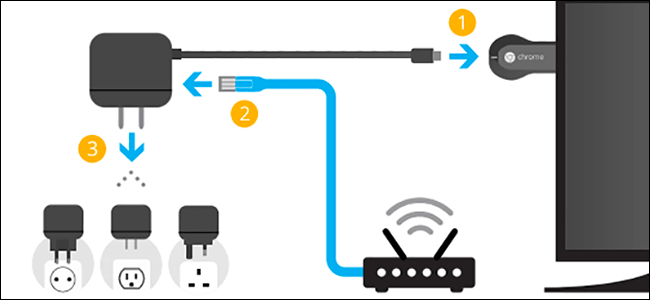
Step 1: Go ahead and connect the HDMI End of your Google Chromecast device to your HDMI port on your Television and have the USB End connected to a USB Power Adapter.
Step 2: After that, go ahead and use the Remote Control of your Television for you to be able to change the source input. You can change it to the right HDMI port wherein you have connected your Chromecast device.
Step 3: Once that you were able to set up Chromecast on your Television, then it is time for you to access google.com/chromecast. This is the website wherein you will download and install the Google Chrome browser on your Mac just in case you do not have it on your Mac.
Step 4: After that, launch your Google Chrome browser on your Mac and then go to chromecase.com/setup.
Step 5: Then on the Chrome Setup page, go ahead and choose the “Set Up Your Chromecast” option.
Step 6: From there, go ahead and click on the “Accept” button for you to be able to agree on the Chromecast Privacy Terms. And once that you have accepted the terms and conditions, the page will then begin to look for any available Chromecast device that is connected to your Wi-Fi connection.
Step 7: Once that your device has been found, go ahead and hit on the “Set Me Up” button.
Step 8: Then, go ahead and click on the Wi-Fi icon which is found on the upper-right corner of your Mac’s screen. Then go ahead and connect it to Chromecast’s open Wi-Fi Network.
Step 9: After you have connected to your Chromecast’s open Wi-Fi network, then you can go ahead and simply click on the Next button.
Step 10: Then on the next page, you will be able to see two arrows indicated by a Yes or a No. From those two arrows, just go ahead and click on the Yes arrow. This is once that the code that you see on your screen actually matches the code that is at the lower-right corner of your TV.
Step 11: Then, taking you on the next screen, you will then be asked that you provide a name for your Chromecast device. From there, just go ahead and input the name that you would want to name your Chromecast device. And once that you are done entering your desired name, just go ahead and click on the” Looks Good” message on your screen.
Step 12: Then after that, you will then be asked for you to confirm the settings of your Wi-Fi. So from there, all you need to do is to choose your Wi-Fi network and then enter your Wi-Fi password. Then once done, go ahead and hit on the Connect button.
Step 13: Then finally, you will be able to see a message on your screen that says “Ready to Cast! And once that you have seen that message, then that means that you have setup Chromecast successfully and you can now use it to play anything that you want from your Mac to your Television.
So there you have it! You can now enjoy any videos that you want to watch on your home television from your Mac device. As you can notice, being able to set up your Chromecast on Mac is a very easy task. And it will only take you a few minutes to finish it.
Part 3. Optimizing Your Mac for Chromecast
For almost all of the mac users out there, the real deal that you should be facing is actually not on the setup of your Chromecast – because it is so easy to set it up. The real deal is that you need to make sure that your Mac is performing smoothly for you to be able to use your Chromecast without having issues.
Because if not, there are actually two common issues that you may encounter. And this includes poor audio and a video that keeps on jumping on your Mac or have a low-quality video. You will be able to experience this kind of issue if your Mac lacks RAM, weak connection to the internet, and some limitations on your hardware or configuration.
And with that, you can go ahead and use a tool that will be able to help you to optimize your Mac. An example of which and is most recommended by most Mac users is by having the iMyMac PowerMyMac tool. This program is known to be an all-in-one Mac application that you can use for you to be able to clean up your Mac in no time. It can remove all of the things that you no longer need such as your unwanted applications, junk files, large and old files, duplicate files, and so much more.
Using the iMyMac PowerMyMac will definitely help you to optimize your Mac for you to have a better experience in using your Chromecast. So for you to have an idea on how this works, here is a step by step guide that you can follow.
Step 1. Have the iMyMac PowerMyMac
First of is that you will be needing to download the iMyMac PowerMyMac from our website. And once that you are done with the download, go ahead and install the program on your Mac.
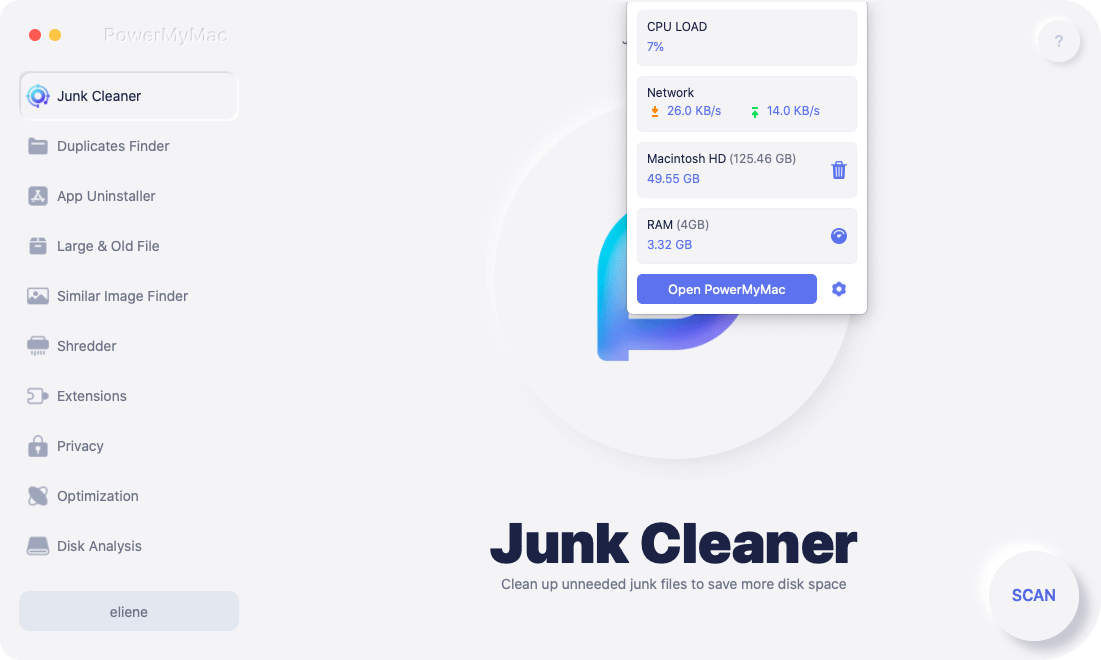
Step 2. Open Up the Program
After installing the iMyMac PowerMyMac on your Mac, then go ahead and run it on your Mac. And once PowerMyMac opens up on your screen, you will be able to see the status of your Mac by default. Through this, you will be able to know information on your Mac's system about the Disk usage, RAM usage, and as well as on the Memory that you still have on your Mac.
Having this information on your screen will be able to let you know which on the system of your Mac need to be cleaned up.
Step 3. Choose A Cleaning Option
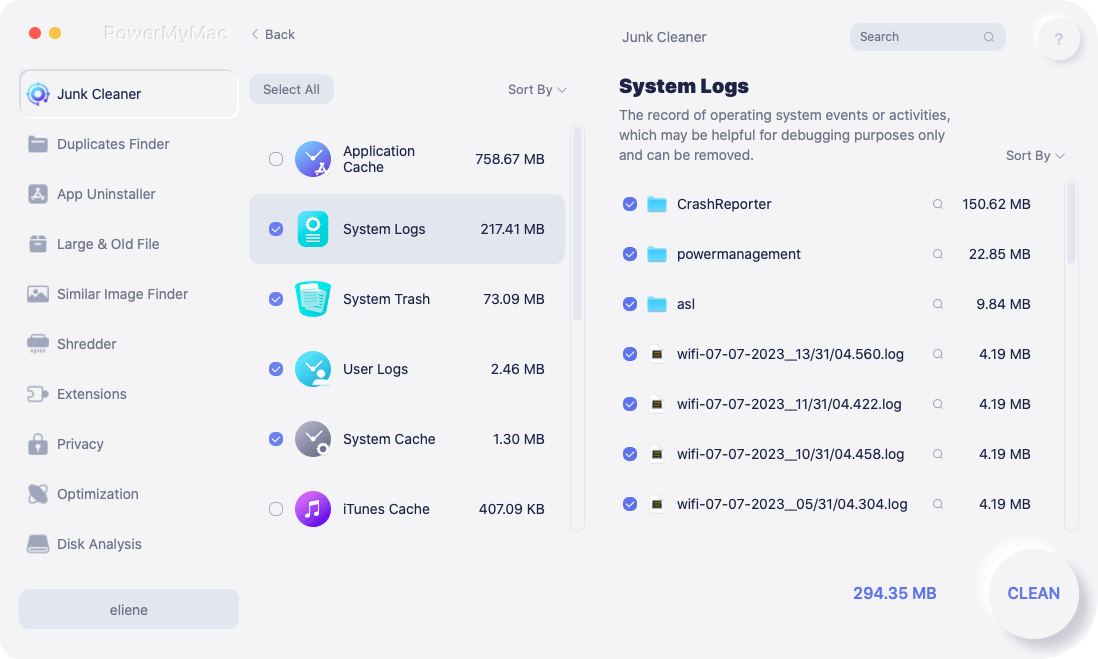
Then on the same interface of the program, let us start by choosing the Master Scan option, which you will be able to find some of the caches that you have on your Mac.
This includes your Application Cache, System Logs, System Cache, Localization, and your User Logs. Taking these all out of your Mac will have your Mac be optimized and perform well. And at the same time, you will be having more space on your Mac.
Step 4. Do A Scan
Then after that, the program will then ask you to make a scan on your Mac. Doing a scanning process will allow the PowerMyMac to look for all of the junks that you have on your Mac. And in order for you to do this, all you need to do is to hit on the "Scan" button and the process will then start. All you will be needing to do is to wait until it is complete.

Step 5. Check the Scanning Result
After the successful scanning process, you can now go ahead and see the result that appear on your screen.
Step 6. Choose All Junks to Delete from Mac
On the left side of your screen, you will be able to see all the categories that are under the Master Scan. And if you are going to click on them, you will be able to all the items that they contain expanded on the right side of your screen.
So from there, you can then go ahead and choose all of the junk files that you would want to remove from your Mac. Or better yet, you can make use of the “Select All” button at the top of your screen for you to select all of the files on your screen at once.
Step 7. Start Cleaning Up Your Junk Files
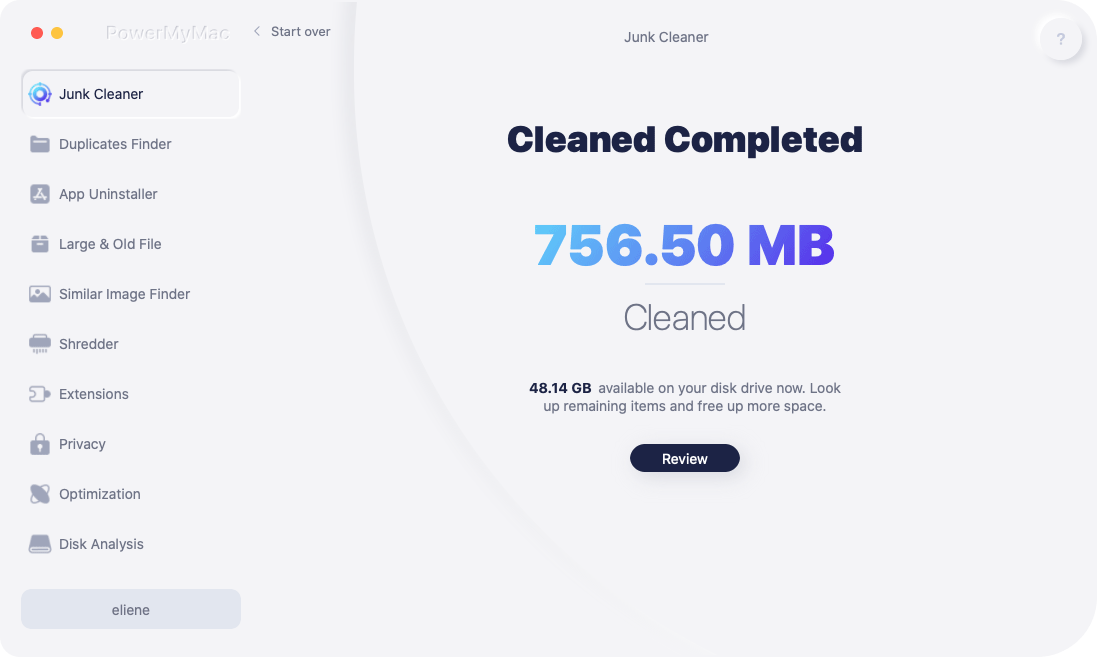
Then after that, once that you are done choosing all of the files that you want to get rid of your Mac, you can now go ahead and start to clean them up and remove them from your Mac. And for you to do this all you need to do is to click on the “Clean” button located at the bottom of your screen. Once the cleaning process starts, all you have to do now is to wait until the process is complete.
NOTE: The iMyMac PowerMyMac might require you to enter your password if it is necessary so all you have to do is to enter your password on the pop-up box.
You can also try to clean up your Mac by using the other cleaning options. That way, you will be able to completely remove all of the useless files that you have and for you to have more space and make your Mac perform better.
Part 4. Conclusion
Chromecast on Mac is actually one of the best ways to have for entertainment. This is because having the Google Chromecast will allow you to watch any movies that you want from the internet using your Mac device. And setting up the Chromecast on Mac is actually a very easy thing to do. It will only take you less of your time and will give you lifetime happiness once that you are done.
Also, do not forget to optimize your Mac. This way, you will be able to experience the best out of your cast. This is also one way for you to avoid having some bad issues using your Chromecast on your Mac such as low quality of videos, poor sound, and so much more.

