


Visual Studio Code (VS Code) is popular among developers due to its versatility, extensibility, and efficiency. However, over time, as we work with multiple projects and extensions, the code cache in VS Code can accumulate and potentially impact performance and cause unexpected behavior. So it is crucial to understand the importance of the process to clear VS Code cache and learn the most effective methods to clear cache files and optimize your development environment.
In this article, we delve into the significance, benefits, the steps to clear the code cache in VS Code, and the potential issues it can resolve. Let's dive in and unlock the secrets to a streamlined and efficient development experience.
Contents: Part 1. Where to Find VS Code Cache?Part 2. How to Clear Cache for VS Code?Part 3. How Do I Safely Clear VS Code Cache on Mac?Part 4. Summary
Part 1. Where to Find VS Code Cache?
When you work with C/C++ files in VS Code, the editor automatically generates a cache to improve performance. This cache is stored in a specific location depending on your operating system.
- On Windows, it can be found in the
%LOCALAPPDATA%\Programs\Microsoft VS Code\Code Cache directory. - On macOS, it resides in
~/Library/Application Support/Code/Cache. - On Linux, it is stored in
~/.config/Code/Cache.
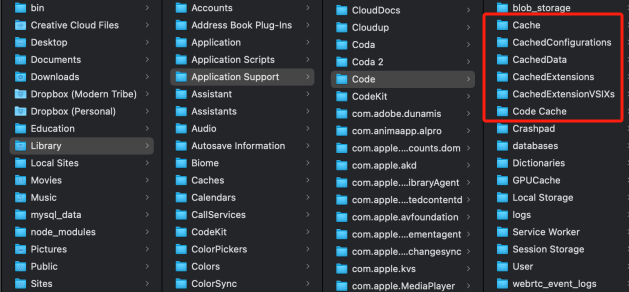
Understanding the location of the the cache is essential for effectively managing and clearing VS Code cache when needed. In addition to the cache directory mentioned earlier, VS Code also maintains other cache-related files and folders. These include the CachedData folder, which stores cached versions of extension files, and the .vscode/.code-workspace file, which contains workspace-related cache data.
VS Code also utilizes a language service cache, which is separate from the code cache. The language service cache is used for language-specific features like IntelliSense and code navigation. By default, the language service cache is stored in a .vscode/.vscdb folder within the workspace.
Part 2. How to Clear Cache for VS Code?
Clearing the VS Code cache can help resolve performance issues, eliminate unexpected behavior, and ensure a smooth coding experience. Here are some easy tips to clear the cache in VS Code:
Close VS Code and Delete Cache Files:
The simplest way to clear the cache is by closing VS Code and manually deleting the cache files. Navigate to the cache directory specific to your operating system (as mentioned earlier), and delete all the files and folders within it. This action removes the accumulated cache data, allowing VS Code to rebuild it when you next open the editor.
Use a Keyboard Shortcut:
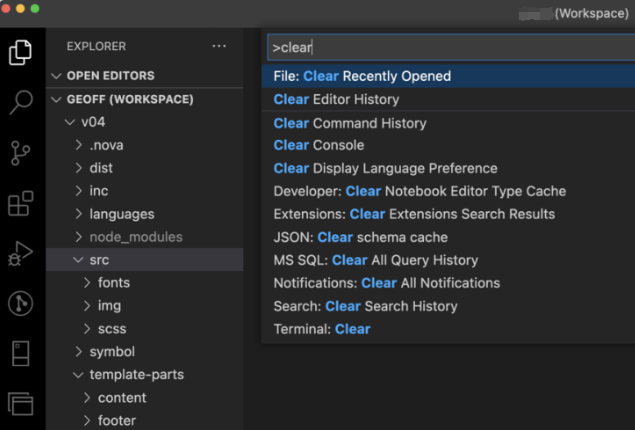
VS Code provides a built-in command to clear the cache. You can use a keyboard shortcut to quickly access this command and clear the cache. Press Ctrl+Shift+P (Windows/Linux) or Cmd+Shift+P (macOS) to open the command palette, and then search for "Developer: Clear Cache" or "Workspaces: Clear Cache" depending on your preference. Select the appropriate option, and VS Code will clear the cache for you.
Utilize Extensions:
Several extensions are available in the VS Code marketplace that provide functionality to clear the cache. These extensions offer a convenient way to manage the cache without manually deleting files or using complex commands. Search for "cache" or "clear cache" in the Extensions view of VS Code, and explore the available options. Install the extension of your choice and follow its instructions to clear the cache effortlessly.
Exclude Specific Folders from Caching:
If you're experiencing performance issues with specific projects or directories, you can exclude them from being cached by VS Code. Open your user or workspace settings (settings.json) by navigating to File > Preferences > Settings, and add the following configuration:
"files.exclude": {
"**/.vscode/.vscdb": true,
"**/path/to/excluded/folder": true
}
Replace "**/path/to/excluded/folder" with the actual path to the folder you want to exclude. By excluding specific folders, you prevent their contents from being cached, potentially improving overall performance.
Disable Extensions Temporarily:
Extensions in VS Code can contribute to the accumulation of cache data. If you suspect that an extension might be causing performance issues, try disabling it temporarily and observe if the problem persists. Navigate to the Extensions view, find the extension you want to disable and click on the "Disable" button. Once disabled, restart VS Code and check if the cache-related issues have been resolved. If so, consider uninstalling or updating the extension, or reaching out to the extension developer for assistance.
Use Portable Mode:
VS Code provides a portable mode that allows you to run the editor from a USB drive or a specific location without leaving traces on the host system. When using portable mode, the cache is stored in a location relative to the VS Code executable, eliminating the need to manually clear the cache. To run VS Code in portable mode, use the --user-data-dir command-line argument followed by the path to the desired location.
By following these easy tips, you can effectively clear the cache in VS Code, improve performance, and ensure a more stable development environment. Experiment with these methods and find the one that best suits your workflow and preferences. Remember to back up any important data before clearing the cache to avoid unintended data loss.

Part 3. How Do I Safely Clear VS Code Cache on Mac?
If you're using a Mac and want to safely clear the VS Code cache, an effective and convenient method is to utilize third-party software like PowerMyMac. It is a comprehensive Mac utility tool that offers various modules to optimize your system performance. The "Junk Cleaner" module in PowerMyMac is specifically designed to clean up unnecessary files, including app caches, on your Mac.
To safely clear the VS Code cache using PowerMyMac, follow these steps:
- Download and install PowerMyMac from the official website or trusted sources.
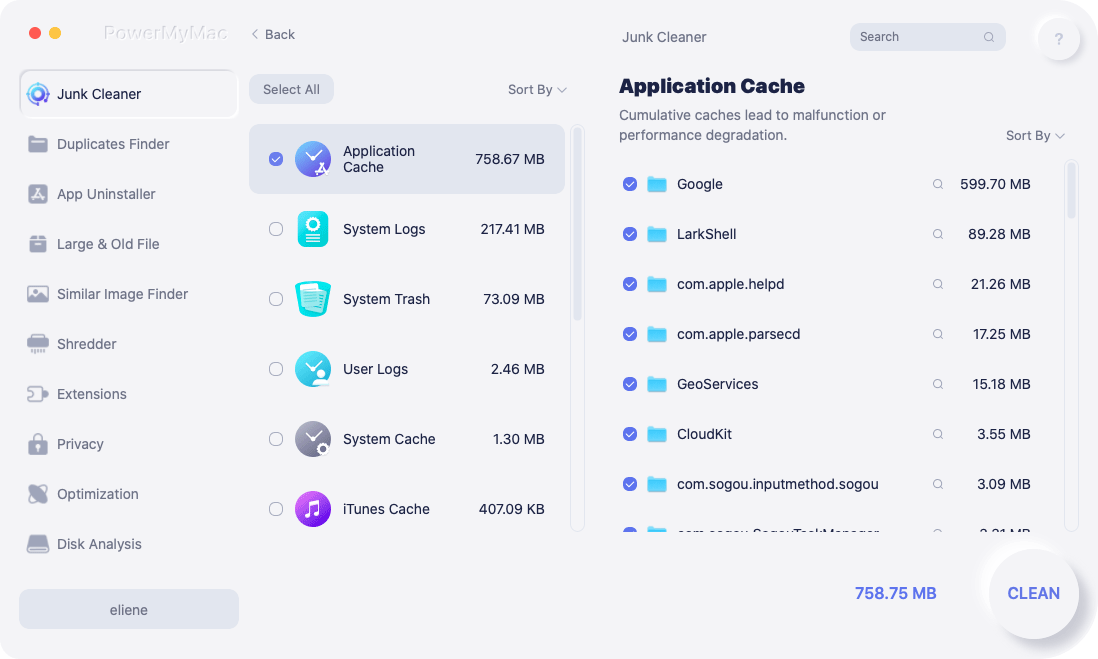
- Launch the app and click on the "Junk Cleaner" module. Click SCAN.
- It will scan your system for various junk files, including app caches.
- Once the scan is complete, you'll be presented with a list of junk files to review.
- Look for the cache files associated with VS Code and select them for removal.
- Review the other junk files that will be deleted and ensure that you're comfortable with the selection.
- Click on the "CLEAN" button to remove the selected junk files, including the VS Code cache.
You can safely clear the VS Code cache on your Mac with PowerMyMac and no need for manual file deletion. This method ensures a thorough cleanup while also minimizing the risk of accidentally deleting important files. You can also use its "App Uninstaller" tool to remove Visual Studio Code if you need.
Remember to regularly clear the cache to maintain the performance and stability of your VS Code editor and overall Mac system.
Part 4. Summary
When it comes to clearing the VS Code cache on your Mac, PowerMyMac emerges as a highly recommended tool. With its "Junk Cleaner" module, it provides a safe and efficient solution to remove unnecessary files, including app caches, from your Mac system.
By utilizing the above ways, you can effortlessly clear the VS Code cache and optimize the performance of your development environment.


John2024-03-24 20:52:29
The path in the article for Windows is not correct. The correct Windows path is: "%APPDATA%\Code\Cache\" or "%APPDATA%\Code - Insiders\Cache\" the difference being that "%APPDATA%" maps to ".\Username\AppData\Roaming\" and "%LOCALAPPDATA%" maps to ".\Username\AppData\Local\". The "Roaming" folder is intended for user data, while the "Local" folder is intended for application data. In the "Disable Extensions Temporarily:" section should mention the built-in VS Code feature that you can start with the command "Help: Start Extension Bisect". The "Bisect" feature is specifically for helping the user to identify extensions that are causing issues. See: https://code.visualstudio.com/blogs/2021/02/16/extension-bisect