


Formatting SD card is quick and easy. Thanks to your Mac’s Disk Utility. Find out the complete steps in this guide on how to format SD card on Mac effectively.
Article GuidePart 1. How to Format SD Card on Mac via Disk UtilityPart 2. How to Format SD Card on Mac without the SD Card SlotPart 3. How to Format Corrupted SD Card on MacPart 4. How to Free up Space on Mac to Get Rid of SD Card – Bonus TipPart 5. Summary
Part 1. How to Format SD Card on Mac via Disk Utility
SD cards are highly popular forms of storage devices especially for electronics such as smartphones, DSLRs and more. These tiny chip-like storage devices are lifesavers for our everyday use.
Can't format SD card Mac? Before you can use the SD card completely, you need to know how to format an SD card first.
In this tutorial, we will teach you how to format SD card on Mac using the Disk Utility. First, you have to understand that formatting an SD card or micro SD card will erase all data saved on the card as set a file system format for the SD card.
To ensure that all your files such as photos and videos are safe, copy these media files or create a backup.
Once you are done taking backups, follow these steps on how to format SD card on Mac:
- Mount your SD card or micro SD card to your Mac. Make sure that the metal contacts face down and pointing towards your computer.
Before inserting your SD card, verify if your Mac supports an SD card slot otherwise you can use an SD card adapter.
- Launch the Disk Utility. You can do this by going to Finder, then go to Applications and select Utilities
- Find and select your SD card from the left sidebar.
- At the upper toolbar, click Erase
- Create a name for the SD card and select the file system format you want to use. If you have an SD card with 64GB or larger, choose ExFAT. If you have 32GB or smaller then choose FAT32. Macs with SD card slots running on OS X 10.6.5 or later can use the exFAT file system.
- Wait until formatting is complete and click done.
- Safely eject your SD card/micro SD when finished.
Don’t be too excited to pull out the SD card without safely ejecting it from your Mac. Just make sure you are not bypassing some operations and cause issues on your SD card.
After safely removing your card, you are now able to use it in whatever purpose you wish such as using it in another device.
Part 2. How to Format SD Card on Mac without the SD Card Slot
After 2016, Mac Book releases did not include SD card slots which meant getting an extra piece when you needed one.
You can get a USB SD card reader or adapter depending on the Mac device you own. The price ranges from $7-$30.
Once you have the card reader ready, you can follow the same guide mentioned in the first part of the article to format the SD card without the SD card slot.
How to Select the Correct File System Format
Mac supports the SD 1.x, 2.x, and 3.x standards. Your SD card slot should work with:
- 4MB to 2GB – Standard SDs
- MMC (Multimedia Cards)
- 4GB/32GB - SDHC (Secure Digital High Capacity)
- 4GB to 2TB - SDXC
- UHS‑II - up to 2TB for iMac Pro only
Your device also supports SD card adapters for MiniSD, MicroSD and even higher densities including MiniSDHC and MicroSDHC.
Each SD media has a different transfer rate. You can check with the package to determine the transfer rate of your SD card. Mac desktops have faster transfer speed in which you can check it by:
- Click the Apple menu
- Go to About This Mac
- Click System Report
Mac notebooks, on the other hand, use the USB bus to communicate with the SD card slot at a maximum speed of up to 480Mbit/s.
Part 3. How to Format Corrupted SD Card on Mac
We may not avoid it sometimes that SD cards get corrupted due to various reasons. Regardless of the causes, you can format corrupted SD card Mac by following these steps:
- Insert the SD card into the card slot or the adapter.
- Open Disk Utility. You can also launch it by double-clicking its icon or go into the Utilities folder inside Applications.
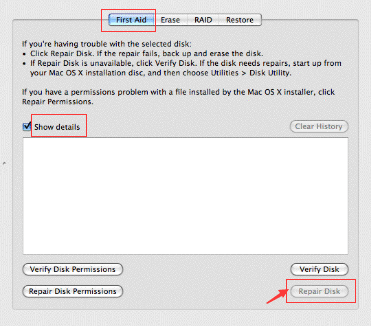
- On the upper toolbar, click First Aid. You can choose to click the Show Details box to see how will the Disk Utility repair your SD card
- Click on Repair Disk button found at the bottom-right corner
- Wait until Disk Utility completes the repair. You can see a progress screen filling up from left to right
- Quit the Disk Utility once the progress bar is filled completely
- Drag the SD card icon from the desktop into the Trash folder and wait until it disappears
- Safely remove the SD card from the card slot.
Again, un-mount the SD card properly from your Mac because sometimes, a careless mistake can cause card corruption.
Good thing, your Disk Utility offers a wide range of functions including repairing the SD card structure. You may now use your SD card as you wish after its recovery.
Part 4. How to Free up Space on Mac to Get Rid of SD Card – Bonus Tip
You may need to buy an SD card because your Mac is running out of space. Actually, you don't need to do that at all.
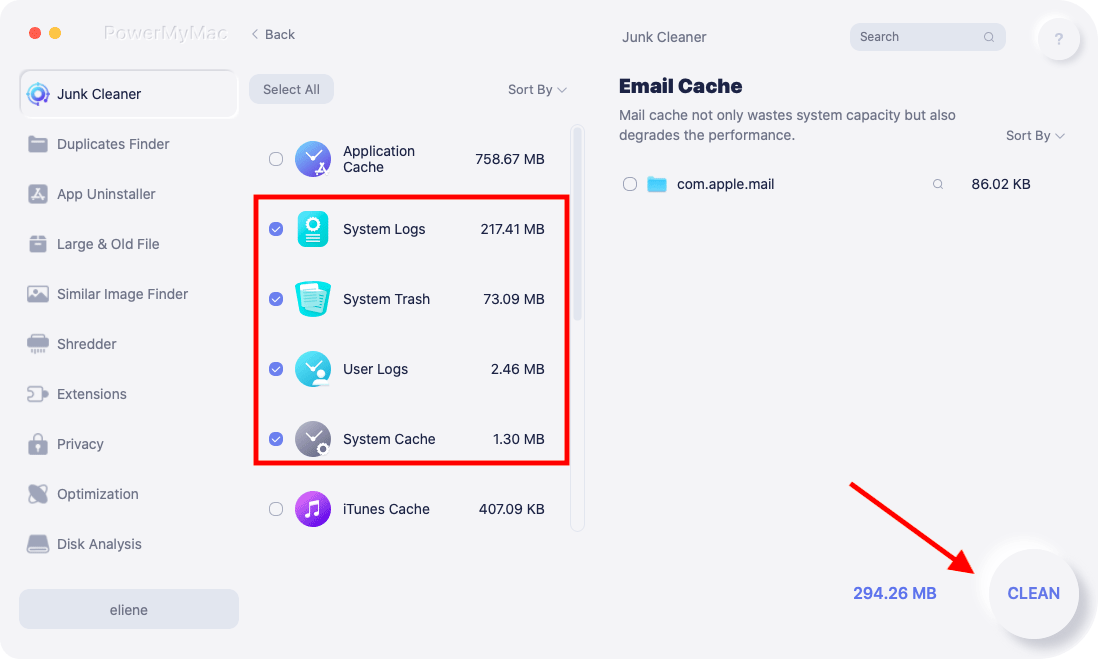
Here I will recommend you a powerful tool called iMyMac PowerMyMac that can help you find out and clean up all junk files on your Mac to free up and save lots of space.
Just follow the easy steps below to free up space with PowerMyMac in just a few clicks:
- Free download PowerMyMac to your Mac, then install and launch it.
- Choose Master Scan module.
- Allow it to scan your Mac for all kinds of junk files.
- View the scanning results and choose your unwanted files to remove.
- Click the Clean button to delete those files.
- Wait for a few second, the cleaning process will be completed.
How to Import Media Files from SD Card to Mac
Now your Mac has enough space. SD cards hold a lot of photos and videos, especially when used in smartphones. If you own one and you wish to import it to your Mac, you can do the following:
- Mount your SD card into the card slot or an SD card reader.
- Go to Photos and click File and then select Import
- Carefully select the photos and videos you want to transfer and then click Review for Import. You can also select Import All New Photos if you want.
- Click the Import To pop up and set a file location
- Name the folder and continue to import media files when needed
- After transferring all the photos and videos, you can select to delete the media contents inside the SD card. (*Optional Step)
- Safely eject SD card after use
Otherwise, if you have an iOS device, you can simply turn on the iCloud backup or use iTunes to sync the photos.
Part 5. Summary
We have just completed the tutorial on how to format SD card on Mac using the Disk Utility. You may also choose to download third-party software to format your SD card but it comes with a price.
I hope you have learned a lot of important things such as repairing a corrupted SD card and even understanding the different SD file system formats supported by your computer.
We even gave some bonus tips on how to free up space on Mac to get rid of the SD card with iMyMac PowerMyMac. It has a free trial version for you to try its powerful features, now you can download it below.
You can also let share this to your friends so they too can learn great tips and tricks on your Mac!


tt2020-06-05 18:54:05
bonjour, c'est tt, j'ai besoin d'effacer ma carte 128go remplit , j'ai suivit les étapes du partie Partie 1. Comment formater la carte SD sur Mac via l'utilitaire de disque", mais ca ne marche pas, l'ordi affiche " impossible d'ouvrir le périphérique :(-69877). pourrais tu me proposer une solution? stp
iMyMac2020-06-06 18:15:00
Bonjour tt, veuillez vous référer à la solution proposée par Apple: https://discussions.apple.com/thread/250900301