


You may want to know how to uninstall Avira Mac completely from your computer. Avira is a free Mac antivirus software that will enable you to remove and block malware. It also offers real-time protection and it helps secure data through VPNs that are encrypted.
As such, it can still be a nuisance for your device. That’s one of the reasons why you may want to remove an application from your Mac completely. Here, we will discuss just how to do that easily and totally. In addition, we’ll make sure that you will remove even the trace files so that the uninstallation will be totally complete.
Contents: Part 1. How Do I Disable Avira on My Mac?Part 2. How to Uninstall Avira Antivirus on MacPart 3. Conclusion
Part 1. How Do I Disable Avira on My Mac?
Before we teach you how to uninstall Avira on Mac, we’ll teach you how to enable or disable the protection feature of Avira first. The feature called Avira Web Protection enables protection for users, especially against fraud, spam, malware, and phishing.

So, here’s how to enable or even disable Avira’s own Web Protection on Mac:
- Go to the system tray on your Mac. Then, click the icon for Avira in order to open its own user interface.
- Go towards the left menu. After that, press Security.
- Then, select the module that is labeled Protection Options.
- Go to the section labeled Web Protection. Turn it On or turn it off as you wish.
So, we have taught you how to disable Avira on your Mac computer now. As you can see the process is very simple. You just have to follow the steps above.
Part 2. How to Uninstall Avira Antivirus on Mac
Below are the steps you should follow in order to implement how to uninstall Avira on Mac. Check out these steps below:
- Visit the folder known as Applications within your Mac computer.
- Find the icon for Avira. Drag it towards the Trash and drop it there.
- Sometimes, the Mac computer will prompt you to make sure you are doing the right step. To confirm it, you should type your username and its corresponding password.
- Wait until the process for removing Avira is complete. You have to note that this is not the complete way because leftover files are still kept.
- The next move will be to remove the support files of Avira. Typically, these are stored within the Library folder of your Mac. In order to launch this particular folder, you should go to Finder, then after that, you should press
SHIFT + CMD + G. Visit the location that is known as~/Library. - Now, go to the different folders below one by one.
~/Library/Cookies~/Library/Containers~/Library/Preferences~/Library/Logs~/Library/Caches~/Library/Application Support

- As you go through each folder, make sure you delete files and subfolders that are associated with the application named Avira.
- After you have gone through folders and subfolders and deleted leftover files, you should go to your Trash and empty it.
- After you have uninstalled Avira, it is necessary to restart the Mac computer.
Remove Avira with Its Own Uninstaller
Another thing you can do on how to uninstall Avira on Mac is to remove it with its own uninstaller. It can help you remove some leftovers as well. Check out the steps below:
- Go to this link here. This is where you can find the uninstaller. Now, grab its Avira Uninstaller.
- Now, open the ZIP file that contains the Avira Uninstaller.
- This will launch the Terminal app that will open the command named as
Avira.Uninstall. command. When your Mac asks you for your password, you can type your username and password for that Mac computer. After that, press the button named Enter. - Wait until the Terminal finished the job by running the particular command that will be used to remove the service files of Avira.
- Quit the Terminal once it gives you a message showing that the removal process is complete. By now, you have finished how to uninstall Avira on Mac with its own uninstaller.

How Do I Completely Remove Avira?
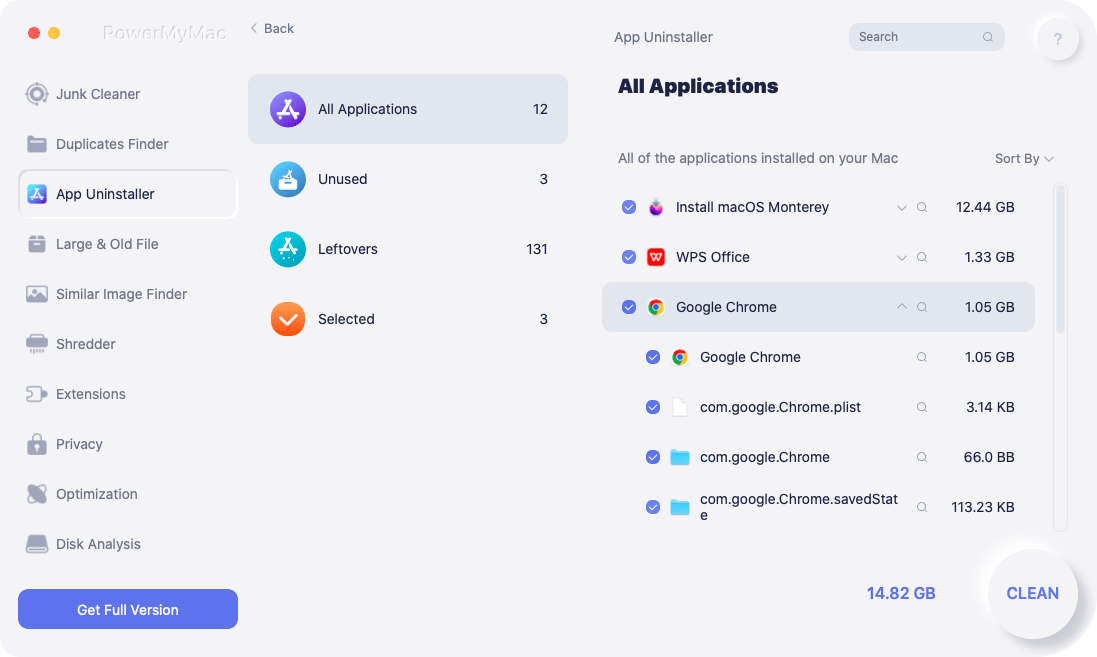
So, how to uninstall Avira on Mac completely without hassles? Well, what you have to do is to use iMyMac’s PowerMyMac. This is an optimizer for Mac computers, including both desktops and laptops. It has one out of many modules named Uninstaller. This module is used to uninstall apps completely ensuring that trace files or associated files of these apps are removed as well.
Here are the steps to use PowerMyMac to implement how to uninstall Avira on Mac:
- Grab PowerMyMac from its official website on the Internet.
- Install it on your computer so you can use it to uninstall Avira completely.
- Launch PowerMyMac on your computer and click the module named App Uninstaller. This will help you start the process.
- Press the option to SCAN the entire Mac for applications. Wait until the process for scanning is complete.
- Locate the app on the left-hand side of the page for Uninstall. In this case, you are looking for Avira.
- Click the Avira app so that its associated files will be displayed on the right side of the interface. Press the button for CLEAN.
- Once a pop-up window appears that says the cleanup process is completed, this means Avira has been removed from your Mac.
Part 3. Conclusion
This article has given you the top ways on how to uninstall Avira on Mac. We have taught you to uninstalling Avira through manual means. We even taught you how to remove it with its own uninstaller.
But, the best way to uninstall Avira on your Mac is through PowerMyMac. This is a great way to remove apps from your Mac computer ensuring that associated trace files aren’t left for more storage space.

