


Have trouble with how to uninstall FileZilla Mac? Some new users may have no idea how to remove FileZilla Client properly. Even experienced users may also get lost when trying to uninstall an application. Uninstalling programs on Mac differs significantly from that on Windows.
In most situations, Mac users just drag and drop the target program to the Trash, then empty it. However, some of them are unaware that Mac programs are separate packages that include the executable and any related resources for the app that still stay even if you uninstall an app.
Contents: Part 1. Is FileZilla a Bloatware?Part 2. How Do I Uninstall FileZilla on Mac Manually? Part 2. How Do I Completely Remove FileZilla from My Mac?Part 3. Conclusion
Part 1. Is FileZilla a Bloatware?
FileZilla is not typically considered bloatware. It's a popular and widely-used FTP client that facilitates file transfers between computers and servers. However, it's worth noting that some versions of the FileZilla installer have been bundled with optional third-party software, which can be seen as a form of adware. So let's begin the useful ways to uninstall FileZilla on Mac from next part.
Part 2. How Do I Uninstall FileZilla on Mac Manually?
To begin, log in to your Mac with administrative privileges. Next is to disable FileZilla if it is running before uninstalling it. To deactivate a program, right-click its icon on the dock and select Quit (or on the Menu bar, pick FileZilla > Quit FileZilla).
Method 1. Dragging FileZilla to Trash.
This drag-to-delete technique is one way how to uninstall FileZilla on Mac.
- Open the Finder app, click Applications on the left side menu.
- Select the FileZilla icon and drag it to Trash.
- To begin your uninstallation, right-click the Trash icon and select Empty Trash.
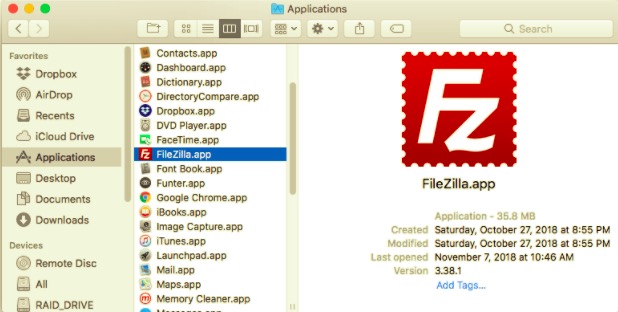
Note that emptying the Trash will delete FileZilla on Mac as well as any other files it contains. If you don't want to permanently delete the file, select it, right-click, and pick the Put Back option before emptying the Trash, as this step is irreversible.
Method 2. Deleting Using Launchpad
The Launchpad approach on how to uninstall FileZilla on Mac with all its components, follow the steps below.
This is only available for App Store apps and needs OS X Lion or above. FileZilla will be immediately deleted when you click the X symbol, without the need to empty the Trash.
- Open Launchpad and search for FileZilla.
- Continue to hold down the mouse button on the FileZilla icon until it begins to shake. Then select the "X" button that will appear beside the FileZilla icon to begin the uninstallation.
Method 3. Using Its Own Uninstaller
Some Mac programs, including FileZilla, have their uninstallers to help you how to uninstall FileZilla on Mac. It is preferable to utilize a specialized uninstaller to completely remove the application as well as any bundled software or associated items.
- Locate and double-click the installation file to launch FileZilla.
- Double-click the [uninstaller] in the package.
How Do I Delete Files from FileZilla Mac?
Even if you successfully uninstall FileZilla, its residual caches, logs, files, and other stuff will remain. These data are not hazardous to your system but do take up some memory space. As a result, if you no longer wish to use FileZilla again, you can safely remove these components on your Mac computer.
Apps save their data and supporting files in two areas, one on the Top-Level Library on Hard Disk: /Library and the other one is on User Library inside Home Folder(~/Library). Aside from these files, FileZilla may also distribute its components throughout the system, such as login items, starting daemons/agents, or kernel extensions.
To uninstall FileZilla on Mac with all its components, follow the steps below.
Hard Disk Top Level Library:/Library
- Open the Finder, go to the Menu Bar, and click Go to Folder.
- Enter the top-level Library on your hard disk:
/Library. - Look for FileZilla files or folders on:
/Library/Library/Caches/Library/Preferences/Library/Application Support/Library/LaunchAgents/Library/LaunchDaemons/Library/PreferencePanes/Library/StartupItems
- Right-click the corresponding files or folders and select Move towards Trash.
The User Library in the Home Folder (~/Library)
- Navigate to Folder, type
~Libraryinto the search box, then hit the Enter key. - Remove any FileZilla files or folders on:
~/Library~/Library/Caches~/Library/Preferences~/Library/Application Support~/Library/LaunchAgents~/Library/LaunchDaemons~/Library/PreferencePanes~/Library/StartupItems
- Empty the Trash to permanently uninstall FileZilla on Mac and all its associated files.
Furthermore, there may be extensions of kernel or hidden files that are not instantly obvious.
In this situation, you can look for FileZilla components on Google. Kernel extensions can be commonly located on /System/Library/Extensions and have a .kext extension. You may use Terminal (from the Applications/Utilities folder) to see the contents and delete malicious items.
Part 2. How Do I Completely Remove FileZilla from My Mac?
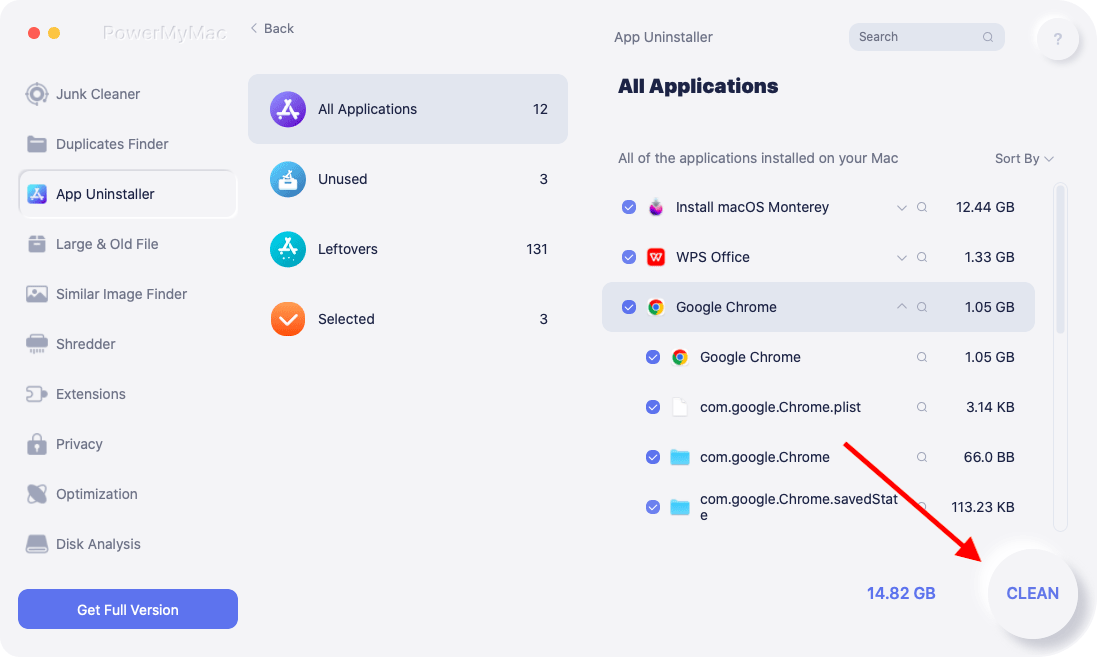
Looking for an all-in-one solution to uninstall FileZilla from Mac? PowerMyMac is an excellent uninstaller that keeps everything easy, plain, and simple. Its App Uninstaller module is a powerful tool that can help you on how to uninstall FileZilla on a Mac as well as its associated files with only a few clicks.
- Click App Uninstaller and press SCAN to let it scan all the apps that have already been installed on your Mac.
- When the scanning process is complete, a list of all programs will show on the right side. Locate FileZilla app in that list.
- After selecting FileZilla and all of its associated files, simply press the CLEAN button.
- After this, a "Cleanup Completed" pop-up window will appear, alerting you of the number of files deleted and the amount of space now available on your disk.
Part 3. Conclusion
As you can see, you have the option to uninstall FileZilla on Mac manually. However, there is a risk that certain related files will be overlooked, causing your software update to fail. It's no longer cost-effective to remove apps on your own now that there's an app for nearly everything.
PowerMyMac is an excellent uninstaller. It enables users to uninstall applications and bundleware so there will be no need to examine the library or manually delete its extra files while optimizing and cleaning up your Mac, guaranteeing a healthy, faster, and secure MacBook or iMac.

