


Pro Tools is like one of those applications which like to hang around for a long time. It uses up a lot of storage, generates folders in several locations, and isn't as easy to remove as a regular program. Continue reading to learn easy ways to uninstall Pro Tools Mac.
Before removing Pro Tools, make a backup of your audio extensions, whether you're using Mac OS X or Windows 10. It's possible that your plugins were downloaded in the Avid/Audio directory, and you accidentally deleted them during the software installation.
There are a few things to keep in mind when uninstalling apps on Mac, and this guide will show you, so let's get started!
Contents: Part 1. Why Can't I Delete Pro Tools?Part 2. How to Uninstall and Reinstall Pro Tools Mac?Part 3. How to Fully Uninstall Pro Tools on Mac?Part 4. Conclusion
Part 1. Why Can't I Delete Pro Tools?
If the uninstall option for Pro Tools is greyed out, it indicates that the system or the application itself is restricting the uninstallation process. Here are some possible reasons:
- Pro Tools or its associated processes are still running in the background.
- Lack of administrative privileges or permissions required to uninstall the software.
- The Pro Tools installation might be corrupted, causing the uninstaller to malfunction.
- System policies or third-party software might be restricting the uninstallation process.

To know more about what you must do to uninstall Pro Tools on Mac, continue to read below.
Part 2. How to Uninstall and Reinstall Pro Tools Mac?
Uninstalling and reinstalling Pro Tools on a Mac involves several steps to ensure all components are properly removed and reinstalled. Here's a detailed guide:
Manually uninstall Pro Tools Mac is an exhausting process and may consume much of your time and effort. Before doing this removal, make sure you're logged in as an admin on the Mac, then proceed in following these instructions below:
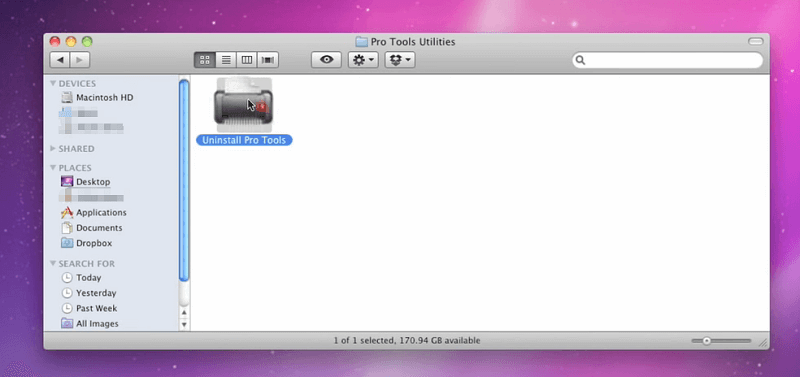
- Locate the Applications directory. Select Applications > Digidesign > Pro Tools > Pro Tools Utilities from the drop-down menu.
- You should see a file named "Uninstall Pro Tools." Double-click this and continue the on-screen directions to complete the uninstall.
- There are two sorts of uninstallation to choose from Clean Uninstall and Safe Uninstall. If you don't want your plugin settings to be left behind, choose Clean Uninstall instead.
- You may not utilize an uninstall document depending on the edition of Pro Tools you downloaded. Instead, to completely uninstall Pro Tools on Mac, simply drag and drop every Pro Tools or Avid item into the trash bin. You must delete the following folders and files:
-
Mac HD/Applications/Pro Tools Mac HD/Library/Application Support/Propellerhead Software/RexMac HD/Library/Audio/MIDI Patch Names/AvidMac HD/Users/home/Library/Preferences/Avid/Pro ToolsMac HD/Library/Application Support/Avid/Audio
You should also carefully examine the library and see if there are some other "Avid" directories and delete these. Then look for the Pro Tools First logo on the Launchpad. Remove it now if it hasn't been deleted automatically. Finally empty the Trash Bin.
Reinstalling Pro Tools on Mac:
- Visit the Avid Pro Tools download page and download the latest version of Pro Tools compatible with your macOS.
- Open the downloaded installer file and follow the on-screen instructions.
- Enter your administrator password when prompted to allow installation.
- Once installed, launch Pro Tools. Follow the activation instructions using your Avid account credentials and any necessary activation codes.
- If you use additional plugins or content packs, make sure to reinstall them after Pro Tools is set up.
- After installation, configure your Pro Tools settings and preferences as needed.
Part 3. How to Fully Uninstall Pro Tools on Mac?
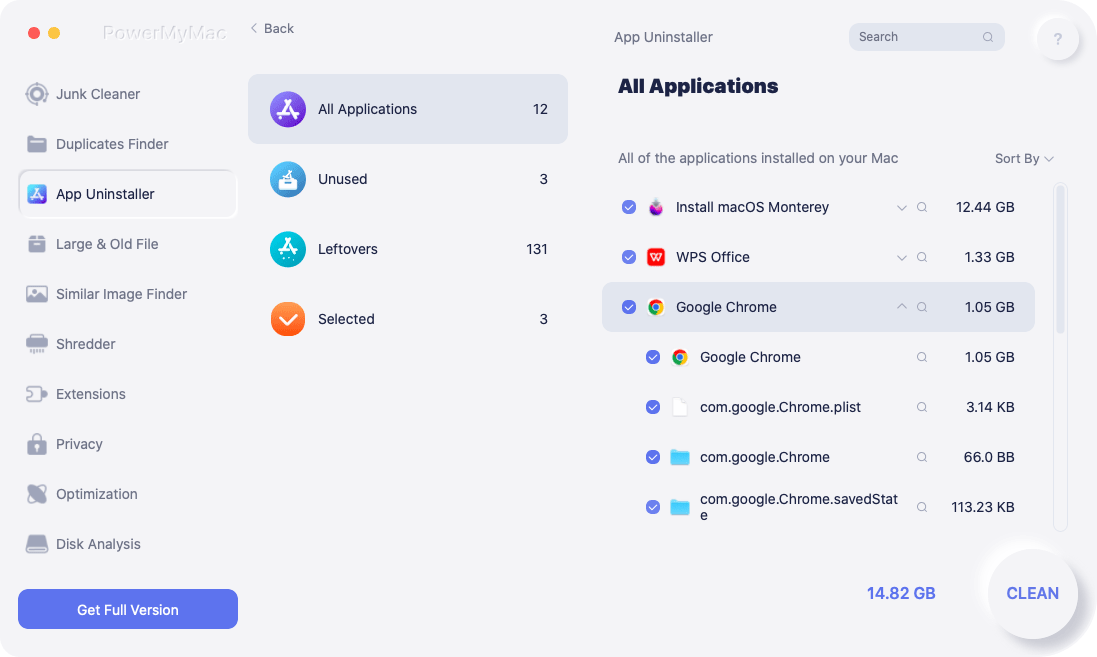
We recommend using iMyMac PowerMyMac to completely remove Pro Tools and safely delete its residual files. As a powerful Mac cleaning software, it can not only intelligently uninstall software like Roblox, Office, and Dropbox, but also clean all kinds of junk files and cache on Mac, scan large files, old files and duplicate files, and also manage browser extensions on Mac.
All you have to do is to follow these steps to uninstall Pro Tools on Mac automatically in just a few clicks:
- To begin, download, install and launch the software.
- Select the App Uninstaller tool, choose SCAN. Allow some time for the scanning to finish.
- Installed apps will appear on the right side after everything has been confirmed. Enter the name of the product you wish to remove, such as Pro Tools, into the search box.
- Choose all the support files you want to get rid of. Select CLEAN to eliminate all of the files you've highlighted after double-checking the data.
- A popup message with the words "Cleanup Completed" will appear when it's finished, signaling that the removal is complete.
Part 4. Conclusion
Pro Tools frequently leaves a lot of settings and data behind even after the uninstallation is done. So how to completely uninstall Pro Tools on Mac? You may need to manually remove every one of these items or utilize registry cleaner software to remove them altogether. These files would be used the very next time you download another edition of Pro Tools if you wouldn't delete them, and also, they can bring problems over time.
So we recommand you user professional tool like PowerMyMac to remove the application and erased any related data easily and quickly.

