


Once we mistakenly delete data, we want to make sure we recover it fast. Thus, we opt for data recovery software to retrieve lost files. One such popular data recovery software is Disk Drill. Available on both Mac and Windows, you use it to recover data. But if you want to delete it, you need to know how to uninstall Disk Drill Mac.
Contents: Part 1. Is Disk Drill Safe to Use on Mac?Part 2. How Do I Uninstall Disk Drill on Mac Using Its SettingsPart 3. How Do I Completely Delete Disk Drill on Mac?Part 4. Conclusion
Part 1. Is Disk Drill Safe to Use on Mac?
Disk Drill is software that is used to retrieve lost data from computers, USB flash disks, and even SD cards. So is safe to use Disk Drill on Mac? The answer is yes because no potential threats were found when the anti-virus software detected this software.
But it has flaws as well. Sometimes it doesn’t work. Or, you may have installed it improperly. Fortunately, you are in this guide today! We will teach you how to uninstall it through various means. You can do it through the app’s settings. You can even implement it using the Terminal. There are manual methods of doing it as well. At the end of this guide, we will give you the best solution to uninstall Disk Drill on Mac.
Part 2. How Do I Uninstall Disk Drill on Mac Using Its Settings
You can uninstall Disk Drill on Mac using the application’s settings window. Within that window, there’s a choice for you to uninstall the app on your Mac computer. So, here are the steps you should follow in order to do it:
- Open your Disk Drill app within the Mac computer.
- Go to the menu bar. Within it, press the icon for Disk Drill. After that, choose the option for Preferences.
- Go to the tab labeled General. An option to uninstall the app will be shown there. Click the button that says Remove Disk Drill.
- Make sure you confirm that you really want to remove the app.

The developers of Disk Drill say that to uninstall their tool, you should use the settings window. According to them, this is the only way to completely remove the app from your computer. You can simply delete these associated files to completely remove Disk Drill from your computer. As such, this is not the best way to do it.
Part 3. How Do I Completely Delete Disk Drill on Mac?
You may want to go through the manual method of deleting Disk Drill and its components from your Mac computer. This can be done by following the steps below:
- Exit the Disk Drill app on your Mac.
- Go to the folder labeled Applications. Find the app of Disk Drill. Make sure you move it towards the Trash.
- Now, open Mac’s Finder tool. Within that, press Go.
- After that, choose the option for Go To Folder.
- A window will be displayed. Within the search bar, type the following and press Go The directory you should type (without the dot at the end) is:
~/Library. - Now, you will be placed in Mac’s main Library folder. Within it, you have to check all files and folders related to CleverFiles and Disk Drill. Typically, it can be found in the following subfolders of your main Library folder:
/Application Support//Caches//Logs//Preferences//Saved Application State/
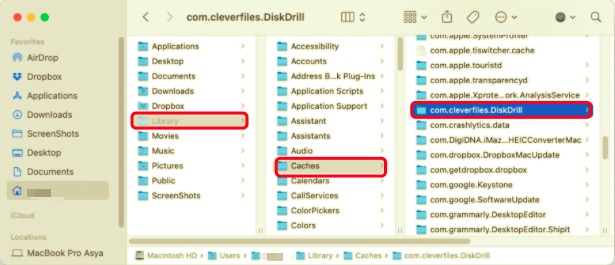
- You need to find both Disk Drill and CleverFiles associated data and move them towards the Trash.
- After that, you can simply empty your Mac’s Trash.
- Finally, reboot your computer.
Delete The Disk Drill Components Using Terminal
This is another way to uninstall Disk Drill on Mac computer using the Terminal:
- Grab the installer of Disk Drill from the website.
- Now, once you have finished downloading the installer, open the
DiskDrill.DMGfile. - As of the moment, make sure you don’t delete the app of Disk Drill located within the Applications folder.
- Now, open Mac’s Terminal which can be found in Applications > Utilities.
- Type in the following command and execute it (without the dot at the end):
sudo /Volumes/DiskDrill/Disk\ Drill.app/Contents/Resources/uninstall. - After that, you have successfully removed the app. Reboot your computer.
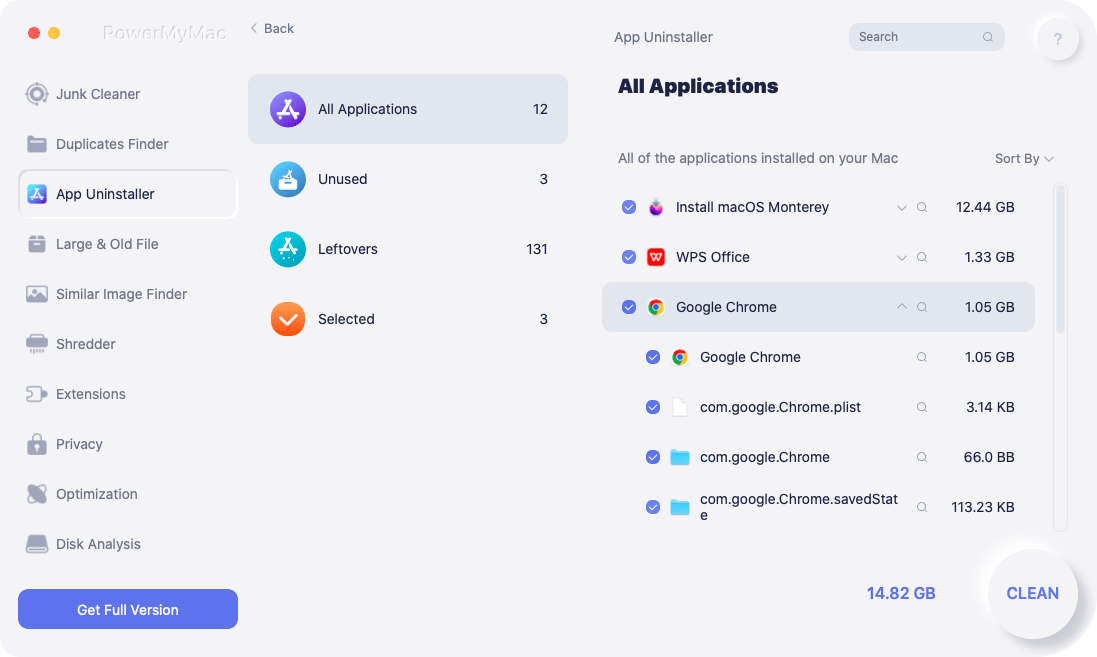
Can’t Uninstall Disk Drill? Use PowerMyMac’s Uninstaller
If you can’t uninstall Disk Drill on Mac, you can use a dedicated uninstallation tool called PowerMyMac. This tool is, in general, a Mac optimization tool. But to optimize your Mac, it has an uninstaller module to remove apps from Mac completely. This frees your Mac more space and keeps it running faster.
Here are the steps to use it:
- Grab Tool. Go to iMyMac.com and grab the PowerMyMac Then, install it on your computer.
- Open Tool. Launch the tool and on the main interface, go to the left panel. In that panel, click App Uninstaller.
- Now, click the SCAN button at the central bottom portion of the interface.
- Select Disk Drill. Choose Disk Drill from the list that will be shown.
- Click the CLEAN button and wait for confirmation that the process is complete. Now, you have removed Disk Drill and its associated data on your Mac.
Part 4. Conclusion
This article is about how to uninstall Disk Drill on Mac. First, we taught you how to remove the app using its Settings window. Then, we taught the manual method of removing the app and its service files on the main Library folder.
In the end, we talked about an easy way to remove the app using a dedicated uninstallation tool. This tool, called PowerMyMac, will help you optimize your laptop or desktop by removing apps, junk files, temporary files, and other unnecessary data. You can use it to uninstall difficult-to-remove apps too!


Chris2022-06-15 07:25:22
I really appreciate this post. I’ve been looking all over for this! Thank goodness I found it on google You have made my day! Thx again .