


Lync was rebranded Skype for Business in 2015. This Lync app is no longer supported by the most recent Mac operating system. But it's possible that it is still on your device. If that is the case, this article will be helpful for you because it will go through two alternative ways to completely and effectively uninstall Lync from Mac.
Upon uninstalling an app from Mac, make sure to remove it completely, including all the associated files it has, scattered on different folders. Incomplete uninstallation can cause problems in the future. To prevent this from happening, follow the step-by-step directions below to be guided on what to do by using a manual approach or automatically using an app that has an Uninstaller feature.
Article GuidePart 1. What Is Lync from Mac?Part 2. How to Manually Uninstall Lync on MacPart 3. How to Automatically Uninstall Lync on MacPart 4. Conclusion
Part 1. What Is Lync from Mac?
Microsoft Lync for Mac is a rich client that integrates messaging services, presence, videoconferencing, and voice for Lync subscribers here on Mac operating system. It was created with the business environment in mind. Lync was then rebranded Skype for Business later on in April 2015.
Lync on Mac was built to work both with Lync Online and Lync Server 2010 to provide you with the following features:
- Reduce the cost of communication.
- Boost user efficiency.
- Improve your operating efficiency.
- Effective collaboration
The most recent update of the program included additional features and a fresh interface. Due to its rebranding, the Lync app may not be functioning as well as it used to, which would want to uninstall Lync from Mac and download the updated version instead or switch to different software.
Part 2. How to Manually Uninstall Lync on Mac
When thinking about manual uninstallation, users believed it meant moving and dropping only the app to the Trash. When in fact, it actually requires more than that. Make sure to follow each step in our tutorial to uninstall Lync from Mac properly:
- First and foremost, ensure that you are signed in as an admin on the system. If you're not certain, go to Users & Groups in Preferences. An administrator label should appear beneath your username.
- Quit Lync and any activities that could be running in the background. To quit Lync, press ⌘+Q or go to the Menu bar and select Lync > click Quit Lync.
- Move Lync to the Trash by going towards the Applications It is the most common method for removing Lync and any other program on a Mac. In actuality, though, many system files linger on the Mac, consuming hard drive space and reducing Mac's performance. As a result, we highly advise deleting service files also.
- Use the
Command+Shift+Ghotkey to open Finder. Type ~/Libraryinto the "Go to the Folder" pop-up that appears and then clicks Go. - Identify and delete all files linked to Lync within the Library directory. They discovered the following on the Mac:
~/Library/Preferences/com.microsoft.Lync.plist~/Library/Preferences/byHost/MicrosoftLyncRegistrationDB.xxxx.plist~/Library/Logs/Microsoft-Lync-x.log~/Library/Logs/Microsoft-Lync.log
- Also, locate and delete the following files produced by Microsoft Lync:
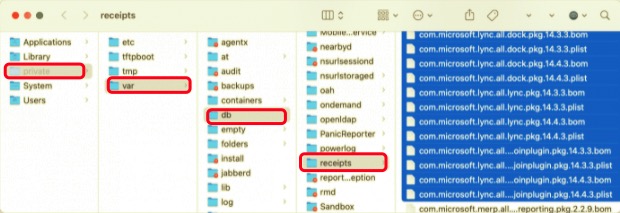
Documents/Microsoft User Data/Microsoft Lync DataDocuments/Microsoft User Data/Microsoft Lync HistoryLibrary/Internet Plug-Ins/MeetingJoinPlugin.plugin~/private/var/db/receipts/…
- Empty your Trash and reboot your PC once you've cleared up the disk of any unnecessary Lync service files.
Microsoft Lync has now been totally removed from the Mac. Use PowerMyMac’s Uninstaller if you're not sure you've located it with all the leftover files or just like to have a more straightforward approach to remove Lync from the Mac. Continue reading to find out more.
Part 3. How to Automatically Uninstall Lync on Mac
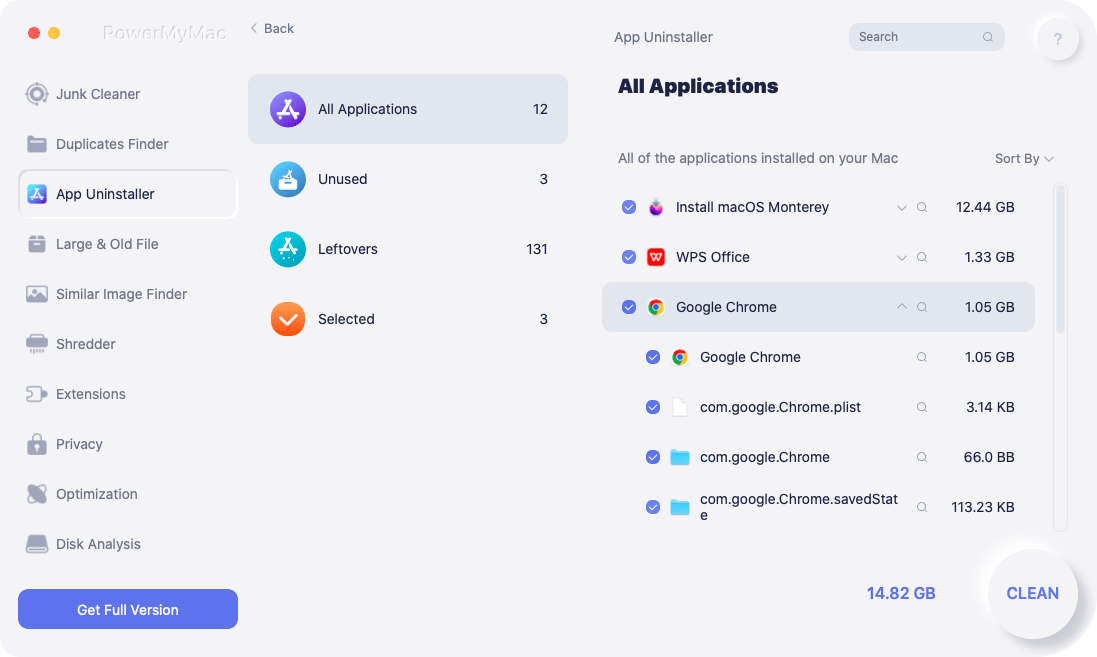
Automatic uninstallation means using an app or seeking assistance from an app to uninstall Lync. One of these apps is the PowerMyMac which has a unique feature that allows users to uninstall Lync from Mac, including all of their associated service components, in only a few minutes entirely. It also enables you to scan your device for any leftover data from any app you may want to remove.
- PowerMyMac is a free application available from the App Store. The program must first be installed before it can be used. When you initially launch the application, it gives you an overview of your system's performance.
- Run a scan after clicking the Uninstaller tool. Wait for the scanning to complete. You may Re-scan all apps only if needed.
- After scanning all of the installed programs on Mac, a list of apps will appear on the right side. To easily find the Lync program or any other unwanted software, type its name into the search box. When you pick the software, the files and folders associated with it will appear on the right side.
- Select all of the files you wish to delete. Double-check everything, then choose Clean from the drop-down menu to finish the removal. Wait for the pop-up dialog "Cleanup Completed" to appear. Restart the Mac to complete the process.
Part 4. Conclusion
This post described and explained how to uninstall Lync from Mac completely, manually, or using an app. Whether having problems with Lync, trying to uninstall for it to be updated, or switching to another messaging app, this article provided a detailed guide for you to not miss a thing in achieving a clean and complete removal.
As beginner or skilled users, we all have struggles in trying to solve technical issues. That is why using the PowerMyMac would be more convenient for most of us, especially since it does the job for us. At the same time, the PowerMyMac's Uninstaller is the one that will find all files for you. Nevertheless, the essential thing to still consider is that you should ensure that the service files and all remnants are deleted to avoid future problems, not just for Lync but for every app as well.

