


Uninstall Snagit on Mac, a screenshot program, using this easy and uncomplicated technique. This removal guide is for those who want to uninstall the Snagit program from their Mac totally. All the methods in this course are extremely possible even if you are a beginner. Not only will it teach you how to uninstall Snagit step by step, but it will also show you how to remove Snagit remaining files, directories, and registry entries. This ensures that you go through the complete removal of the app.
Today, we'll go through how to remove this other Techsmith product, the Snagit screenshot program, and you may either perform it as a manual process or, if having difficulties, scroll down to get the most satisfactory software removal solution for the job.
Article GuidePart 1. What Is Snagit?Part 2. Uninstalling Snagit on Mac ManuallyPart 3. Uninstalling Snagit on Mac via PowerMyMacPart 4. Conclusion
Part 1. What Is Snagit?
Of the most basic things you could do to a Mac, one of these is to take a screenshot. Most individuals utilize screenshot programs to store or share what they see on their computer monitor, and we now frequently utilize Snagit, highly-skilled screen capture and recorder application.
The Snagit app, produced by Techsmith, isn't only a snapshot program but also an editing and screen recording program. The resolution of the pictures and videos it provides is quite sharp and meets the publication criteria.

Snagit is a versatile program that can perform various tasks, including screenshotting, panoramic taking, screen recording, producing GIF pictures, cutting short movies, creating special documentation and visual directions, and more. You may obtain more remarkably communications using Snagit.
Because there are other programs that provide comparable functions, some individuals would no longer utilize the Snagit app. Follow the steps on each method given below to uninstall Snagit on Mac entirely.
Part 2. Uninstalling Snagit on Mac Manually
Before we begin, keep in mind that dragging and dropping the software towards the Trash will not entirely uninstall Snagit on Mac since its related files may linger on your hard drive. This applies to any software you uninstall on your Mac.
Such files can eat up a lot of space on your hard drive over time. That is why it is critical to remove programs fully and wipe away their service files on a Mac. Hence, let's take a look at how to remove Snagit and its related files on the Mac.
- To begin, close Snagit and ensure that no processes linked to the program are running in the background. To do so, open Activity Monitor and look for Snagit processes to terminate.
- You may now proceed to the folder 'Applications' and uninstall Snagit.
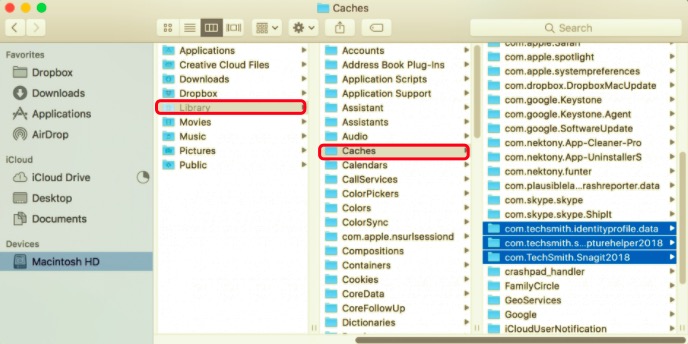
- Finally, we've arrived at the most critical step: locating and deleting any unnecessary support files. Applications produce and save support files within the device's system Library directory by default. Although this directory is concealed, there are various methods to access it on Mac. Within the Library, browse to these folders and delete the ones that relate to Snagit:
~/Library/Application Support/…~/Library/Caches/…~/Library/Containers/…~/Library/Logs/…~/Library/Cookies/…~/Library/Saved Application State/…~/Library/LaunchAgents/…~Library/Preferences/
- Emptying the Trash folder will then be the final step in entirely removing the program.
This method of uninstalling software on the Mac isn't often used since it takes a long time to look for support files, and it wouldn't assure that all extra files have been identified and deleted. It's why experts also suggest skipping ahead to our steps for using PowerMyMac's Uninstaller to remove any applications on your Mac. In this manner, you will see that the apps with issues have been totally deleted.
Part 3. Uninstalling Snagit on Mac via PowerMyMac
PowerMyMac's Uninstaller makes it easy to uninstall programs safely and quickly. It locates all of the application's support files, even the remnants of previously removed apps.
So below is the guide on how to use the Uninstaller to uninstall Snagit on Mac.
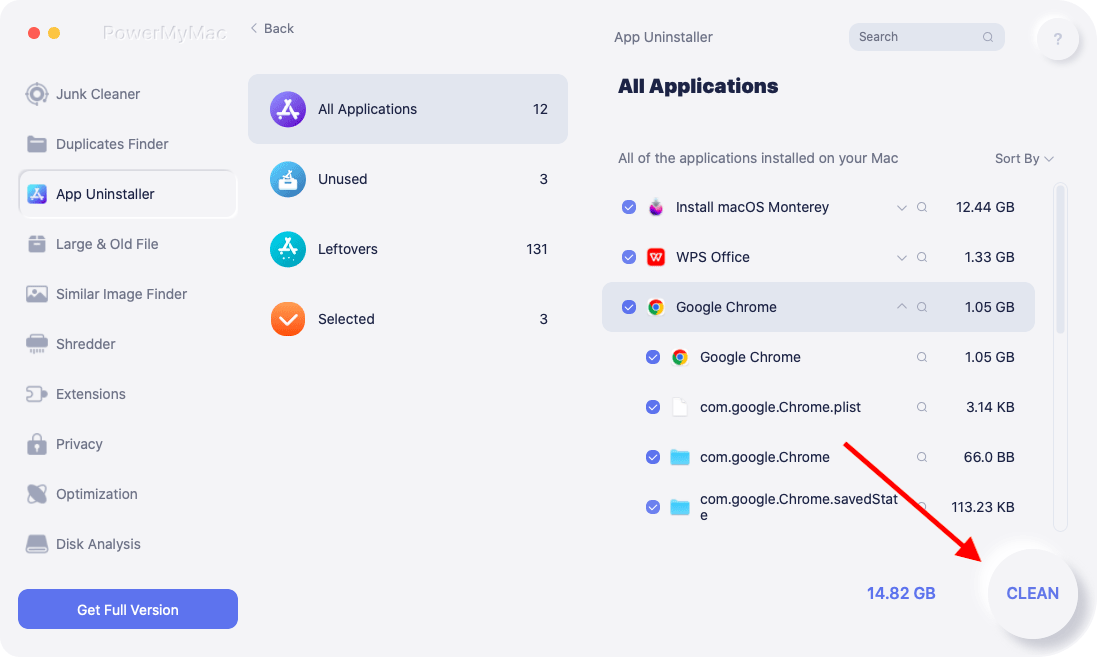
- The PowerMyMac is an app available for download. Install and launch the app. The program will allow you to see the current condition of your system or an overview of when you first use it.
- Choose Uninstaller, then Scan. Please wait till the scanning procedure is completed before proceeding. Only re-scan if it is really required.
- A list of applications will show on the left side of the screen once all of them have been scanned. From the list, choose the Snagit app or any other undesirable applications. You can also use the search box to look for the software by typing its name. The Snagit-related files and folders will appear on the right.
- Select all of the app's related files after that. To finish the procedure, double-check the files you chose, then click the Clean option.
- The message "Cleanup Completed" appears, indicating that the uninstallation is complete for Snagit.
Part 4. Conclusion
This tutorial to uninstall Snagit on Mac provided you with two different methods. Whatever reason you may have in wanting to uninstall this app, the main thing you should remember is to delete the service files related to Snagit as well.
Uninstalling it manually may take you too much time and effort, but these steps should be followed to make sure you are doing it right. Leaving even a few of the service files behind related to Snagit may cause unforeseen problems.
That is why most of them prefer to use the PowerMyMac app since it is more convenient and efficient for them. As it only requires a few minutes and a few clicks, it prevents you from wasting too much time. The process is smooth and easy, even if you are a beginner. Since it is a professional tool that you can download, it does the job for you and makes sure that your device is safe throughout the process.

