


Lulu is a popular firewall application for Mac that offers enhanced security by monitoring and controlling network connections. However, there are situations where users may find it necessary to uninstall Lulu from Mac. Whether you're experiencing compatibility issues with other software or simply want to explore different firewall options, this article provides a comprehensive guide on how to uninstall Lulu on your Mac.
We'll walk you through the step-by-step process, discuss potential challenges you might encounter, and explore alternative firewall solutions to ensure your system remains secure even without Lulu. So, let's get started on removing Lulu from your Mac and finding the perfect firewall solution for your needs. Hope you can enjoy the process of removing apps from your Mac by reading this article.
Contents: Part 1. Can You Delete a Lulu Account?Part 2. How Do I Delete Lulu from My Mac?Part 3. How Do I Uninstall Lulu on Mac Completely?Part 4. Conclusion
Part 1. Can You Delete a Lulu Account?
Yes, you can delete a Lulu account. Here's how you can do it:
- Log in to your Lulu account on Lulu.com.
- Go to the Help section or Contact page. Submit a request by explaining that you want to permanently delete your Lulu account.
- Lulu’s support team will process your request and may ask for additional verification.
- Once approved, they will permanently delete your account and all associated data.
Deleting your Lulu account will remove your projects, sales data, and personal information permanently.
While uninstalling Lulu on Mac is generally straightforward, there are a few common issues that users may encounter during the removal process. Some of these problems include:
- Incomplete Uninstallation: Sometimes, Lulu may not be fully removed from your system, leaving behind residual files or preferences. This can potentially cause conflicts if you install another firewall application like McAfee LiveSafe. It is important to ensure a thorough removal to avoid such complications. It may even require you to delete McAfee LiveSafe and Lulu at the same time.
- Error Messages: Occasionally, users may encounter error messages or prompts while attempting to uninstall Lulu from Mac. These messages can be vague and make the removal process confusing or difficult. Troubleshooting these errors requires additional steps to overcome the obstacles.
- Manual Deletion: Lulu’s files and components might be spread across various directories on your Mac. Manually locating and deleting all associated files can be time-consuming and prone to errors, especially for users unfamiliar with the file system structure.
Part 2. How Do I Delete Lulu from My Mac?
Manually uninstalling Lulu from your Mac requires locating and removing its associated files and components. Here is a step-by-step guide to help you through the process.
- Quit Lulu: Before proceeding with the uninstallation, ensure that Lulu is not running in the background. To do this, right-click on the Lulu icon in the menu bar and choose “Quit”.
- Remove Lulu from the Applications Folder: Open the “Applications” folder on your Mac and locate the Lulu app. Drag the Lulu icon to the Trash or right-click and select “Move to Trash” to uninstall Lulu from Mac.
- Delete Lulu Preferences: Some preference files associated with Lulu may remain on your system even after deleting the app. Go to the “Finder” menu and choose “Go”, then select “Go to Folder”. Type “
~/Library/Preferences/” and hit Enter. Look for files containing “Lulu” or “Objective-See” in their names, and move them to the Trash. - Remove Lulu Kernel Extensions: Lulu utilizes kernel extensions to function properly. Open the “Finder” menu again, select “Go,” and then choose “Go to Folder”. This time, enter “
/Library/Extensions/” and click Enter. Locate files with “Lulu” or “Objective-See” in their names and move them to the Trash. - Delete Lulu Network Extensions: Lulu also employs network extensions. In the “Finder” menu, select “Go” and click “Go to Folder.” Enter“
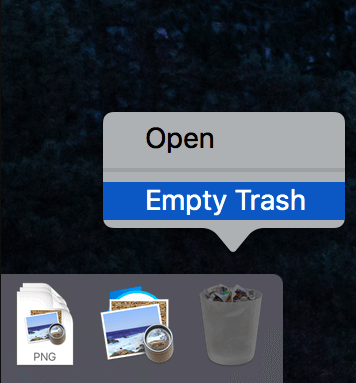
/Library/NetworkExtensions/” and press Enter. Remove files containing “Lulu” or “Objective-See” in their names and move them to the Trash. - Empty the Trash: After removing all Lulu-related files, right-click within the Mac’s Trash icon in the Dock and choose “Empty Trash”.Confirm the action to permanently uninstall Lulu from Mac with its files.
It's important to note that manual uninstallation may leave behind some residual files or preferences. To ensure a thorough removal, you can use third-party uninstaller applications that can scan for and remove any leftover traces of Lulu. These applications can assist in achieving a complete uninstallation and help avoid potential conflicts with other software.
Part 3. How Do I Uninstall Lulu on Mac Completely?
If you prefer a more convenient and comprehensive method to uninstall Lulu from Mac, using a professional uninstaller tool like iMyMac PowerMyMac can simplify the process. Here's how you can utilize PowerMyMac to uninstall Lulu and its associated files:
- Download and then Install PowerMyMac.
- Once installed, launch the PowerMyMac application on your Mac.
- From the main interface of PowerMyMac, choose the “App Uninstaller” module.
- Click on the “SCAN” button to let PowerMyMac scan your Mac for installed applications.
- After the scan is complete, PowerMyMac will display a list of all the installed applications on your Mac. Locate Lulu in the list and select it.
- Click on the “CLEAN” button to initiate the uninstallation process. PowerMyMac will not only remove Lulu from your system but also scan for and delete any leftover files or preferences associated with Lulu.
- Once the process is finished, you will receive a notification confirming the successful removal.

Part 4. Conclusion
In conclusion, when it comes to uninstalling Lulu from your Mac, using a professional uninstaller like PowerMyMac with its Uninstaller module is highly recommended. PowerMyMac simplifies the process, ensuring a thorough removal of Lulu and its associated files, thereby minimizing the risk of conflicts with other applications.
With its user-friendly interface and comprehensive scanning capabilities, PowerMyMac provides a convenient solution for you to uninstall Lulu from Mac and optimizing your Mac's performance. Consider utilizing PowerMyMac's Uninstaller module for hassle-free and efficient removal of Lulu, leaving your Mac clean and optimized for your future firewall needs.

