


Radio Silence is a popular Mac application that allows users to block specific apps from accessing the internet. While it can be a useful tool for enhancing privacy and controlling network access, there may come a time when you no longer need or want this software on your system. Whether you're experiencing compatibility issues or simply looking for alternatives, the process to uninstall Radio Silence from Mac requires more than just dragging it to the Trash.
In this article, we will provide you with a detailed guide on how to uninstall Radio Silence from your Mac, ensuring a clean uninstall process and restoration of your network settings. Follow the steps below to regain full control over your internet connectivity.
Contents: Part 1. Is Radio Silence Safe?Part 2. How Can I Uninstall Radio Silence from My Mac?Part 3. How to Uninstall Radio Silence Completely and Effortlessly?Part 4. Summary
Part 1. Is Radio Silence Safe?
Radio Silence is a Mac application that allows users to block internet access for specific applications. It provides users with control over their network connectivity, enabling them to prevent certain apps from accessing the internet while allowing others to connect seamlessly. However, users may have concerns about the safety and effectiveness of Radio Silence, which prompts the question: Is Radio Silence safe?
Radio Silence itself is a legitimate and safe application. It is developed by Juuso Salonen and has been available on the Mac App Store for several years. The app operates within the system's firewall rules and does not pose any inherent security risks. It is designed to enhance user privacy and control over network connections, and many users have found it to be a valuable tool.

That being said, there are circumstances where users might want to uninstall Radio Silence from Mac. Compatibility issues with certain apps or system updates can sometimes arise, leading to conflicts or unexpected behavior.
Additionally, some users may find that they no longer require the functionality provided by Radio Silence or prefer alternative solutions for managing internet access. In such cases, it is essential to properly uninstall the application to ensure a clean removal and restore the system's default network settings.
Uninstalling an application may seem straightforward, but there can be specific challenges when it comes to removing Radio Silence from your Mac. Here are some common problems that users may encounter during the uninstallation process:
- Incomplete Removal: Simply dragging the Radio Silence app to the Trash does not completely remove all associated files and configurations.
- Network Settings: Radio Silence modifies the firewall settings on your Mac to block or allow specific applications.
- Startup Items: Radio Silence may have been set to launch automatically when your Mac starts up. Failing to remove these startup items can result in the application continuing to run in the background, even after uninstallation.
- Preferences and Cache Files: Like many applications, Radio Silence creates preference files and cache data. These files can take up valuable storage space.
Part 2. How Can I Uninstall Radio Silence from My Mac?
If you've decided to uninstall Radio Silence from Mac, it's important to follow the correct steps to ensure complete removal. Here is a step-by-step guide to help you uninstall Radio Silence manually and remove any traces associated with the application:
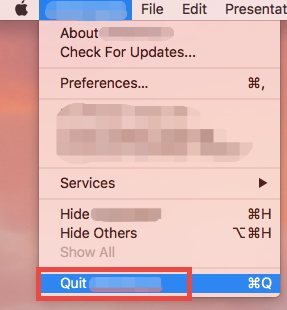
- Quit Radio Silence: Before proceeding with the uninstallation process, make sure Radio Silence is not running. You can do this by right-clicking on its icon in the menu bar and selecting “Quit Radio Silence”.
- Remove Radio Silence from Applications: Open the “Applications” folder on your Mac and locate the Radio Silence app. Drag the app icon to the Trash in the Dock or right-click and select “Move to Trash” to uninstall Radio Silence from Mac. Alternatively, you can use the “Command + Delete” shortcut.
- Remove Radio Silence Preferences: Radio Silence creates preference files that may remain on your system even after deleting the app. To remove these preferences, go to the Finder menu, click on “Go”, and select “Go to Folder”. Type “
~/Library/Preferences” and press Enter. Locate the preference file named “com.radiosilenceapp.radio.plist” and move it to the Trash. - Clear Cache Files: Radio Silence also creates cache files that can accumulate over time. To remove them, go to the Finder menu, click on “Go,” select “Go to Folder”, and enter “
~/Library/Caches”. Locate the folder named “com.radiosilenceapp.radio” and delete it. - Restore Firewall Settings: Uninstalling Radio Silence will not automatically restore your Mac’s firewall settings to their default state.
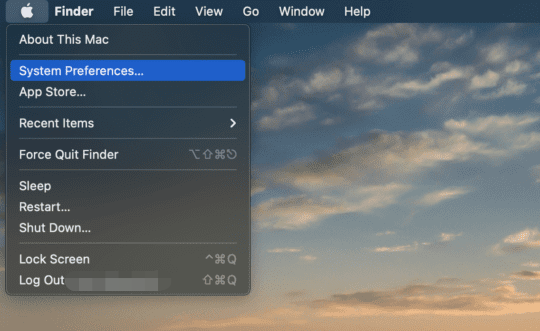
- To do this, go to System Preferences, click on “Security & Privacy”, and select the “Firewall” tab.
- Click on the lock icon, enter your administrator password, and click on “Turn Off Firewall” to disable the firewall.
- Then, click on the lock icon again, re-enter your password, and click on “Turn On Firewall” to enable it back with the default settings.
Following these steps, you can manually uninstall Radio Silence from Mac and remove any associated traces. Remember to restart your Mac after completing the process to ensure that all changes take effect.
Part 3. How to Uninstall Radio Silence Completely and Effortlessly?
If you're looking for a more efficient and hassle-free way to uninstall Radio Silence and ensure the complete removal, you can utilize a powerful tool like iMyMac PowerMyMac. PowerMyMac is an all-in-one Mac cleaning and optimization software that includes a feature specifically designed for uninstalling applications and removing their associated files.
Here's how you can use PowerMyMac to uninstall Radio Silence from Mac completely:
- Download and Install PowerMyMac: Visit the official iMyMac website and download PowerMyMac. Install the software on your Mac and launch it.
- Choose Uninstaller: From the main interface of PowerMyMac, select “App Uninstaller” from the left sidebar.
- Scan for Applications: Click the SCAN PowerMyMac will scan your system for installed applications. Once the scan is complete, you will see a list of applications displayed.
- Select Radio Silence: Locate Radio Silence from the list of applications and check the box next to it. You can also use the search bar to quickly find the application.
- Uninstall Radio Silence: Click on the “CLEAN” button at the bottom right corner of the window to initiate the uninstallation process. PowerMyMac will uninstall Radio Silence from Mac, including its associated files and folders.

PowerMyMac's App Uninstaller feature makes the process of uninstalling applications and removing their leftover files effortless and thorough. It saves you time and eliminates the need to manually locate and delete scattered files across your system. You can also remove MacPilot with PowerMyMac if you have MacPilot on your Mac and find it useless for you.
Additionally, PowerMyMac offers other useful features like system cleanup, performance optimization, and more, making it a comprehensive solution for maintaining your Mac's performance. By utilizing PowerMyMac, you can uninstall Radio Silence from Mac completely and effortlessly, ensuring a clean removal without any traces left behind.
Part 4. Summary
In summary, when it comes to uninstalling Radio Silence from Mac, there are multiple approaches you can take. While manual removal is possible, it requires carefully deleting associated files and restoring network settings. However, for a more convenient and thorough uninstallation process, it is recommended to use PowerMyMac.
With its Uninstaller feature, PowerMyMac streamlines the removal process to uninstall Radio Silence from Mac and its leftovers, providing a hassle-free experience. By utilizing PowerMyMac, you can ensure a complete and effortless uninstallation, saving time and effectively maintaining your Mac's performance.

