


To link with network drives, view secure sites, and CSU/CLA Resources, Mac users must link with Pulse Secure, whether it's on a desktop pc or even a CLA-issued device. However, some users may find Pulse Secure not useful anymore because they have connection problems as it always gets stuck on saying 'connecting' or 'waiting to connect'. This leads them to uninstall Pulse Secure Mac and switch to other apps.
To know how to delete Pulse Secure or uninstall any unwanted apps from Mac, this article will help you with how.
Contents: Part 1. Where Is Pulse Secure on Mac?Part 2. How Do I Manually Uninstall Pulse Secure on Mac?Part 3. How to Uninstall Pulse Secure on Mac Completely?Part 4. Conclusion
Part 1. Where Is Pulse Secure on Mac?
On a Mac, Pulse Secure (now known as Ivanti Secure Access) can be found in several places depending on what you are trying to do:
1. Applications Folder: You can find this app by pressing "Space" + "Command" to open Spotlight, then type "Pulse Secure" to access a new window, and click OK.
2. Menu Bar: After the Pulse Secure client is installed, an icon usually appears in the menu bar at the top-right of your screen. The icon resembles a small shield or network icon. From here, you can launch the application, connect or disconnect VPNs, or configure settings.
3. System Preferences: If you have configured Pulse Secure as a VPN, you might see it listed here under the available network connections.
4. Uninstall Location: To uninstall Pulse Secure, you may need to use the Uninstall Pulse Secure tool, which could also be located in the Applications folder.

Why Uninstall Pulse Secure for Mac?
So why would people like to uninstall Pulse Secure on Mac? Pulse Client 9.0.X is by far the most recent version that has been enhanced for improved performance in macOS Big Sur. Some customers were unable to download the updated version using the Pulse Secure installers unless they first uninstalled Pulse Client 5.0 or prior versions of the software.
If you're having difficulties using Pulse Secure or that's just not functioning on the Mac, read this quick guide to know how to remove the Pulse Secure VPN client altogether.
Part 2. How Do I Manually Uninstall Pulse Secure on Mac?
Because the Pulse Secure client requires you to adjust the Security options, we highly advise you to uninstall Pulse Secure on Mac from your device using the professional Uninstaller application.
Alternatively, unless you have advanced computer skills, you may cleanly remove Pulse Secure on the Mac by following the instructions below. With this method, you might have to do everything manually and on your own. In order to guide you better, read the guidelines below.
- Using the Activity Monitor program, stop Pulse Secure and any background operating threads > Launch Finder > go to Applications > Locate Pulse Secure > Delete Pulse Secure to the Trash from the Applications folder.
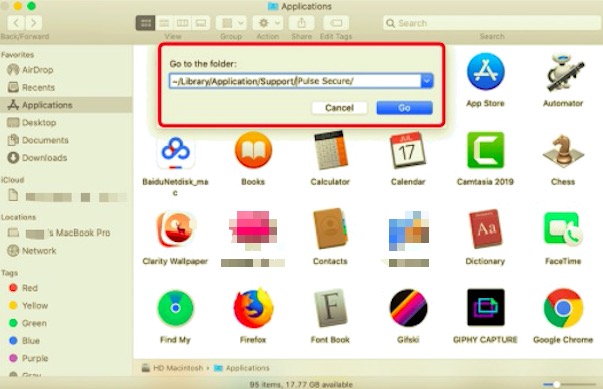
- Launch Finder menu > click Go > Go to Folder > Enter
~/Library/Application/Support/Pulse Secure/. - In these folders, look for all Pulse Secure-related data, temp files, and pre-fetch files:
Caches,Application State,Application Support,Containers,Frameworks,Preferences,Logs,Saved,WebKit
- To complete the Pulse Secure uninstallation on the Mac, drag the items related to Pulse Secure to the Trash > Empty Trash and restart your Mac.
Part 3. How to Uninstall Pulse Secure on Mac Completely?
Many VPN clients and browser extensions on macOS are resistant and difficult to uninstall altogether. One of the most typical macOS issues created by Pulse Secure is that even if you remove Pulse Secure from Mac using the standard approach, it could still appear in the Menu. If you select its icon, the software will run automatically.
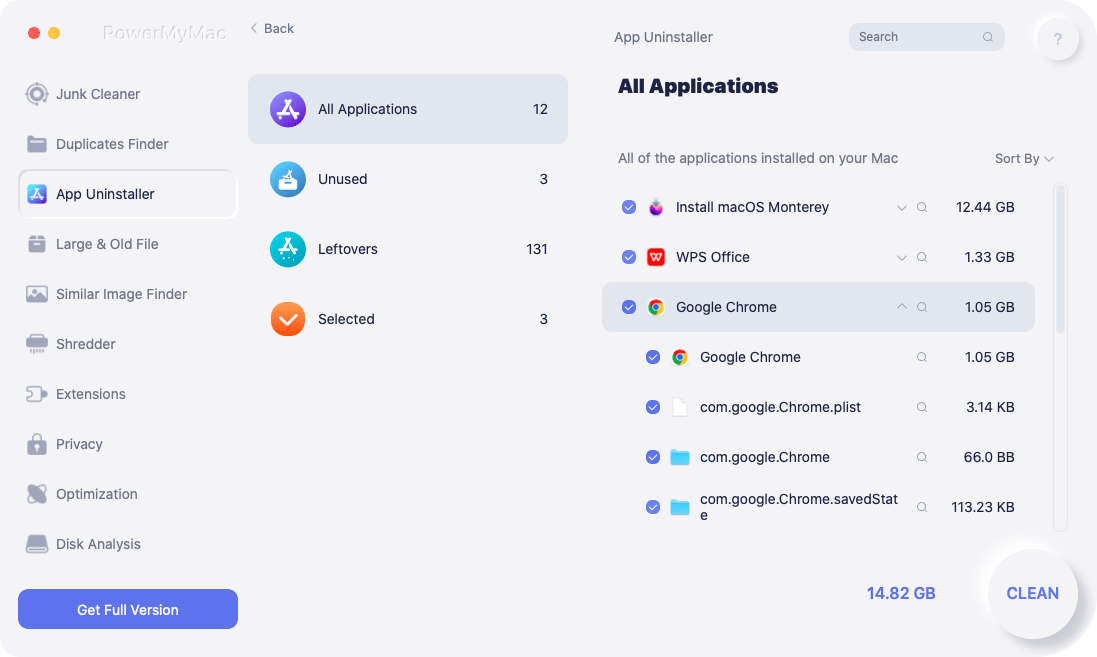
PowerMyMac can help you with that. Its App Uninstaller can thoroughly uninstall Pulse Secure, saving you the headache of getting caught up upon Pulse Secure leftovers. PowerMyMac scans throughout the macOS, finding and clearing all Pulse Secure orphaned garbage, using the most up-to-date Mac App Cleaning methodology.
Read the instructions below to uninstall Pulse Secure on macOS Big Sur.
- Firstly get the program downloaded, installed, and running.
- Click the App Uninstaller tool, and press SCAN. Allow time for the scanning procedure to finish.
- Installed applications will appear on the right side after scanning. In the search box, type the name of Pulse Secure. The app's related files and folders will appear below when you choose it.
- Select all of the support files that you want to delete. After double-checking the data, choose CLEAN to eliminate every one of the files you've marked.
- A popup message with the words "Cleanup Completed" will appear when it is done, indicating that the removal is complete.
Part 4. Conclusion
The whole page discussed how to uninstall Pulse Secure on Mac. Unlike automatic removal, the manual approach takes more time as it locates all the remnants individually in different folders and locations.
Instead of doing it alone, they would prefer being assisted by a professional tool or app that does the job for them. PowerMyMac helps you remove unwanted apps and it only needs a few clicks to finish the whole procedure.
It scans the entire system for possible apps you want to remove then it automatically detects all the remnants and service files of each app, which is very helpful so that you won't need to find them one by one. This will help you ensure that the process is safe and trustworthy for your device.

