


As we all know, backing up our iPhone devices is one of the greatest ways for us to keep all of our data safe. However, there are instances that since we regularly backup our device, then the tendency for this is that they will all pile up in your Mac. And because of this, it can be a reason as to why your Mac may become slow or you might run out of storage.
That is why in this article, we are going to show you on how to delete backups on Mac in the easiest way possible. Also, we are going to show you another way for you to be able to prevent your Mac from getting full of your backups.
Article GuidePart 1. Where Are My Backups Stored on My Mac?Part 2. How Do I Delete Old Backups on My Mac?Part 3. How to Delete Backups on Mac from iTunes/iCloudPart 4. Conclusion
Part 1. Where Are My Backups Stored on My Mac?
There is a software component that records changes to your system and stores them on your own internal storage, so certain applications may use your external disk to store backups and these backups are there when an external drive has not been connected to protect your data.
For example, when you try to back up your iPhone data to your Mac, the files will be automatically stored in iTunes. So you will be able to find your iPhone backup here: ~/Library/Application Support/MobileSync/Backup/
So how to delete backups on Mac? We'll talk about several ways for you to do that.
Part 2. How Do I Delete Old Backups on My Mac?
Here the unnecessary files or folders can be selectively chosen. You can clean them. As one of the PowerMyMac's features, Master Scan not only offers cleaning for your Mac but also gives you more alternatives to delete which files and folders are on your Mac too. You are less worried that other necessary files are mistakenly deleted. The software itself is specially designed yo clean up junk files like caches, application cache, logs, and localization, resulting in an optimized and space-free Mac.
To give you an example of how PowerMyMac works on how to delete backups on Mac, we are going to guide you the steps below (Download and install PowerMyMac first):
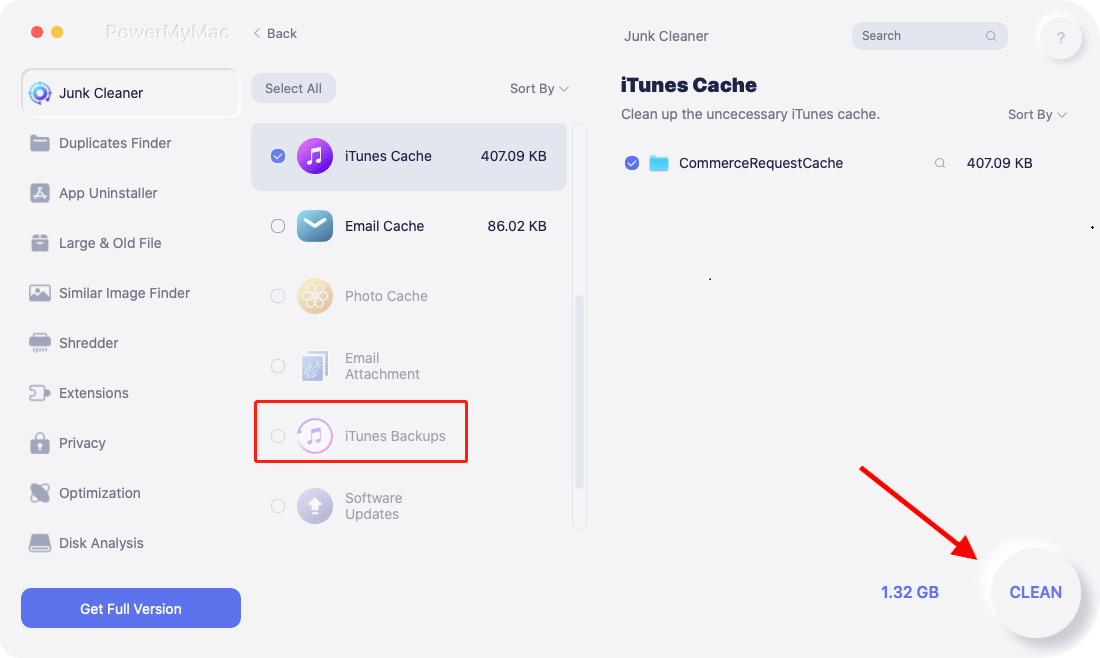
- Launch PowerMyMac and click Master Scan.
- To begin scanning backups or System Cache, Application Cache, and other system junks, click on the Scan button.
- View results and select backup files to delete.
- To remove the old backup from Mac, click the Clean button. Then wait for the cleaning process and be patient. (Note: You may need your password if necessary.)
Part 3. How to Delete Backups on Mac from iTunes/iCloud
How to Delete Backups on Mac from iTunes
- On your Mac, open iTunes.
- On the top left-hand menu, click on iTunes.
- From the drop-down menu, click on Preferences.
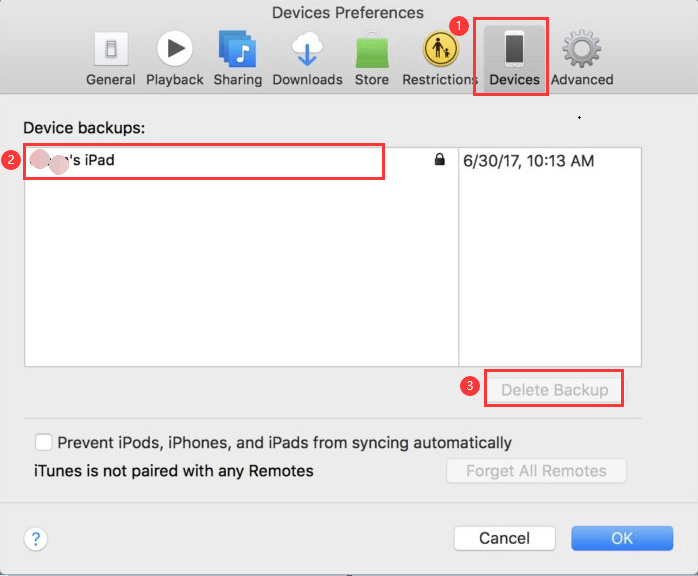
- This opens an iTunes window with General Preferences. From the top of the menu, select Devices to the right.
- The list of the backups you made and when they were created will be displayed. The device you want to delete is must be selected and click "Delete Backup" underneath the table. If you wish to delete more than one, just hold the command key and choose the devices to delete before you hit the' Delete Backup' button.
- You will be asked by a window to confirm that you want the backup deleted. That's it, Done. Click "Remove". Your backup will be erased and space on your Mac will be free.
How to Delete Backups on Mac from iCloud
iCloud could be a valuable elective to iTunes, since it doesn’t store the data on your gadget. The drawback is merely are constrained by iCloud’s 5GB free restrain, so on the off chance that you think you’re reaching to go over you've got to pay for that additional capacity. In the event that you choose to erase your iPhone reinforcement from the iCloud, you'll be able do it straight from your Mac.
- Select 'System Preferences' by clicking on the Apple menu
- Click on the icon "iCloud".
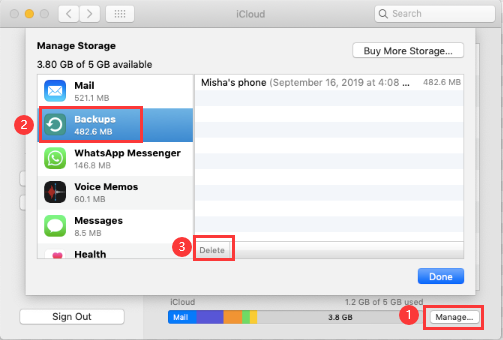
- At the bottom right of the window, click "Manage" and then choosing "Backups" from the left-hand side.
- There will be a list of devices that that you have backed up in iCloud. To delete these backups, simply click on one of them and click Delete on the bottom left side of the framework.
- If you wish to add more storage, simply click the Buy More Storage button and continue with the process.
Delete iCloud Backup with Terminal
One way for you to be able to manage your iCloud backups and for you to be able to gain more of your storage space is to remove your iCloud backups from your Mac’s hard drive. With this, you can actually use Terminal for you to complete this action. Here is how you can remove your old iCloud backups using your Terminal.
- Go ahead and launch Terminal on your Mac.
- After that, go ahead and enter the following command:
sudo tmutil disablelocal - After entering the command, go ahead and press the Enter key.
In case you would want to bring back the local backups that you have on your Mac, then you can also do the following steps below. This should only be done if and only when you have other storage options.
- Go ahead and open Terminal on your Mac.
- And then, simply enter the following command:
sudo tmutil enablelocal - And then lastly, go ahead and press the Enter key.
Tip: If you also own a Windows computer and want to use iCloud on it, then you can turn to this guide on Computerworld.
Part 4. Conclusion
There are ways on how to delete backups on Mac with one simple click, PowerMyMac does this for you effectively. It filters and shows you all in your Mac. You can openly select items and check the results examined by size, time, etc. It only selects records that are to be erased. Therefore, you just sort out the right files.
The PowerMyMac application is packed with great highlights, allowing your Mac to gain additional space. You can choose whether you want, like most valuable toolboxes, to make use of PowerMyMac's outstanding highlights at a reasonable cost. The free trial could also be seen here.

